-
 How to Make Cake at Homes: Tips & Tricks + 6 Easy-to-Make Cake Recipes that You Can Prepare Right in Your Kitchen! (2020)
-
 Wondering How to Make a Cake at Home? 8 Simple, Step-by-Step Recipes for Baking a Cake without an Oven Plus Tips and Tricks for Making Your Cake Perfect, Just Like You! (2020)
-
 यहां 6 आसान और स्वादिष्ट केक रेसिपी हैं, जो आपको अपने घर पर जरूर बनाने चाहिए। घर पर केक बनाने के लिए जरूरी सामान(2020)
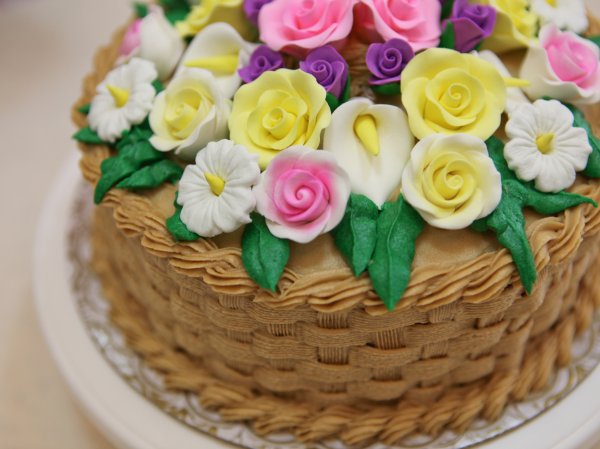
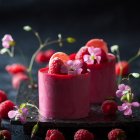
Importance of Cake Decoration
Presentation is always the key, specially when you are cooking or baking. You might be able to bake some of the most delicious cakes in town but if you don't decorate them well then they will not look so perfect or appealing. There are numerous ways by which you can decorate a cake and make it look highly professional but flowers are always the most popular.
The art of cake decoration started in the 17th century somewhere in Europe but it was a tough job. Later in 1840s baking became a lot easier due to the invention of temperature controlled ovens and the use of baking powder. As baking became easier the emphasis on presentation and decoration of baked goods increased. People started making cakes in various sizes and decorating them using icing to making flowers, etc.
Decorating a cake is an art created by sugar in which icing and frosting or other edible elements are used to make a plain cake look more festive. A decorated cake looks special and makes events like birthdays, weddings and other festivities a lot happier. In this BP Guide we have compiled a few methods through which you can make beautiful flowers from different icing. Enjoy baking and decorating your treats!
Related articles

Things You Need to Decorate a Cake at Home
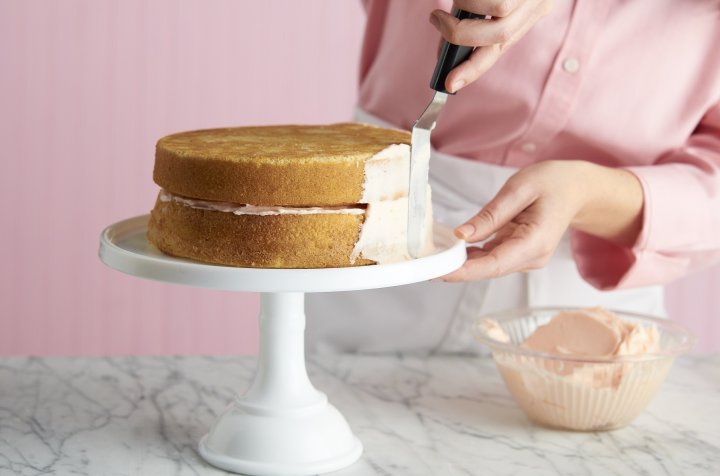
Tools are very important in any form of art, therefore, if you are thinking of making flowers or decorating your cakes from now on, you will need the required tools to do so. Here is a list of things you need to start with. Before you start decorating your cake, take a deep breath and relax yourself after all you are about to become an artist. Start with the basics and improve your skills. The essentials list for beginners is:
- Cake Leveller: It is one of the very first tools you will need for decorating a humped cake. Most cakes after baking come out a little curved or cracked at the top and if you want to decorate it you would need a nice flat cake to do it. A leveller cuts a cake perfectly to get a precise flat cake.
- Cake Board: It is a cardboard cutout is different sizes. It helps in creating the bottom foundation on which you set the cake before decorating it. It is also very helpful in moving the cake from the stand to the table or onto a plate.
- Turntable: It is very difficult to rotate yourself with the cake while applying icing on it. A turntable makes it easier for you as it helps you to rotate the cake for applying an even icing on it. The top part of the table spins and the bottom stays put on the table. It is a must-have tool for decorating a cake as it will help you get a clean and perfectly iced cake. It is also great for piping the cake as it will turn with ease while you simply and effortlessly pipe the cake on the edges. You can find these turntables in plastic and metal.
- Spatula and Scraper: These are helpful in applying a smooth icing on the cake, you can easily spread even Swiss meringue buttercream or chocolate ganache with the help of these and get a professional looking cake.
- Piping Tips and Couplers: You will need these to create different borders on the cake. These are small cones with different designs on them which give beautiful designs to the border of a cake.
- Piping Bags: These are a must. You will need to fill up these bags with icing, attach a tip to it and squeeze the icing from it to create different designs on the cake. You can find these bags in different sizes, styles and materials.
- Icing Smoother: If you do not want to end up with an uneven looking cake with clumps of icing here and there then you will also need to buy an icing smoother. It is a stainless steel blade which covers a wide area and helps you get a clean and smooth motion while icing a cake.
There are many other tools used in cake decoration as well, but since we are talking about the beginners here, these tools should do the trick for a great start.
6 Cake Flower Decoration Ideas
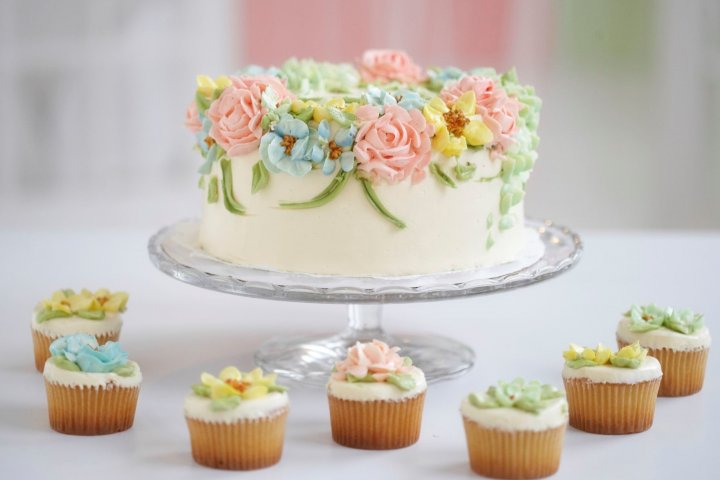
Buttercream Flowers on Cake
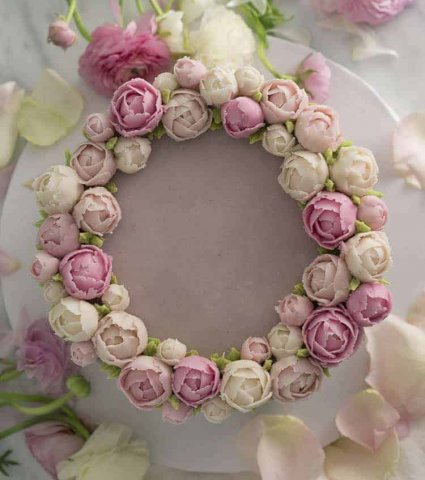
Buttercream is widely used for icing in most of homes. It is quite easy to make buttercream icing and it tastes excellent on a cake. If you are planning to make flowers on your cake you can use buttercream icing, just remember to use the right piping tips and your buttercream should be of the right consistency to get the perfect flowers.
Tips:
- Prepare a small batch of extra thick buttercream for making a cone shaped base of the flower.
- Sift your sugar properly to avoid any lumps clogging your tip.
- Store the flowers in the fridge before applying them on the cake.
- Don't pour a lot of food colour in the first go, use a toothpick for adding a drop of food colour till you get the perfect shade for your flower.
How to Make Buttercream Peonies:
- Take a square of parchment paper and add a small cone of thick buttercream onto it.
- Take a curved petal tip (120, 121, 122, etc.) to make an overlapping group of petals, place them close to the cone. You can even use your finger to press the edges of the petals on the base.
- Continue making overlapping petals.
- If you want to make large flowers you will need to add another row of petals but they will not hug the centre as the ones before.
- Once done, put them in the fridge and use when needed.
Related articles
Swirl Rosette
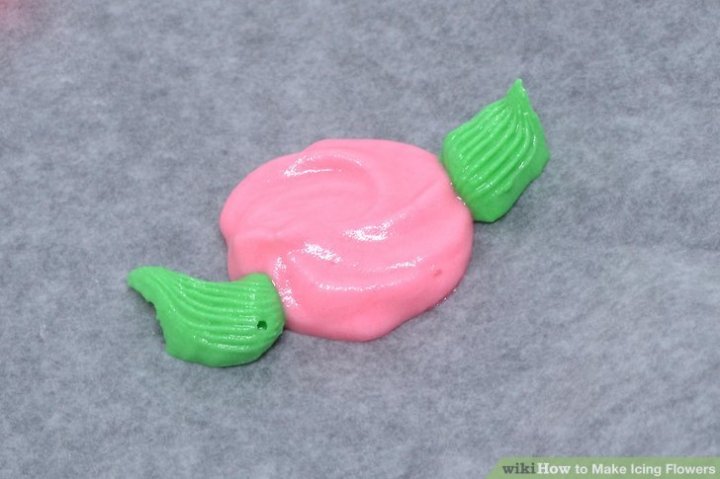
Another set of beautiful flowers you can put on your cake is the swirl rosette made with royal icing. They look adorable and the royal icing is always a hit with everyone.
Method:
- Take a piping bag and fit a star tip #13 in it.
- Fill the bag with the royal icing of any colour of your choice.
- Take another piping bag and fit a leaf tip #65 with green icing for the leaves.
- Take a sheet of wax paper or parchment paper to place the flowers when done.
- Take the star tip bag and gently squeeze the bag keeping the bag perpendicular to the surface. Don't lift the tip after making the first drop, rather start the next step.
- Keep squeezing the bag while moving the start tip around the first dollop. Spiral the icing in a full circle. Keep the bag perpendicular and apply the same pressure to make the complete the flower.
- Make sure to keep the tip close to the centre to create perfect spirals and stop squeezing the bag as soon as you are done with the circle. Lift the bag only when the icing stops coming from the tip.
- You might see a tail when you lift the tip, use a toothpick to press it inside the flower.
- Let the rosette dry for 30-60 minutes at room temperature, make all the flowers before you start with the leaves.
- Take the bag with the leaf icing in it and hold it at a 45° angle to one side on the flower.
- Squeeze it to make a wide base on the base of the flower. Your green icing should touch the base of the flower or else it will not stick to the flower.
- Decrease the pressure on the bag while you remove the tip away to create a narrow leaf tip effect.
- Let it dry for 30-60 minutes. You can make multiple leaves at the same time using this method.
- Peel the dried rosettes off from the paper and put them in an airtight container.
- Place them on the cake by putting a little wet icing at the base of the flower and you are done.
Related articles
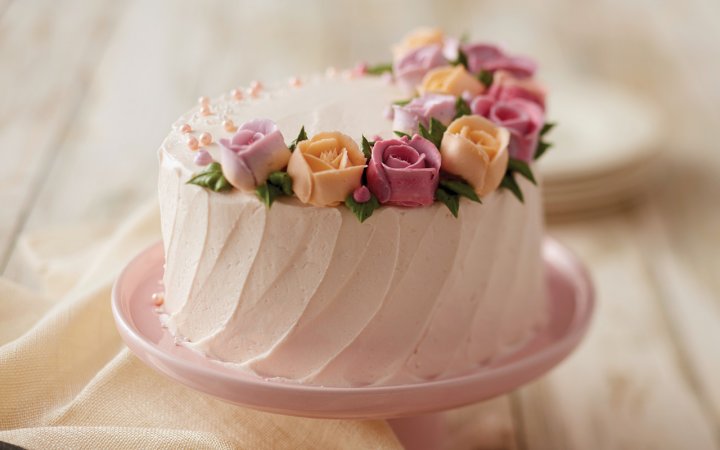
Frosting Roses
You can also try making these beautiful "wild roses" from either buttercream or a medium consistency royal icing. If you decide to use buttercream you can put these flowers in the fridge, they will become soft at room temperature and you can easily fix them onto the cake while the flowers made of royal icing will harden and can be stored at room temperature for a long time.
Ingredients:
- Frosting of your choice
- Pastry bag with a coupler fitted in it
- A large rose nail
- A rose tip of your desired size
- A small circular tip preferably size 3 or 4
- Wax paper cut into small squares
Method:
- Start with fitting the piping bag with the rose tip and fill it up with the frosting.
- Hold the bag in one hand and the rose nail in the other.
- Squeeze a small amount of frosting on the top of the rose nail and press a small square of wax paper on it. Make sure the frosting secures the paper to the nail properly.
- Use the wide end touching the nail and position the tip on the top of the nail. It should be around 30-45° from the base.
- You will have to squeeze the frosting out of the bag and move the piping bag while you turn the nail. Squeeze out a small arc of the frosting by making a circular motion to make the first petal. The petal should be broader on the outside and narrow in the centre. You need to end by having the pastry bag in the same position as you started by twisting the rose nail in the opposite direction while squeezing it. (Don't worry, it sounds harder than it is, you'll get a hang of it after a couple of tries).
- Repeat the same for the second petal next to the first one. Make the petals of about the same size.
- It is best to make same size petals on each flower although it does not matter as long as they are close to the same size and evenly placed.
- After you are done with the flower, place a dot in the centre to complete it. You can use the same colour or a different colour if you like.
- Take a piping bag with a small circular tip and drop a dot in the centre of the flower.
- Now, look at your beautiful flowers with an awww.
Related articles
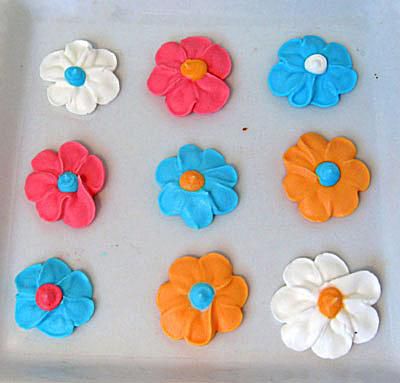
Royal Icing Flowers

Another set of beautiful flowers you can make is from royal icing. These look wonderful on cakes, cupcakes and cookies as well. You can use different coloured icing and make your baked treat look more presentable.
Ingredients:
- 1 tbsp + ¾ tsp meringue powder
- 1½ tbsp water + more for thinning
- 2 cups powdered sugar
- ½ tsp vanilla
- Food colouring of your choice (I used green, red, blue, and yellow)
Method:
- Take a mixing bowl and whisk meringue powder and water till it is nice and foamy.
- Add your powdered sugar and mix it till all the sugar is incorporated properly. You can use an electric mixer on medium speed for this.
- Add vanilla and mix till you see soft peaks forming, this should take about 5-8 minutes.
- Now divide this into 4 bowls and add food colours of your choice.
- You can mix ¼ tsp and use a knife to cut through the surface for the icing to take its form.
- Take a piping bag and fit a tip of your choice to it.
- Gently squeeze the bag and pipe flowers of different sizes on the wax paper.
- Let them dry overnight and they are ready to use.
- You can store the unused material in an airtight container and use it up to 3 months.
Related articles

Gum Paste Flowers
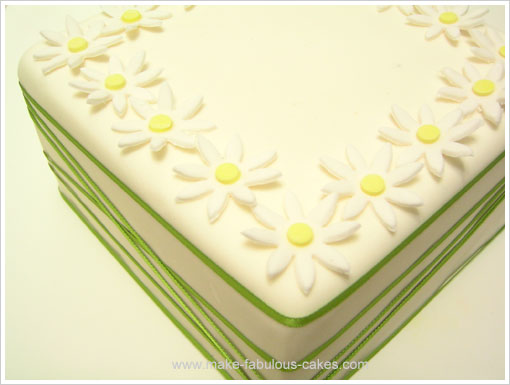
Gum paste flowers look really beautiful on a cake and they are not as hard to make as they seem, although it may take some time and precision to get them right if you are new to it. Gum paste sugar is made with gum tragacanth which is stretchable and makes it easy to roll it out as thin as a paper. You can make real looking flowers from it and store them for a long time. Here is how you can make these gum paste daisies for you next cake:
Ingredients:
- Gum paste (coloured white and yellow)
- daisy gum paste cutter
- Wilton flower formers
- Small paint brush
- Icing tip #10
- Cornstarch
Method:
- Start with dusting your work table with some cornstarch.
- Take the white gum paste and roll it into thin sheets.
- Cut out cute daisies with the help of the cutter.
- Place them on the flower former.
- Take the yellow gum paste and cut a small centre from it, you can use the icing tip #10.
- Dab the centre of the flower with some water and attach the yellow dot to it.
- Let dry and you're done.
Related articles
Ruffled Fondant Flowers
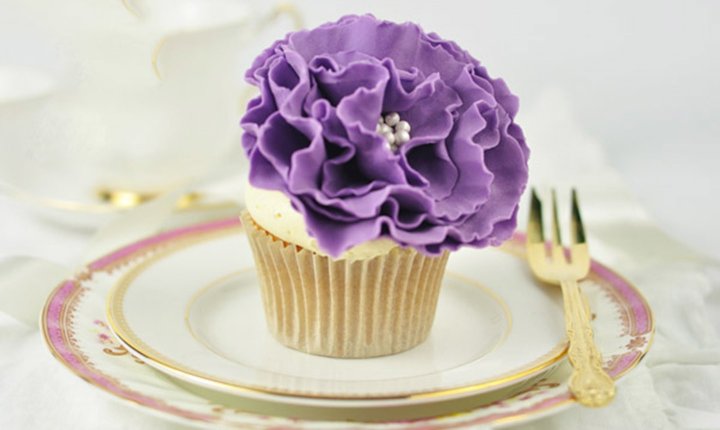
First of all let's thank the person who invented fondant. They are excellent for decorating cakes and are super tasty. They can be made into numerous shapes and sizes and you can decorate your cake with it. You can make these easy ruffled fondant flowers and make you cake look extremely beautiful and attractive:
Ingredients:
- Fondant (buy it or make your own)
- CMC or Tylo powder
- Fondant rolling pin
- 3 circle cutters in descending sizes
- Flower forming cup, saucer or teacup
- Plastic wrap or kitchen paper towels
- Cornstarch to dust
- Edible sugar pearls (optional)
- Foam pad
- Large ball tool
- Food-safe paintbrush
- Edible glue
Method:
- Take your fondant and mix it with a little CMC or Tylo powder. Roll it to a thickness of about 2 mm.
- Cut out two circles from the fondant with each circular cutter. You need to cut six circles of the fondant in three sizes.
- To make the ruffles you need to place a circle on the foam pad.
- Take the ball tool and drag it across the edge of the circle. Be gentle, you don't want to tear the fondant. Do this for all the circles.
- Line the tray or a plate with a plastic wrap and place your first large ruffled fondant on it. Put plastic wrap around the edges for it to set.
- Put a dab of edible glue on the circle and put the second large piece on it, make sure to put more plastic wrap around the edges to help it stay in place. Continue to do the same from the largest to the smallest circle.
- You can add a couple of sugar pearls in the centre with the help of the edible glue, if you like.
- Leave it to set for a few hours, you should check the flowers and if they are hard enough they are all set.
- Carefully remove the plastic wrap and attach the flowers on the cake with a little royal icing and melted white chocolate...and you have a perfectly decorated floral cake ready to serve.
-
 10 Stunning Birthday Cakes for Girls in 2020: Must Have Cake Designs She'll Fall in Love with and Where to Buy Them Online
-
 10 ऐसे केक जिनको देखकर और खाकर आपके बच्चे और मेहमान हमेशा आपको याद करेंगे ! लेटेस्ट केक रेसिपीज आपकी बेटी के जन्मदिन के लिए ।(2020)
-
How to Make Cake at Homes: Tips & Tricks + 6 Easy-to-Make Cake Recipes that You Can Prepare Right in Your Kitchen! (2020)
-
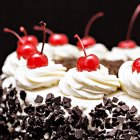 Learn How to Make the Best Black Forest Cake at Home: 2 Recipes That Will Make a Spectacular Cake, Plus an Eggless Recipe
-
 What's the Best Gift for Your Beloved? Check Our 10 Fantastic Gifts for Boyfriend's Bday and Ideas to Let Him Know Just How Much You Love Him
Cake Decoration is an Art
Cake decoration is an art and you will perfect it over time with practice and patience. We hope this BP Guide would have helped you appreciate that making cake flowers for your cake is not difficult at all and you can become an expert in it with practice within a reasonably short time. The experience of watching the happy smiles on the faces of your loved ones on seeing your beautifully decorated cake will be a truly priceless reward for you. Stay connected with us for more such engaging content.
 Highlight the Best Facets of Your Incomparable Beauty: Discover the Best Face Highlighter Currently Available in India and Everything You Need to Know About Using Face Highlighters for Maximum Effect (2023)
 Forget the Blemishes and Get that Picture Perfect Flawless Radiance on Your Face: Check out the Best Foundations for Oily Skin Currently Available in India and Everything You Need to Know About Makeup Foundations (2023)
 Make Your Presence Felt Wherever You Go: Discover the Best Perfumes Under 2000 for Both Men and Women to Announce Your Arrival and Make Any Occasion Memorable (2023)
 Protect Your Oily Skin from the Harmful Rays of the Sun: Discover the Best Gel Based Sunscreens for Oily Skin and Everything You Need to Know Before Buying One (2023)
 Minor Blemishes and Wrinkles Affecting Your Confidence? Check out the Best BB Creams to Conceal Your Worries and Nourish Your Skin to Restore the Healthy, Radiant and Glowing Complexion Back Again (2023)