-
 Learn How to Make a Mug Cake with Our 6 Delicious Recipes (2019): Because There’s Nothing Quite Like a Cup of Decadence That's Ready in Minutes!
-
 Now You Can Make Cakes in Just a Few Minutes! Check Out These Simple Eggless Mug Cake Recipes and Enjoy Cakes Whenever You Want. (2021)
-
 10 Fabulous No-Fail Friendship Day Gifts From Pinterest To Celebrate Friends Who Mean The World To You(2019)
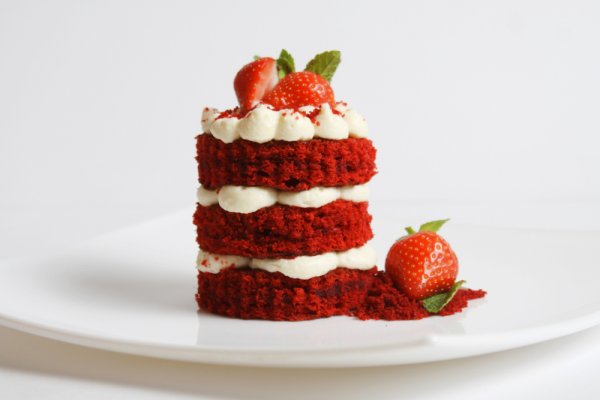
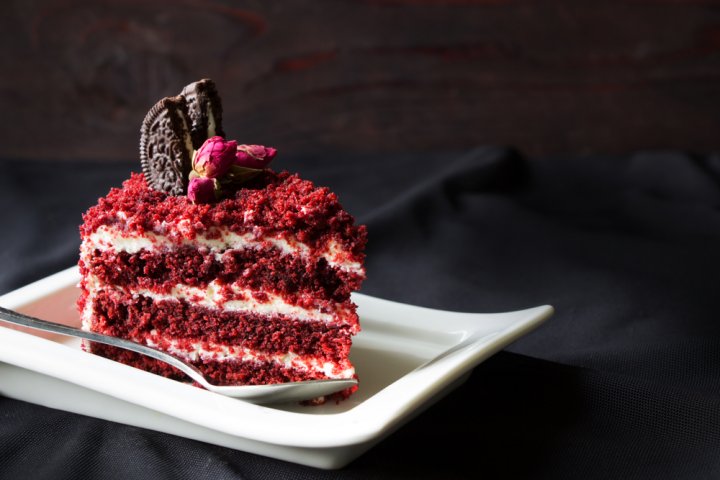
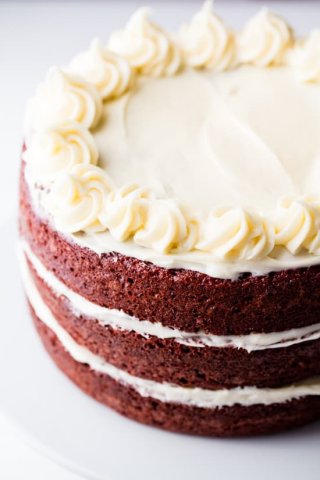
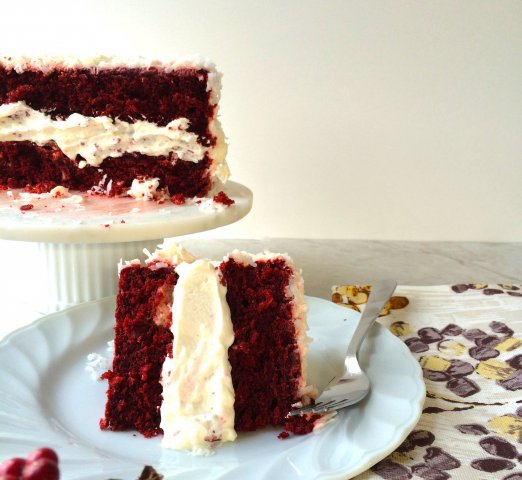
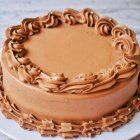
Homemade Red Velvet Cake, It's Tastier Than Anything Else!
Everyone should have a good red velvet cake recipe bookmarked and the recipe we're sharing with you is the one. A couple of years ago, this delicious cake made a come back and we loved it! How many of you remember passing by cafes, looking at the striking red coloured cake and thought, hey! I need to try this!! Well, we have experienced it and it was disappointing.
We had to wonder, why is this cake so hyped and fussed about? It tasted like an average vanilla cake. We tried several slices from different commercial bakers. Admittedly, there are some which were better than others. However, we wanted to try, baking our own red velvet cake from scratch and understand what makes this cake stand out.
It does sound intimidating, the phrase ‘from scratch’, but it wasn’t worrisome at all. It was different than what traditional bakers usually incorporate in their recipes. That’s not to say, its difficult but you have a better understanding of why your cake is so delicious. Honestly, it even encouraged us to experiment with other cake recipes for better results. So if you're looking for THE recipe, look no further.
Related articles
The Illusive Red Velvet Cake Flavor
It is really hard to accurately describe the flavor of the cake. It’s not just a regular chocolate cake or a red dyed vanilla cake, even though red velvet has both vanilla and cocoa. The cocoa isn't as overpowering as a chocolate cake, more of behind the scenes with just a hint, and even that is mixed with vanilla. In addition to that, the buttermilk and vinegar leaves a wonderful texture to the cake. And when you combine them all, you get yourself indulged in a vibrant moist cake with a distinct chocolate flavor.
The Redder the Better
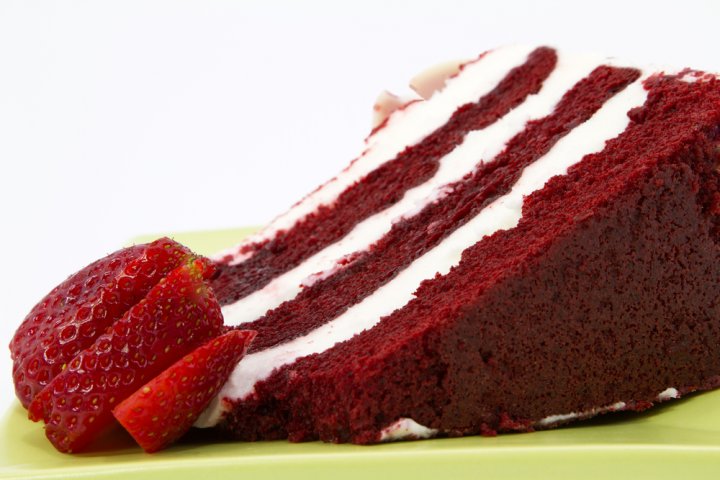
One of the exciting characteristic of this cake is the striking red color and we're sure many of you are crazy about the red like we are! For the longest time, before food coloring was a thing, people used beetroot juice to dye their red velvet cake red. So, for those who rather use natural dye than a food coloring, that’s a good alternative. However, the color will be fainter and a faint beetroot flavor is observed. We personally recommend using food coloring gel as it only requires a few drops to get this deep rich red color. The vinegar in the recipe also helps enhance the redness of the cake.
Related articles
Frosting Choices

Frosting takes the cake one step further and adds the wow factor and cream cheese frosting is perfect for that. The slight acidity of the cream cheese accentuates the cake’s acidity that is found in the buttermilk and vinegar, and the flavor that gives you matches no other. It is the most preferred frosting for many. However, there are other frostings that can be used.
One of these is buttercream frosting, which is quite popular for its rich buttery smooth texture and the rich flavor. Although buttercream frosting is a good alternative. However, the disadvantage of this frosting is that it has a tendency to melt or become runny when in room temperature. So, one has to be mindful to keep the cake refrigerated at all times till serving.
Another frosting which we've recently discovered is the ermine icing or boiled milk frosting, an original frosting of red velvet cake. As the name suggests, this frosting is done by boiling milk and flour which is very interesting and worth giving a shot.
Related articles
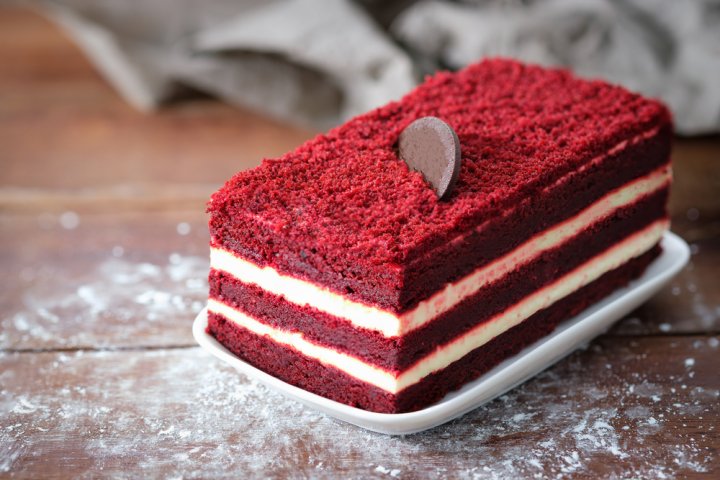
4 Recipes to Make Red Velvet Cake from Scratch
Simple Red Velvet Cake Recipe
This simple and delicious cake yields approximately 16 servings and takes almost 55 minutes from preparing the ingredients to bake time.
Simple Red Velvet Cake
List of Ingredients
- Cake:
- 3 cups of All purpose flour
- 3 cups sugar
- ½ cup cornstarch
- ½ cup unsweetened cocoa powder
- 1 tablespoon baking soda
- 1 ½ teaspoon baking powder
- 1 ½ teaspoon salt
Wet Ingredients
- 4 large eggs
- 1 ½ cup buttermilk
- 1 ¼ cup warm water
- ½ cup vegetable oil
- 1 teaspoon vanilla extract
- 1 teaspoon white vinegar
- 2 tablespoon red food coloring
Cream Cheese Frosting:
- 2 cups softened cream cheese
- 1 cup softened butter
- 4 cups powdered sugar
- 1 teaspoon vanilla extract
- Preheat the oven at 200 degrees celsius, oil three 9 inches baking dish for a three layer cake or one 12 inch baking dish for a single layer cake. Dust the oiled dishes with flour and keep aside.
- Combine all the dry ingredients in a bowl and mix well.
- Mix all the wet ingredients with an electric mixer or beater on medium speed until you get a smooth texture.
- Add the dry ingredients into the wet ingredients in batches until its homogenous.
- Pour the mixture into the oiled and dusted baking dishes and place in oven.
- Bake the cake for 30 to 35 minutes or until an inserted toothpick comes out clean.
- Let the cake cool off before proceeding to frosting the cake.
- To make the frosting, use a hand mixer or a stand mixer and for better result use a chilled bowl to beat butter and cream cheese. Beat the two until it’s fluffy and light then add vanilla extract. Gradually add powdered sugar, a cup at a time till until smooth.
- After cake is completely cooled, smooth frosting all over the cake and decorate accordingly.
Baking Steps
Related articles
Eggless Red Velvet Cake Recipe
This yummy eggless red velvet cake yields 6 servings and takes approximately 40 minutes from preparing the ingredients to bake time.
Simple Red Velvet Cake
List of Ingredients
- Dry Ingredients for Cake
- 3 cups of All purpose flour
- 3 cups sugar
- ½ cup cornstarch
- ½ cup unsweetened cocoa powder
- 1 tablespoon baking soda
- 1 ½ teaspoon baking powder
- 1 ½ teaspoon salt
- Wet Ingredients for Cake
- 4 large eggs
- 1 ½ cup buttermilk
- 1 ¼ cup warm water
- ½ cup vegetable oil
- 1 teaspoon vanilla extract
- 1 teaspoon white vinegar
- 2 tablespoon red food coloring
- Cream Cheese Frosting:
- 2 cups softened cream cheese
- 1 cup softened butter
- 4 cups powdered sugar
- 1 teaspoon vanilla extract
- Preheat the oven at 200 degrees celsius, oil three 9 inches baking dish for a three layer cake or one 12 inch baking dish for a single layer cake. Dust the oiled dishes with flour and keep aside.
- Combine all the dry ingredients in a bowl and mix well.
- Mix all the wet ingredients with an electric mixer or beater on medium speed until you get a smooth texture.
- Add the dry ingredients into the wet ingredients in batches until its homogenous.
- Pour the mixture into the oiled and dusted baking dishes and place in oven.
- Bake the cake for 30 to 35 minutes or until an inserted toothpick comes out clean.
- Let the cake cool off before proceeding to frosting the cake.
- To make the frosting, use a hand mixer or a stand mixer and for better result use a chilled bowl to beat butter and cream cheese. Beat the two until it’s fluffy and light then add vanilla extract. Gradually add powdered sugar, a cup at a time till until smooth.
- After cake is completely cooled, smooth frosting all over the cake and decorate accordingly.
Baking Steps
No Oven Red Velvet Recipe

This luscious no oven red velvet cake recipe yields 4 servings and takes approximately 45 to 55 minutes from preparation to baking time.
No Oven Red Velvet Cake
List of Ingredients
- Dry Ingredients for Cake:
- 1 cup all purpose flour
- ¾ cup powdered sugar
- 1 ½ teaspoon cocoa powdered
- 1 teaspoon baking powdered
- ¼ teaspoon baking soda
- Wet Ingredients:
- ½ cup buttermilk
- ½ cup oil
- 1 teaspoon vanilla extract
- 2 teaspoon red food coloring
Baking Steps
- Preheat the pot at medium heat with lid on. Oil a 6 inch baking dish. Dust the oiled dishes with flour and keep aside.
- Combine all the dry ingredients in a bowl and mix well.
- Mix all the wet ingredients with an electric mixer or beater on medium speed until you get a smooth texture.
- Add the dry ingredients into the wet ingredients in batches until its homogenous.
- Pour the mixture into the oiled and dusted baking dish and place in pre-heated pot on top of a trivet (hot pot stand) and cover with lid.
- Bake the cake for 40 to 45 minutes or until an inserted toothpick comes out clean.
- Let the cake cool off before proceeding to frosting the cake.
Related articles
6 Minutes Red Velvet Mug Cake
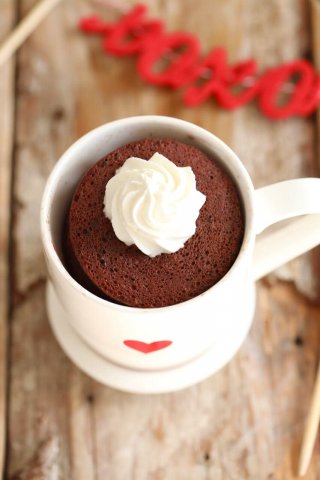
This red velvet mug cake recipe is prepared in microwave as single serving to quickly satisfy your craving. It takes approximately 6 minutes from preparation to baking time.
6 minute Red Velvet Mug Cake
List of Ingredients
- Dry Ingredients
- 4 tablespoons of flour
- 4 ½ tablespoons of sugar
- 1/8 teaspoon baking powdered
- 1 ½ tablespoons unsweetened cocoa powder
- pinch of salt
- pinch of cinnamon
- Wet Ingredients
- 3 tablespoons of oil
- 3 tablespoons of buttermilk
- 1 egg
- 1 teaspoon of vanilla extract
- ½ teaspoon of red food coloring
Microwave Baking Steps
- Combine all the dry ingredients in a bowl and in a large mug mix all the wet ingredients well.
- Spoon the dry ingredients into the mug and mix well until completely incorporated.
- Bake the mixture in microwave. Since every microwave watt capacity is different, bake at 30 second interval till toothpick inserted comes out clean.
- Let cake and mug cool before smoothing a layer of frosting.
- Enjoy!
Related articles
Tips to Perfect Your Cake
The Flour to Use

Most people get perplexed by different names and kinds of flour, various recipes call for. Why there are all these types of flour? So, we have narrowed down which flour is used for what purpose and why. Cake, cupcakes, muffins and pastry usually call for cake flour in their recipes, we know you have to be asking yourself, "Can't we just use regular flour?".
Well, cake flour generally has less protein, which means it has less gluten, and that helps your cake to be more tender and softer. This is what we all aim for our cakes to be, no one wants a bread like texture for a cake and this type of flour can change your cake game.
The best thing is, you don't need to go and search for a cake flour in the markets, you can make one yourself, its that easy! For one cup of all purpose flour, remove two tablespoon of flour and replace it with two tablespoon of cornstarch and voila! There you have it!
Saying that, if you run out of cornstarch there is no problem just use all purpose flour. As the name suggests, all purpose flour can be used for everything, its for all purposes including baking. It won't dry out your cake. There are other key ingredients that help your cake stay tender, its just that cake flour takes it to another level.
Another type of flour is the self rising flour, which has added leavener to raise batter or dough and you don't want that for your cake unless the recipe calls for it. You cant substitute cake flour and all purpose flour with self rising flour, it changes the texture of cake.
The Butter or Oil Dilemma
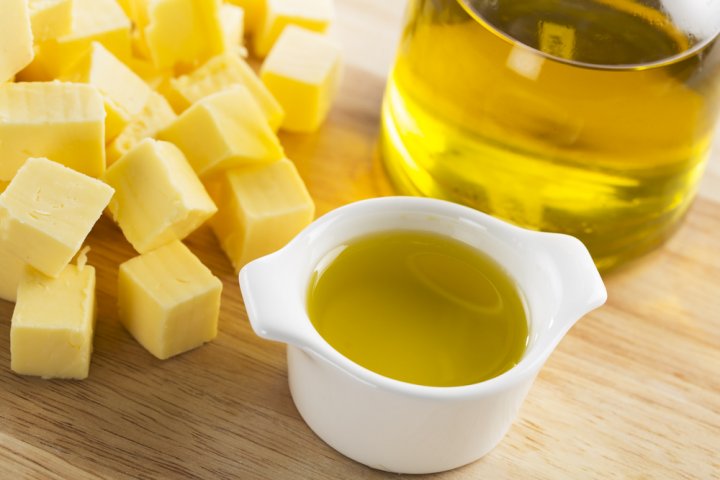
Butter is amazing and gives a nice flavor to everything but butter is not always better. Like we have mentioned a few times, what we aim for in a cake is tenderness, softness, moistness and vegetable oil gives us that. This is what most people enjoy in a cake, the distinct flavor and the way the cake just melts in your mouth.
While butter used to be a 'must' in most traditional cake recipes more people are coming around to the wonders oil has on cakes. You should too! For starters, even though butter gives better flavor, there are other extracts and spices that can make up for it. Oil cakes even beats butter cakes by lasting tender longer as oil is always in liquid state whether cooled or aged by a few days. Butter cakes however, solidifies and need to return to room temperature if cooled.
Related articles

Decorate Your Cake with Crumbs
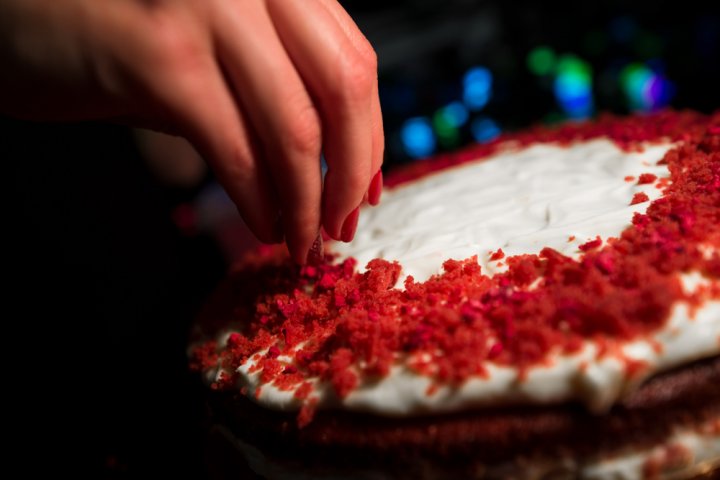
Decorating a cake can be the most intimidating step of baking, because, you’re first judged by the appearance of your cake, and not how it tastes. In addition, we also want that perfect picture to post and show off. The simplest and most appealing way to decorate your cake is using cake crumbs. Simply just level off the excess of the cake and grate it to have a consistent and uniform crumb. After smoothing over the frosting and allowing it to chill, coat the sides of the cake with crumbs. Gently smooth the crumbs with your hands, don't press too hard.
For the top of the cake, you can either sprinkle a bit of crumbs and leave it at that or if you’re feeling a bit creative you can reach out for a piping bag and add medium sized twirls at the edges. Just remember simple designs are more appealing.
-
 How to Make Cake at Homes: Tips & Tricks + 6 Easy-to-Make Cake Recipes that You Can Prepare Right in Your Kitchen! (2020)
-
 Wondering How to Make a Cake at Home? 8 Simple, Step-by-Step Recipes for Baking a Cake without an Oven Plus Tips and Tricks for Making Your Cake Perfect, Just Like You! (2020)
-
 यहां 6 आसान और स्वादिष्ट केक रेसिपी हैं, जो आपको अपने घर पर जरूर बनाने चाहिए। घर पर केक बनाने के लिए जरूरी सामान(2020)
-
 Wondering How to Make a Chocolate Cake? Check out 6 Great Recipes to Make Every Type of Chocolate Cake at Home and Delight Your Family (2020)
-
 Love Baking But Don't Have an Oven? Here's How You Can Make Cakes Without an Oven with Our 5 Delicious Recipes! (2019)
 Highlight the Best Facets of Your Incomparable Beauty: Discover the Best Face Highlighter Currently Available in India and Everything You Need to Know About Using Face Highlighters for Maximum Effect (2023)
 Forget the Blemishes and Get that Picture Perfect Flawless Radiance on Your Face: Check out the Best Foundations for Oily Skin Currently Available in India and Everything You Need to Know About Makeup Foundations (2023)
 Make Your Presence Felt Wherever You Go: Discover the Best Perfumes Under 2000 for Both Men and Women to Announce Your Arrival and Make Any Occasion Memorable (2023)
 Protect Your Oily Skin from the Harmful Rays of the Sun: Discover the Best Gel Based Sunscreens for Oily Skin and Everything You Need to Know Before Buying One (2023)
 Minor Blemishes and Wrinkles Affecting Your Confidence? Check out the Best BB Creams to Conceal Your Worries and Nourish Your Skin to Restore the Healthy, Radiant and Glowing Complexion Back Again (2023)