-
 केक और कुकीज पर इन 5 तरीकों से करें आइसिंग फिर देखें आप को बनाने में भी मजा आएगा और खाने वाले को भी । साथ में कुछ टिप्स ।(2020)
-
 Learn How to Make Cake for Christmas: 4 Recipes for Christmas Cakes and 5 Decor Ideas That Will Warm Everyone's Heart (2020)
-
 Learn How to Make Cake Fondant at Home and Give your Cakes a Professional Look: 6 Fondant Recipes, Tips and More (2019)
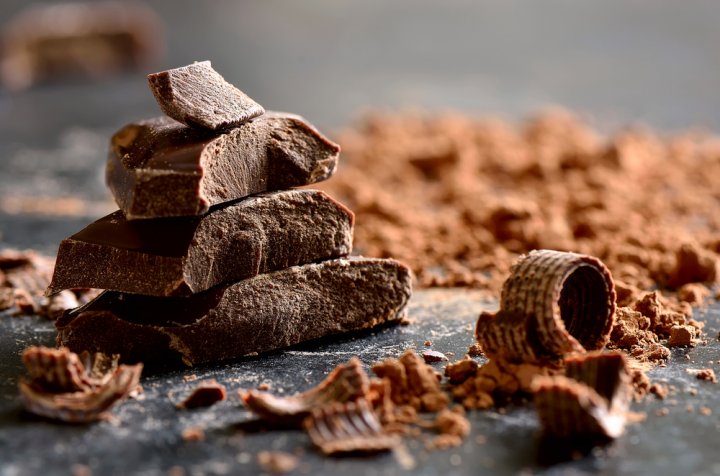
For the Love of Chocolate!
“Chocolate is happiness that you can eat” - a sentiment many will agree with! The love for chocolate is beyond words. Nothing can be more satisfying than an intense chocolatey gooey delight smoothing its way down your tummy, taking away all your stress and troubles along!
Well, if that sounds a bit of an exaggeration to you, then you might believe in the scientifically proven fact that humans crave chocolates not only because it tastes delicious and smells heavenly. but also because chocolates help in the release of neurotransmitters, mainly dopamine, in specific parts of our brain. Dopamine is the feel-good hormone and so, eating chocolates makes us happy.
A person who has been eating chocolates since childhood gets these crazy chocolate cravings at least once a week, or sometimes more, which can be satisfied only with chocolates. Chocolates were first tasted by Aztec kings and women have known to secretly hoard on chocolates to satisfy their cravings. It also has a melting point that is just a bit lower than the average human body temperature, which gives you that melt-in-your-mouth feeling every time you pop a piece of chocolate in your mouth. Chocolate lovers often describe this melting feeling like a true moment of ecstasy.
Playing with Chocolate Is Not Rocket Science
If our description of chocolates has made your mouth water, then why not experiment with chocolate yourself! Playing with chocolate is no rocket science and once you have mastered the art, you can come up with delightful chocolate recipes to be relished by family and friends.
Tips to Keep in Mind While Making Chocolate Decorations
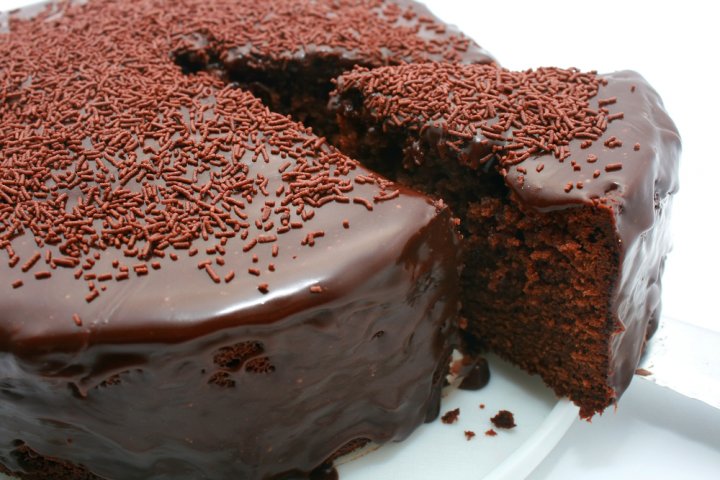
The most basic chocolate recipe that all of us have tried is a chocolate cake without the icing. A simple chocolate cake is easy to bake and tastes divine, especially when it is freshly baked at home. This article will now help you take your chocolate cake baking skills to the next level. Here are some easy ways to make stunning chocolate decorations that can be added on your cakes, muffins, puddings, ice-creams and more. To polish your culinary skills, you need to first learn a few important tips while making chocolate decorations. It is easy to burn your chocolate or make it into a runny consistency. These tips will help you how to cook your chocolate to perfection
How to Melt and Temper Chocolate?
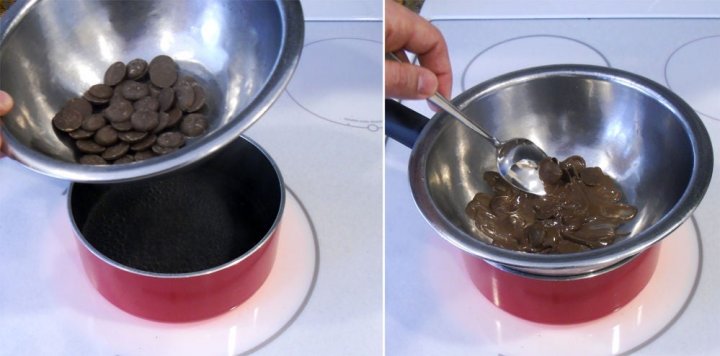
Tempering means improving the consistency, hardness or durability of a substance by either heating or cooling it. To temper chocolate, one needs to melt solid chocolate to a temperature high enough that the crystals in the cocoa butter break down.
There are various ways of melting chocolate. The best way is to place chopped chocolate pieces in the top of a double boiler or a heatproof bowl kept over a saucepan of simmering water. You need to cook and stir occasionally until the entire chocolate has melted. It takes around 2 to 3 minutes to melt or temper chocolate this way. You can, alternatively, also melt the chopped chocolate in a microwave-safe bowl. Place the bowl in 30-second intervals, removing every 30 seconds to stir, until completely melted.
How Long Do Chocolate Decorations Last?
Solid milk chocolate lasts for over a year. Solid dark chocolate lasts for nearly two years and the solid white chocolate lasts for four months. Chocolates that are filled, such as chocolate truffles, last for three to four months unless they are full of preservatives.
Chocolate decorations are best stored in a cool, dry and dark place at about 13- 15 degrees Celsius temperature. These should not be stored in the refrigerator or next to anything with an overpowering smell, as the chocolates tend to absorb the smell and get spoilt. You can properly wrap chocolate decorations made out of cooking chocolate and these will last for up to a year.
Which Is the Best Chocolate to Melt?
White chocolate is tougher to melt than other chocolates because it burns very easily. It should be melted in a double boiler or a heat-resistant bowl placed over hot water. White chocolate, when melted in a microwave, can easily get burnt quickly.
To find out which is the best chocolate to melt in dark chocolate, always keep in mind that the chocolate variety that is best to melt is the one that tastes the best. To make your chocolates every smoother and creamier, you can add some butter while melting or taste-free vegetable oil shortening.
How Do You Prevent Your Chocolate Decorations from Sticking to the Mold?
To prevent your chocolates from sticking to the mold, you need to first air-dry your molds thoroughly so that no moisture or remnants any foreign substances remain. Once this is done, you can pour melted chocolate into the molds. Ensure that you pour the melted chocolate into the molds only and not on the plastic parts in between the molds. Do not grease your molds with oil shortening or butter as these will leave a greasy shine on the chocolates and the designs of the mold will not be able to transfer completely on the chocolates. As long as you use a proper mold, your chocolate will not stick to the mold.
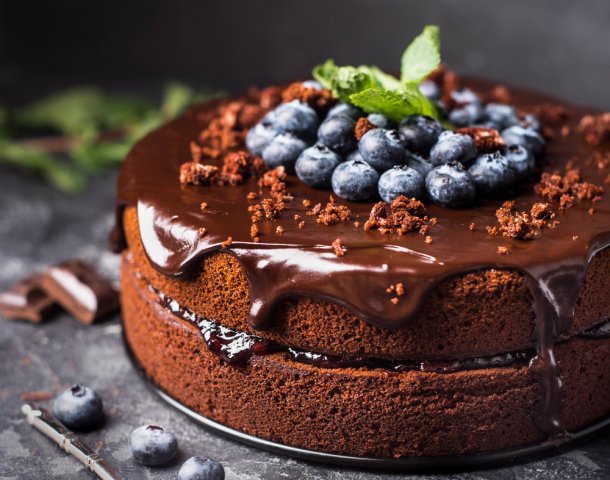
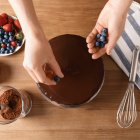
Dress Up Your Cake in the Most Chocolicious Way!

It is fun and easy to play with chocolate. The fact that it melts and sets so quickly, makes it very versatile. It is a lot of fun to melt it and give it some desirable shape within minutes. Another good aspect about chocolate is that it tastes delicious with fruits, butterscotch, vanilla, red velvet and so many other flavours. You can bake a cake of your preferred flavour and then top it up with chocolate decorations. You don't need to bake a chocolate cake only. Moreover, chocolate decorations also look good on puddings, smoothies, cold coffee and many other sugary delights. So now that you have learnt a few basic tips before playing with chocolate, let’s get started with our tutorials for making chocolate decorations.
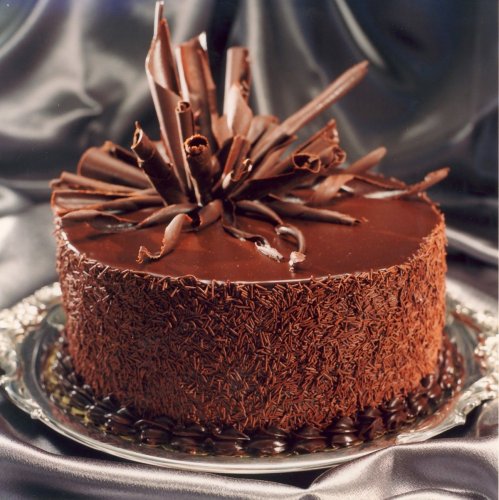
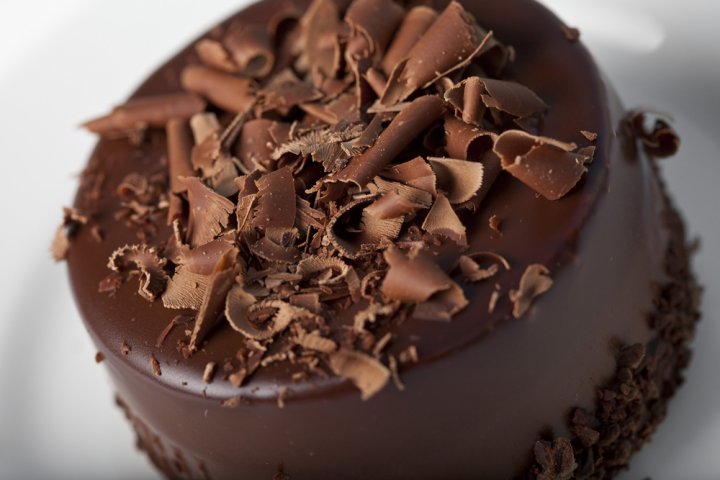
1.Chocolate Curls and Shavings
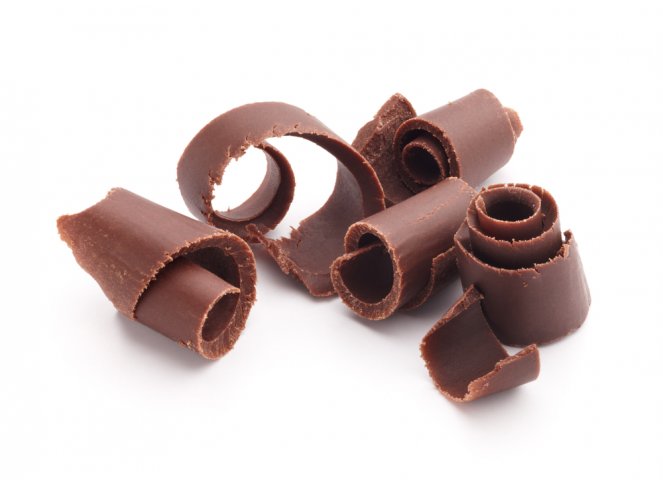
Chocolate curls and shavings look very pretty on a cake and are also quite easy to make.
Chocolate Curls Instructions:
First, you need to slightly soften a 3 to 4-inch chunk of chocolate in the microwave on medium power. You can also put it in the double boiler but remove it after a minute for two. Next, using a vegetable peeler, scrape the blade lengthwise across the softened chocolate to create pretty, delicate curls. Refrigerate the curls until ready to use. If you leave them outside, the very thinly shaved chocolate curls may melt and lose their form in room temperature because they are too thin and delicate.
Chocolate Shavings Instruction:
Use a vegetable peeler or knife to shave flat, thin shavings from a room-temperature block of chocolate. To make shavings, you do not need to soften the chocolate. Just make sure it is hard enough to be held in hand without melting. You can put the shavings in the refrigerator until ready to use.
2. Chocolate Pipe Designs
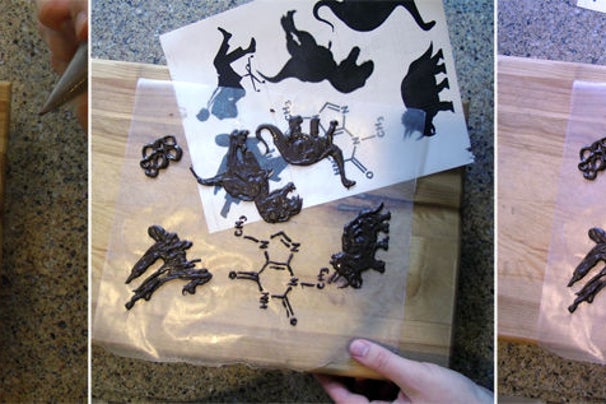
Chocolate pipes can be used to make alphabets, letters or any other designs.
Chocolate pipe design instructions:
Once you have tempered your chocolate, fill it into a squeeze tube or a small piping bag. You can also use a zip-top bag with a small hole snipped in one corner. Now hold the bag about an inch above the parchment paper or butter paper kept on a flat surface and trace whatever designs you want to make. Squeeze with even pressure but stop a little earlier as you are about to complete your design as the chocolate will continue to flow. Using a toothpick, fill any tiny gaps and allow the chocolate to set completely in the refrigerator. It takes only about 15 minutes. After the chocolate designs have set, you can carefully peel them off from the sheet and use it as your decoration.
3. Chocolate Shards

Chocolate shards are thin shapes of chocolate. Once you want to decorate your cake according to different themes, shards will be very useful.
Chocolate Shard Instructions:
Scoop a dollop of melted chocolate on to the parchment paper and spread it evenly with a spatula. Ensure to keep a thick border on all the sides. Pick up the sheet and gently drop it on the counter a few times to ensure that the chocolate has evenly spread in a uniform layer and that there are no bubbles. Add any coloured sprinkles or coloured candy while the chocolate is still wet. Keep it in the refrigerator to set. Once set, you can use a knife to cut the chocolate into your desired shapes. You can also use a cookie cutter to cut shapes. Now you can peel off the shapes and use it for decoration on your cakes or muffins.
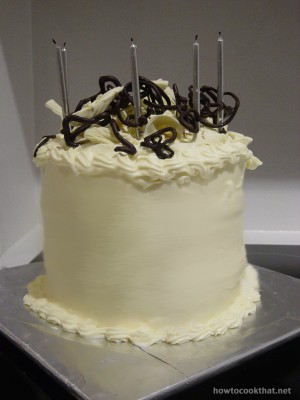
4. Chocolate Waves
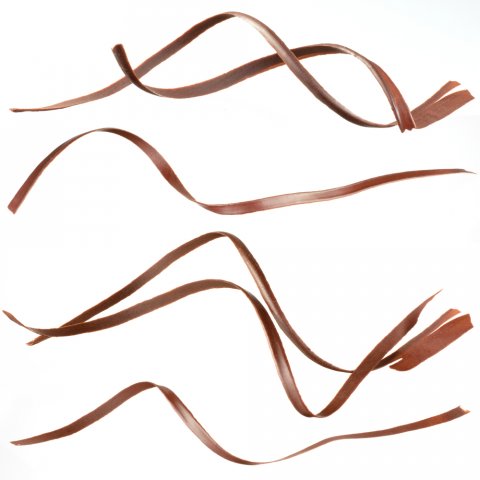
Chocolate waves are pretty-looking chocolate garnishes that can easily transform the look of any cake from ordinary to extraordinary with a few minutes.
Chocolate Waves Instructions:
You will need both white and dark chocolate melts for this garnish. Measure and cut your parchment paper loosely around your cake pan to get the exact measurements. Let the chocolate melts stand at room temperature and you can begin when they start to thicken a bit. Now pour the chocolate in the centre of the parchment paper and spread it evenly using a spatula. Now use the scalloped edge of a cake comb/scraper to make wave designs in the chocolate. Put the paper in the refrigerator for the dark chocolate waves to set.
Now pour the melted white chocolate over the dark chocolate waves and spread it evenly using a spatula. Again keep it in the refrigerator to set and once set, carefully peel the white chocolate from the paper. You will find pretty looking dark chocolate waves set on white chocolate on the reverse side. Cut these into desirable shapes as use them as decorations.
5. Chocolate Swirlies
The versatile chocolate is the perfect garnish for any dessert. Chocolate swirls look amazing when topped on any cake flavour and not just chocolate.
Chocolate Swirlies Instructions:
Chocolate swirlies are three dimensional swirls of chocolate made by piping melted chocolate onto a chilled bottle with a long neck that had been sitting in the freezer for some time. The melted chocolate instantly sets on the cold surface and you can remove them and use it as a frosting on top of cakes or cupcakes.
6. Chocolate Sticks
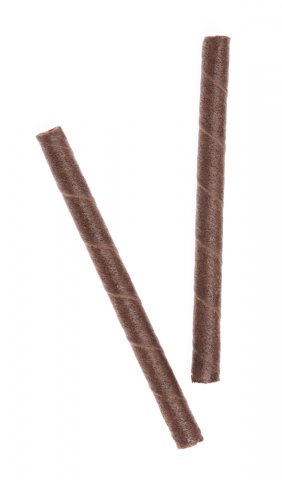
Chocolate sticks look great when served with chocolate smoothies, cold coffee or chocolate milk shakes.
Chocolate Sticks Instructions:
These are quite simple to make. Take melted chocolate in a piping bag and draw straight lines of melted chocolate onto the parchment paper. You can make the lines thin or fat as per your requirement. Place the paper in the refrigerator once done. Once set, peel off carefully and you will have your chocolate sticks ready.
7. Chocolate Lollipops
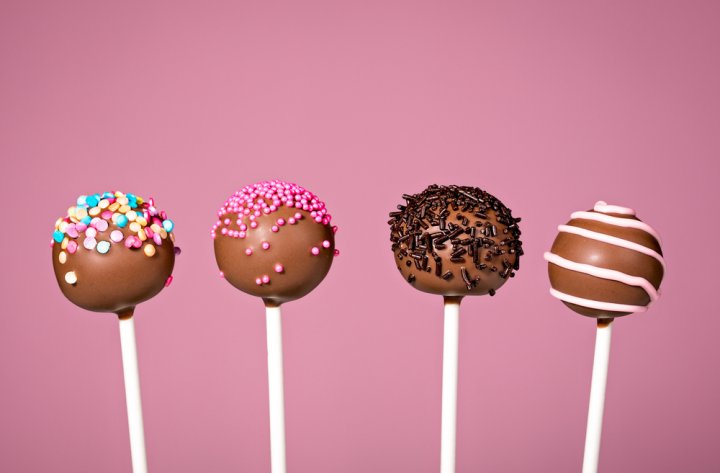
Chocolate lollipops are a great way to accent your dessert.
Chocolate Lollipop Instructions:
Pour melted dark chocolate into a piping bag or a squeezy bottle. Place a butter paper on your kitchen counter. Place lollipop sticks on the paper. On top of each stick, pipe swirls of chocolate over one end and sprinkle with coloured candy bits. Place it in the freezer. Once set, carefully peel off the lollipop. You will find the stick sticking to the chocolate lollipop.
-
 10 Stunning Birthday Cakes for Girls in 2020: Must Have Cake Designs She'll Fall in Love with and Where to Buy Them Online
-
 10 ऐसे केक जिनको देखकर और खाकर आपके बच्चे और मेहमान हमेशा आपको याद करेंगे ! लेटेस्ट केक रेसिपीज आपकी बेटी के जन्मदिन के लिए ।(2020)
-
 How to Make Cake at Homes: Tips & Tricks + 6 Easy-to-Make Cake Recipes that You Can Prepare Right in Your Kitchen! (2020)
-
 Wondering How to Make a Cake at Home? 8 Simple, Step-by-Step Recipes for Baking a Cake without an Oven Plus Tips and Tricks for Making Your Cake Perfect, Just Like You! (2020)
-
 यहां 6 आसान और स्वादिष्ट केक रेसिपी हैं, जो आपको अपने घर पर जरूर बनाने चाहिए। घर पर केक बनाने के लिए जरूरी सामान(2020)
Chacolatey Fun!
Don your baking hat and display your culinary skills by presenting your homemade chocolate cake with the most stunning chocolate decorations. These decorations elevate the level of your home baking and will enable you to dress up your cakes in the most chocolicious way!
 Highlight the Best Facets of Your Incomparable Beauty: Discover the Best Face Highlighter Currently Available in India and Everything You Need to Know About Using Face Highlighters for Maximum Effect (2023)
 Forget the Blemishes and Get that Picture Perfect Flawless Radiance on Your Face: Check out the Best Foundations for Oily Skin Currently Available in India and Everything You Need to Know About Makeup Foundations (2023)
 Make Your Presence Felt Wherever You Go: Discover the Best Perfumes Under 2000 for Both Men and Women to Announce Your Arrival and Make Any Occasion Memorable (2023)
 Protect Your Oily Skin from the Harmful Rays of the Sun: Discover the Best Gel Based Sunscreens for Oily Skin and Everything You Need to Know Before Buying One (2023)
 Minor Blemishes and Wrinkles Affecting Your Confidence? Check out the Best BB Creams to Conceal Your Worries and Nourish Your Skin to Restore the Healthy, Radiant and Glowing Complexion Back Again (2023)