
-
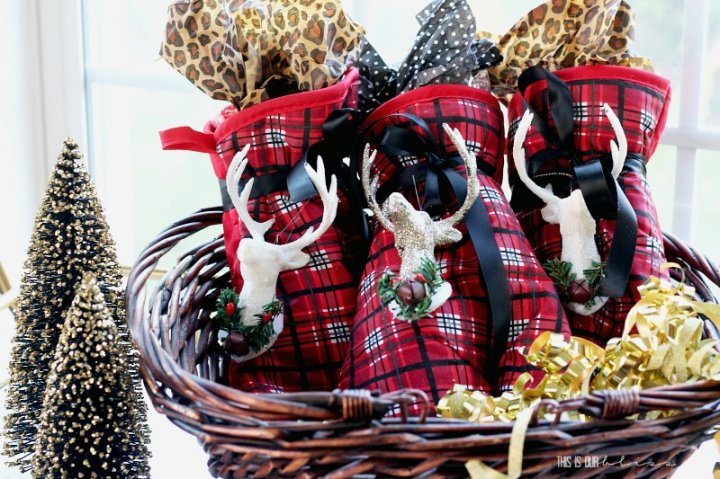
 14 Unbelievably Awesome Birthday Gift Ideas For Your Best Male Friend + How to Give Him an Unforgettable Birthday (2020)
-
 Top Reasons Why Handmade Gifts are the Best Along with a List of 10 Homemade Friendship Day Gift Ideas for 2019
-
 This Friendship Day Give Small Gifts to All Your Friends: 10 Fabulous Ideas for DIY and Personalised Gifts to Win Your Friends' Hearts (2019)
Handmade Gifts Leave a Lasting Impression. Here's Why To Do it More Often
If you are planning to create a special gift for your loved one, then you are at the right place. This article will offer you a comprehensive list of some unique, do it yourself, gift ideas which have been compiled from over thousands of different websites. Handmade gifts are trending these days because they have a personal touch and provide that feeling of extra care and warmth to the recipient. It doesn't matter what the occasion is, a Birthday, Anniversary or farewell, nothing can be as special as a handmade gift.
Make your loved ones feel extra special. You can buy many things from the market and they definitely are appreciated by the recipient but when you take-out that precious time and put in that extra effort to make something for your loved ones on your own, the gift becomes much more meaningful and valuable.
Related articles

Do-It-Yourself (DIY) Gifts V/s Store Bought Gifts
Homemade gifts are always exclusive. If you are the crafter, then you can make sure that the gift is customized to the liking of the recipient. My son likes green color and super heroes, so if I have to bake a cake for him or knit a sweater for him I will make sure that it is green in color and has a picture of his favorite superhero on it. It isn’t certain that I will get the similar combination in stores. Homemade gifts are always a clear winner when they are compared with store bought gifts. Homemade gifts are a delightful way to show-case your talent and love for your near and dear ones.
When To Go For a DIY Gift
If the person for whom you are buying the gift for is more of a gadget person, then it is better to buy the gadget since a gadget is not very easy to make at home! You really need to be a tech junkie if you plan to do so. Also, if your relationship with the recipient is formal, then it is good to keep it generic and store bought items should be preferred in such cases.
Well, in this article we are going to give you a comprehensive list of some exclusive DIY items that are a clear winner when compared to the ones available across the web. In many cases we do see items that look really amazing and beautiful but we are not able to source the material used in making them. There are so many common things that every site offers when you search for DIY gifts but none of them gives you ideas for alternatives you can choose if the material suggested by them is not available.
Related articles

7 DIY Gift Ideas to Make Gorgeous Gifts Which Will Flatter Anyone
In this article we will focus on creating the some gift items using alternate methods and arrangements. The list itself includes the best DIY items that you can make and we bet you will want to try your hands on them as soon as you go through our list.
Sturdy Crystal Planters - For Oxygen Rich Space
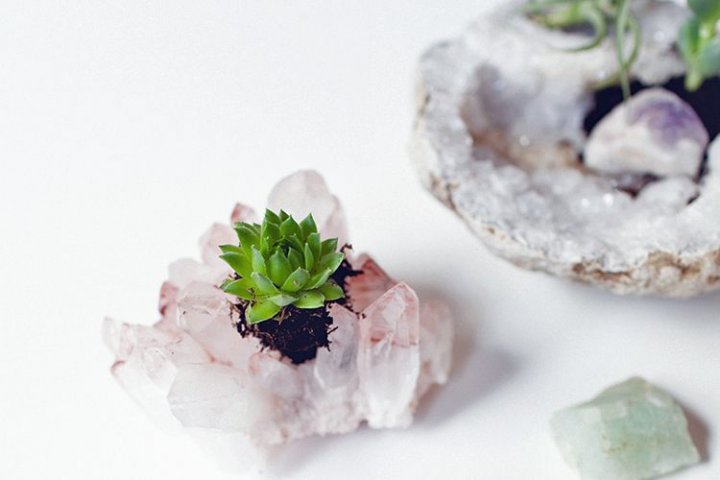
These crystal planters can be easily made with just a few crystals and a small plant that you can choose from a nursery nearby .
- Choose a wide vase or pot for arranging the crystals and a small potted plant in it. In the link you can find some tips and ideas that we have incorporated
- Buying crystals from open market and online stores can be very expensive, so here we are going to give you an alternative that you can vouch for.
Material Required
- Pink Salt or Rock Salt - It is available in chunks at www.amazon.in for Rs.200 per 250g.It is also believed that keeping pink Pink Salt in your house keeps away the negativity. So gifting something that has pink salt in it to your friend or loved one can really be beneficial for them. It also cleanses the air and has many health benefits. Today, when the pollution levels in India have increased to a great extent, it becomes necessary to do every small thing to make sure we can breathe fresh air.
- Vase – The shape of the vase can depend on the decor and place where you are going to keep it. But if you are gifting it to someone, any flattering pot with a good finish can work. Nowadays it has become really easy to pick from a wide variety of beautiful vases online. Here we have picked a metal vase in which it will be easy to arrange the salt crystals, and the pinkish salt crystals will look really classy in the golden bowl like vase. It is available on www.amazon.in for Rs.240 only.
- Small Potted plant, preferably air purifiers for indoors - There are many air purifying plants that you can get in the open market or online. Many of these plants can be planted in indoors and need very less maintenance. Watering it just once a week will be enough to keep them healthy. The one chosen by us is a snake plant, it is available at www.amazon.in for Rs.299.
Related articles

Creative Tea Coasters
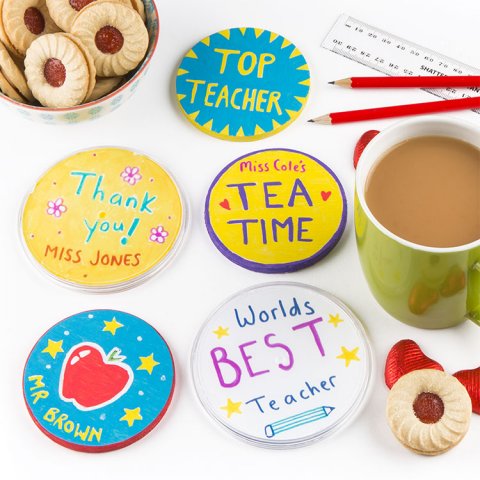
If you are confused about what to gift your friend if you are visiting their house for dinner and do not want to go empty handed, these tea coasters are the most appropriate thing to present. We recommend making at least a couple of sets as they can come in handy at many occasions.
Take a look at the link given below for reference. We are going to create a similar product by using alternate materials as getting a wooden log and cutting it can be really tedious and cumbersome.
DIY Painted Wood Slice Coasters
Material Required
• Cork sheet coasters
• Paint or color of your choice
• Paper to use as stencil
• Black marker
Instructions
• Cork sheet coasters will make your life a lot easier as all you have to do is paint your coasters as you want them. In case you wish to reuse something from your home, you can use exam boards that are no more being used now.
• Cut the paper in the desired shape and use it as a stencil over the coaster.
• Once you have kept the coaster stencil, just paint it in the desired place, remove the stencil and outline your drawing using a black marker.
• You can choose to color the background or just leave it as it is.
Tip – Do not use water color as the cardboard will absorb the moisture and color along with it. Using acrylic color will help but if the hues do not appear as expected, apply a thin layer of Gesso on the area you want to paint.
Useful Links:
Related articles

Let Your Heart Pour Out With This Heart For The Wall
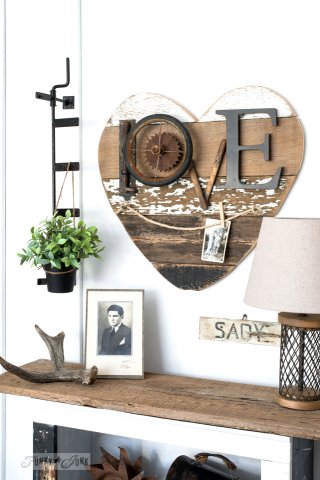
With Valentine around the corner, all I can think of is hearts, so it becomes imperative for me to include it in our DIY gifts. We got our reference for a heart gift from www.funkyjunkinteriors.net. They have got really ingenious ways to use junk. But for this junk heart, we do not feel it is possible for us to get a piece of wood cut into a desired heart shape. So our alternate material for this craft would be a cardboard.
Material to create the background
• Cardboard – If you have the carton from your recent online purchase, you can use that too. Just make sure that the size of the cardboard is big enough to accommodate all the letters.
• Thermocol sheet – This is optional, you can choose to build your background with thermocol sheet or just leave it like that.
• Glaze paper or wrapping sheets as per choice
• Adhesive
Material for Letters
• Thermocol sheet – Buy a thick one or make your own letters out of cereal boxes or cardboard whichever is easier for you to work with.
• Yarn
• Adhesive
• Cutter/scissors
Instructions to create the background :
• Cut the cardboard and thermocol sheet of the same size in heart shape.
• Apply glue or adhesive over the cardboard and paste the thermocol sheet over it.
• Leave it overnight so that it gets fixed firmly.
• Once the base is set, cover it with wrapping sheets.
• Multiple colors can be used to make it look attractive. Here is one of the ideas from us:
www.dreamstime.com
Instructions to create letters:
• Use cardboard or cereal boxes to make letters. Draw the letter on the cardboard and cut it neatly with scissors. Add height to your letters using cardboard and paste the pieces with an adhesive.
• The length of the letters should match, so use a ruler and also make sure that the height and width of the letters is such that they can be arranged on the heart shape background that you have created.
• Wrap the letters with different color yarns and fix the yarn to cardboard letters using adhesive.
• Now arrange the letters to background one by one. Here are some tips and tricks which you can use:
www.sisterssuitcaseblog.com
Related articles
Hanging Photo Displays For Your Loved Ones
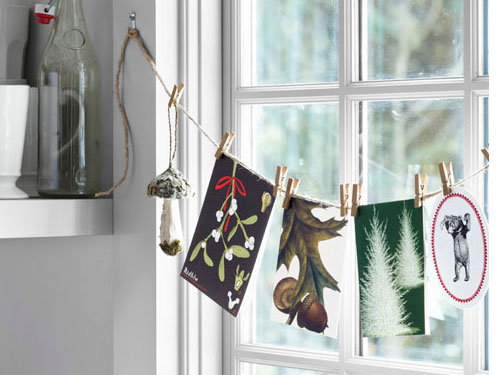
I found this idea very interesting but, then again, it got really difficult for me to collect all the the material used in this post so here we are including the material that we used and which is something readily available at a very low cost.
Material required:
1. Wooden Duster
2. Eyelets Screw hooks
3. Printouts and Photos
Instructions:
On the back of the wooden duster, place the eyelet screws and secure the position by pushing the screws in. This can be done using hands by applying little force. Place two screws together so you can place the pictures between them. You can make 3 to 4 arrangements of these kind on one duster.
To decorate the duster you can use a colored print out that reads Family, Love, Friend or any other words on your choice that describe your relationship with the recipient. Paste the cut out on the sides of the duster. You can choose to get creative and use some mirrors, glitters or sequins in decoration.
Related articles

Bracelets - A Symbol Of Friendship
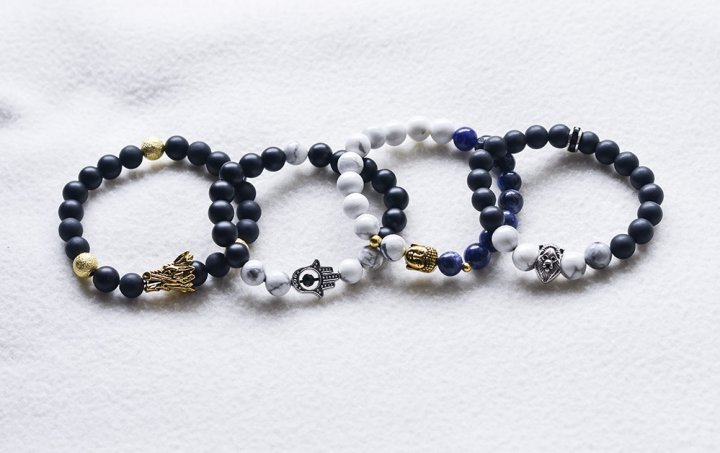
We found this idea of gifting bracelets to someone very adoring. There are many choices and ways of doing it for women, starting from beads to shells, but the idea of making bracelets that men will really like has not been really explored well. So in this article we are going to share an idea on bracelets that men will really adore.
Material Required:
1.Strap – This can come off from a watch that’s no more in use or you can use a belt that was worn off from the ends. I used a strap from the belt of my purse that was no more in use and I also thought of using the material from the straps of my sandals. If you want to use something new the faux leather and suede straps are available on www.amazon.in
2.Rivets – You can choose any rivet that are used in bags and boots. Rivets are available in different styles; we found the one with spikes more attractive than others. It is available at www.amazon.in
3.Snap Fastener – For fastening the bracelets, we chose snap fasteners as they are very convenient to use and are easily available. If the strap you are using already has a buckle than you can use that as well. Most watch straps and waist belts already have buckles.
Instructions:
1. Start by choosing the color of the strap that you plan to use and also finalize the thickness that you would want to work with. If you are reusing a material, and are not able to cut it to the dimension of your choice, then you can take it to a nearby cobbler and have him cut it. It works best if the thickness is large.
2. Once you have the right size that you desire, you can work on making it beautiful.
3. If you use the suede straps or thin straps, you can also use multiple strands and form a cross or braid pattern. It just adds to the volume and makes it look trendier.
4. Now, on each strand, fix the spine rivets in queue. Rivets can be fixed using a hammer. It will be good to make a marking before you hammer in the rivets as that it gives you a fair stencil to work on.
5. Once you have decorated the strands, you need to work on how to fasten it. If you already have a buckle on the strap then this step is redundant. For fastening the straps we will use snap fasteners that are also fixed using hammer. Magnetic fasteners or buttons that we use on denims can also be used.
Tip: If you are using multiple strands then before attaching the fastener, you will need to collate them, you can do so by using an adhesive. After applying the glue it is advised to use a cloth or leather piece to hold it together.
Related articles

Photo Box - For Moments Of Joy
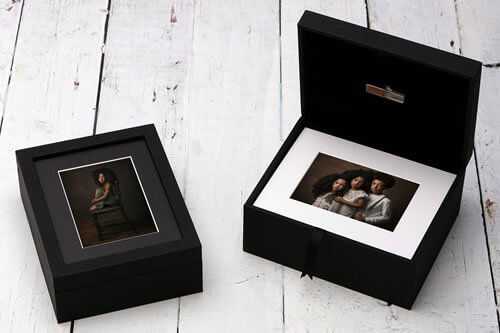
A stack of photos coming out of a box is a great idea and makes for a perfect gift for your near and dear ones. It takes very little effort to make this gift box but finding a good box to make it can be a challenge. So what we recommend is either you buy a wooden piggy bank or you can use a box that came with your watch or ring.
Material Required:
1. Wooden piggy bank or wooden Jewellery box- They are easily available at www.amazon.in at quite a reasonable price.
2. Black chart paper
3. Scissors / cutter
4. Adhesive
Instructions:
1. Cut the chart paper according to the size of the box. It should be cut in a manner so that it can be pulled out of the box smoothly.
2. Make a fan of the chart paper by folding the strips equivalent to the size of the photographs.
3. Paste the photographs of your choice and paste the end of the chart paper to the bottom of the box.
Sparkling Candle Centerpeice
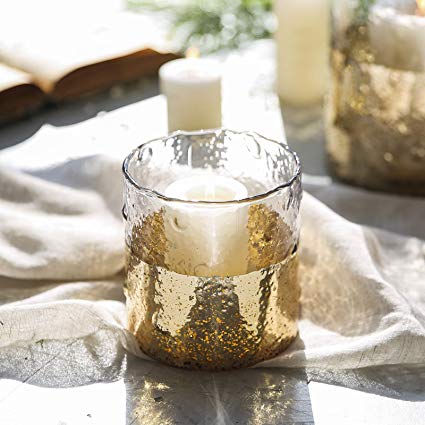
The whole idea is to create a beautiful, larger than life centerpiece that looks exotic even after using inexpensive material.
Material Required:
1. Clear water beads
2. Marbles of your choice
3. Floating gel candles
4. Tall glasses
5. Dried flowers, which add fragrance to centerpiece
Instructions:
In the tall glass, add marbles, dried flowers and water beads in layers and top them up with the floating candles. Tie a satin ribbon on the glass to match the color of the bead and marbles.
-
 The Secrets to Dressing Smart! 3 Traditional Saree Types You Didn't Know Existed + 9 Striking Sarees That Take the Humble Drape to the Next Level (2019)
-
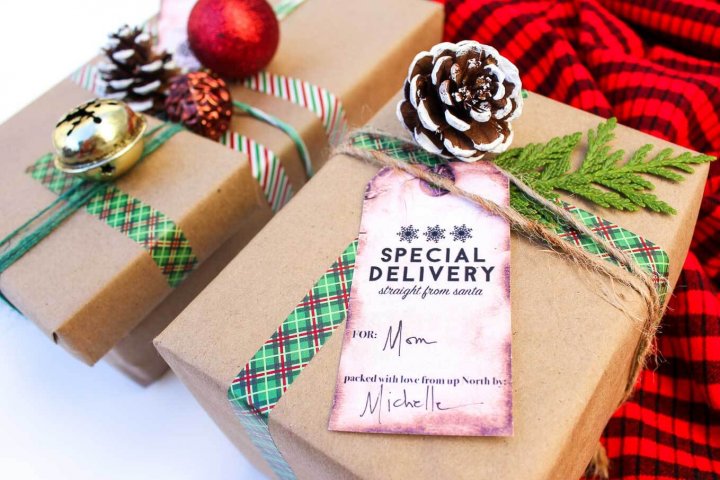
 Looking for the Most Incredible Gift Wrap Ideas to Take Your Gifts to the Next Level? We Give You 10 Easy and Pocket Friendly Ideas of Gift Wrapping
-
 Give An Extra Special Gift This Time! 10 Unique, Super Easy Handmade Gifts For Birthdays That You Can Make Yourself
-
 Let the Magic of Handmade Gift Permeate Your Love! 10 Easy Handmade Gift for Boyfriend to Show Your Love and Care! (2019)
-
 Have the Perfect Gifts for Your Loved Ones But Can't Find the Right Gift Boxes? Learn How to Make Them Yourself!
Make Any Occasion Memorable by Gifting These Items in 2019
Relationships require time. And there can be no better option to showcase the dedication and love for your close ones, than giving them a personalised present. So, be it your spouse, friend, family, neighbor, or even your boss, they will surely cherish these gifts. So go ahead, and explore your creativity!
 Highlight the Best Facets of Your Incomparable Beauty: Discover the Best Face Highlighter Currently Available in India and Everything You Need to Know About Using Face Highlighters for Maximum Effect (2023)
 Forget the Blemishes and Get that Picture Perfect Flawless Radiance on Your Face: Check out the Best Foundations for Oily Skin Currently Available in India and Everything You Need to Know About Makeup Foundations (2023)
 Make Your Presence Felt Wherever You Go: Discover the Best Perfumes Under 2000 for Both Men and Women to Announce Your Arrival and Make Any Occasion Memorable (2023)
 Protect Your Oily Skin from the Harmful Rays of the Sun: Discover the Best Gel Based Sunscreens for Oily Skin and Everything You Need to Know Before Buying One (2023)
 Minor Blemishes and Wrinkles Affecting Your Confidence? Check out the Best BB Creams to Conceal Your Worries and Nourish Your Skin to Restore the Healthy, Radiant and Glowing Complexion Back Again (2023)