-
 10 Best Gifts for Boyfriend and a Complete Guide for Selecting Gifts That Will Not Only Surprise and Impress, but Knock His Socks Off! (2019)
-
 What If You Can Make an Exclusive Designer Dress by Re-Using Your Old Saree(2020)? Create Magic by Transforming Sarees into Lehenga Using Our Craft Ideas and Be Proud of Yourself!
-
 Make His Birthday a Day to Remember! 10 Excititng Gifts for Your Husband on His Birthday and 3 Ways to Make This Day Memorable (2019)
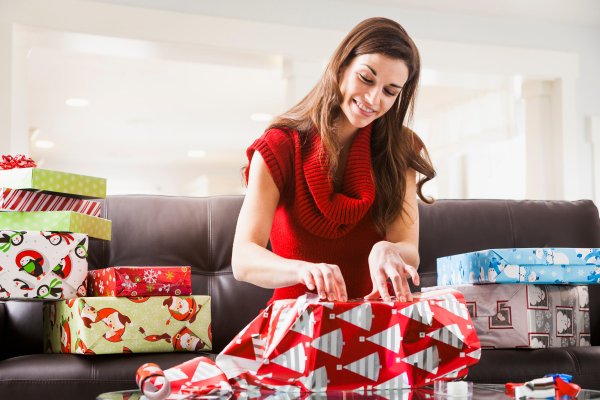
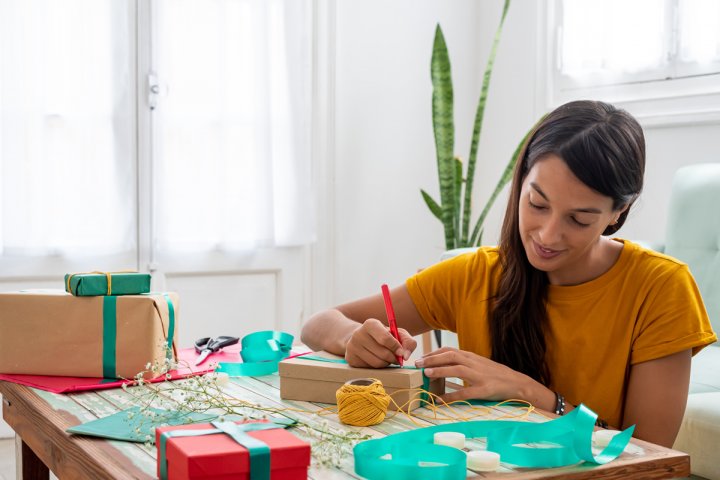
Learn the Art of Gift Wrapping
Gift wrapping is considered to be an artist today and involves a little extra effort to make the gift more special. Traditionally, the gift is wrapped with a coloured paper (or gift wrapper) and secured by tapes and ribbons. Gift wrapping came into prominence after the Chinese invented paper in the 2nd century. During the reign of the royals, money and other gift items were wrapped inside the paper and given as presents to other dignitaries and subjects.
Moreover, the ancient Chinese wrapped their gifts with rice straws and bamboos as well. After many centuries, the art of gift decoration and wrapping was revived in the 20th century when many players entered the market and started a widespread trend. Patterned gift wrappers were made famous by the Hall brothers and they gained prominence during the holiday season. Nowadays, in every country, people are looking for greener alternatives by switching over to cloth wrappers that can be reused.
Related articles

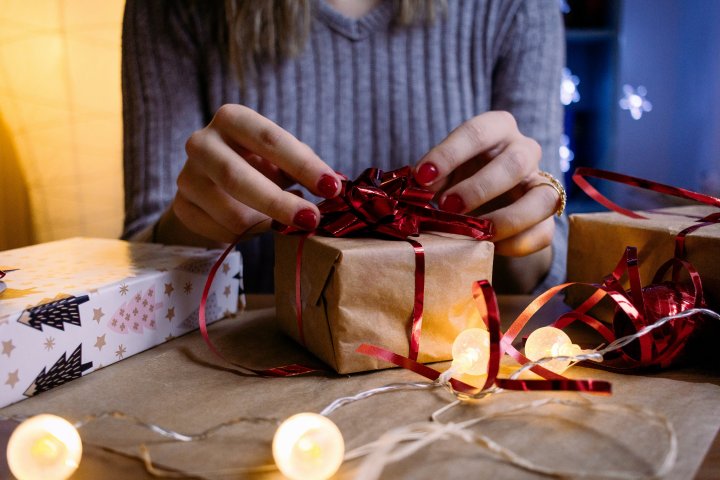
How to Wrap a Perfect Gift?

Gift wrapping is a lifesaver and can help you during various situations and present your gifts elegantly. Gift wrapping is easier to learn with certain materials. To wrap a perfect gift the minimum materials that are required include wrapping paper, scissors and tape. Here are a few tips and techniques that are used to wrap the perfect gift:
- Assemble all the things that you require for wrapping your gifts.
- To make gift wrapping easier, secure the gift object within a box so that it does not break when you are wrapping the gift.
- You can now measure the wrapping paper according to the size of the box.
- Take one end of the paper and secure it to the box to keep it from moving.
- Wrap the other end of the paper over the other edges and make sure that it is secured tightly around the box.
- Once it is secured tightly, you can start folding the other ends of the flaps securely around all corners of the box.
- Fold the edges of the box neatly inside the other end and secure it with sticky tape.
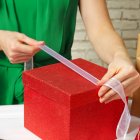
- Once the box is neatly secured, add the final touches by adorning the wrapper with a ribbon and placing a card.
Related articles
Great Alternatives to Gift Wrapper Paper
During the holiday season like Christmas, buying adequate gift paper might be the last thing on your mind. Running out of gift wrappers at the last minute might be an embarrassing situation. In case if the inevitable happens, we are there to rescue you from your predicament:
- Use Metallic Wrapper – Most of you will always have processed snacks lying around your house any time of the day. You can clean the empty metallic snack wrapper and use it to wrap your gift.
- Use Grocery Paper Bags – Normally there are numerous unused grocery bags lying around the house. Give them a new lease of life as gift wrappers.
- Butter Paper – Butter paper is not just useful for baking, it can also be used for wrapping your gifts.
- Old Glitzy Magazines – Many of you would have fallen victims to buying glitzy magazines that are made of glossy paper. You can use them to wrap your gifts.
- Empty Cardboard Boxes or Cereal Boxes – If you are fond of recycling, you can recycle these boxes for your gifts.
- Socks – Socks not only keep your feet warm, but they will also keep your gifts secure. Remember to choose colourful socks to secure fragile gifts like vases and wine bottles.
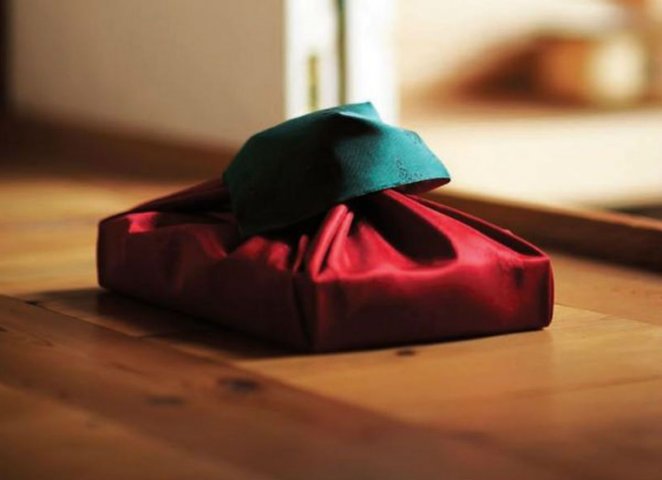
- Silk Scarves – If you have old silk scarves lying unused in your wardrobe, you can use the Japanese art ‘Furoshiki’ for wrapping your gifts.
Related articles

Running Out of Gift Paper? Smart Hacks to Make Good Use of Available Gift Paper
As mentioned earlier, there are numerous hacks that you can use if you are running short of gift paper:
- Technique – 1: Rather than wrapping the gift straight, you can place the gift diagonally and bring the long ends together for securing it. This technique ensures that you make better use of the resources available to you. Once the long ends are secured, you can neatly tuck in the remaining sides.
- Technique – 2: Take a large gift wrap and fold the paper into three equal halves. Fold in the ends of the paper in the middle and secure it with tape. Take one end of the paper and fold it. Remove the outward folds and gently fold the sheet inwards to form an inverted square. Take the top and bottom of the paper and secure it with sticky tape. Your gift paper bag is ready for placing the gift. Once the gift is placed, tie the top end with a ribbon.
- Technique – 3: If you have run out of ribbons, all you need is a piece of gift paper. Take the paper and fold it into two equal halves. Using a scissors to cut the ends of the paper into strips. Using the pencil pull the strips along their entire length to create elegant ribbons. Fold the paper inwards to create paper ribbons.
- Technique – 4: Make a gift box for small items with a small roll. Take the cardboard roll and flatten it into equal halves. Place a small bottle at the end of the roll and sketch a semi-circle. Now fold the semi-circle inwards and stick one end with glue. Place the gift inside the other end and secure it with a tape and decorate according to your choice.
- Technique – 5: Use empty Pringles cans for placing your gifts. Wrap the can with a gift paper of your choice and secure one end with a ribbon.
How to Wrap Gifts without Sticky Tapes or Ribbons?
Easily wrap your gifts without any sticky tapes or ribbons like a pro using a Japanese technique:
- Step – 1: Take the gift paper and trim off the excess paper to create a square.
- Step – 2: Place the gift diagonally and fold one of the sides inwards.
- Step – 3: On one side of the box, place your index finger in the middle and thumb on the edge to fold in the end securely.
- Step – 4: Repeat step 3 on the other side as well.
- Step – 5: Repeat step 3 on the top end as well and bring it outwards.
- Step – 6: Fold the excess paper inwards and secure it inside like an envelope.
Thus, your wrapping is complete sans any tapes or ribbons.
Related articles

How to Wrap Oddly Shaped Gifts in a Jiffy?
Gift wrapping a bulky gift can be a hard job. Here are a few tips to ace the art:
- Odd-Shaped Items – For odd or irregular shaped gifts, you can make a bag out of paper and place the object neatly into the paper bag. You can seal the top of the paper with a ribbon or some sticky tape. If you don't want to make a paper bag, just use a grocery bag and decorate it with colours, stickers, and glitter once done.
- Large Items – If an item is large, you can put it in a box and wrap the box. In case if the paper is not sufficient, you can use a large cloth like a sarong or a scarf to wrap the gift. You can also go a step further and explore your creativity – roll the gift with toilet paper rolls or old newspapers and decorate them elegantly.
- Fragile Items – For small and fragile gifts it is essential to secure them safely. As mentioned earlier, you can use thick woollen socks, jute bags lined with cotton, bubble wrap or paper shreds to secure them.
Gift Wrap Using Empty Toilet Rolls
Who would have thought that empty toilet rolls can also be used as gift papers? We will show you how to do it:
Things Needed:
- Empty toilet rolls
- Paints
- Brushes
- Markers
- Ribbons
Procedure:
- Step – 1: Take an empty toilet roll and gently flatten it.
- Step – 2: Paint the empty roll with a colour of your choice and allow it to dry.
- Step – 3: You can use coloured markers to decorate the rolls as per your liking.
- Step – 4: Once the decorations are completed, fold the ends of the rolls inwards. If you want you can secure them with tape.
- Step – 5: Place the gift inside and voila you wrap is ready. You can further decorate it with coloured ribbons.
Related articles

Use Aluminium Foil for Gift Wrapping
Aluminium foils are not only used for wrapping food items, but they can also be used as gift wrap:
Things Needed:
- Aluminium foil
- Scale
- Thin rolling pin
Procedure:
- Step – 1: Take the aluminium foil as per the desired length.
- Step – 2: The shiny side of the foil must face upwards while the matte side should be inwards.
- Step – 3: Fold the foil into equal halves using a scale or a thin rolling pin.
- Step – 4: Place the box inside the foil and fold it like a normal gift.
- Step – 5: Finally, secure the tips with sticky tape.
Best Gift Wrapping Techniques
Here are some of the best gift wrapping techniques that can be used:
Related articles

1. Hand Lettered Gift Wrapping
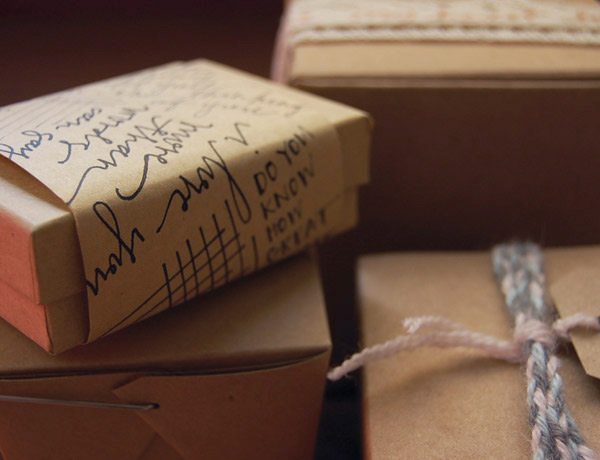
If you want to add a personal touch to your gifts, then you can choose this technique:
Things Needed:
- Gift box
- Kraft paper
- Tape
- Tags
- Pencil
- Eraser
- Pen
Procedure:
- Step – 1: Measure the Kraft paper and secure the ends using glue.
- Step – 2: Using the gel pen you can trace the wordings of your choice on the Kraft paper.
- Step – 3: Place your gift into the box.
- Step – 4: Secure the gift box and place the taped Kraft paper over the gift box.
- Step – 5: As an additional decoration, you can fasten cute gift tags with a specialised message on them.
2. Floral Gift Wrapping
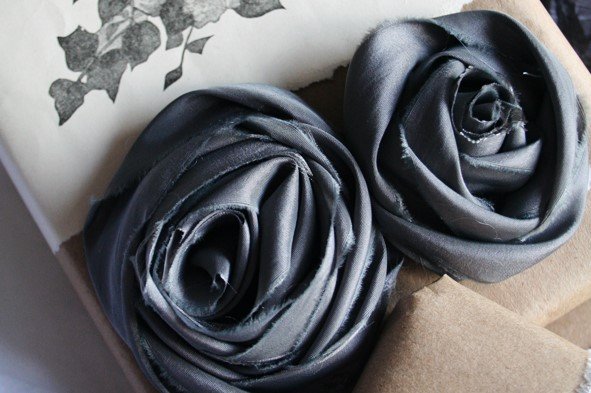
Make your own paper flowers to wrap your gifts.
Things Needed:
- Coloured tissue paper or scarves
- Scissors
- Tape
Procedure:
- Step – 1: Stack 10 to 12 pieces of tissue paper or scarves on top of each other.
- Step – 2: Fold the stacked pile in half and trim the ends. This is done to determine the size of the flower.
- Step – 3: Fold the stack like a fan with small pleats and cinch it in the middle with tape.
- Step – 4: Cut off the edges to form the shape of petals.
- Step – 5: Fan or spread out the folded tissues on one side and fan the individual later.
- Step – 6: Repeat step 5 for every layer until a colourful flower is formed.
- Step – 7: Stick the flower on top of the box and impress your loved ones.
Related articles

3. Fabric Gift Pouch
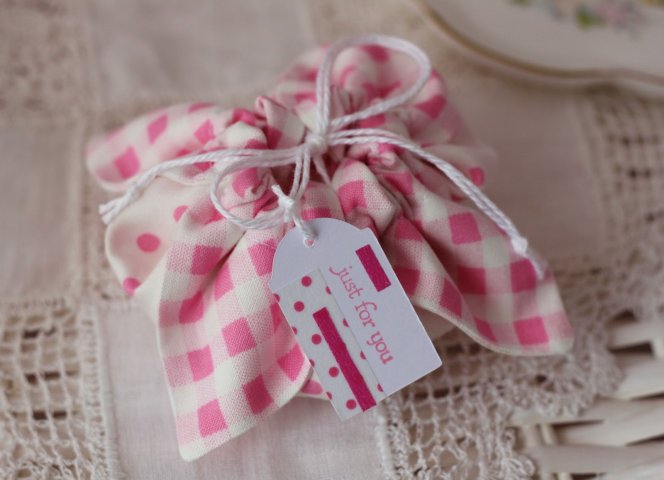
Make reusable gift pouches using fabrics that can be recycled.
Things Needed:
- The fabric of your choice
- Scissors
- Crochet cotton
- Scale
Procedure:
- Step – 1: Cut the fabric into a square and measure 1/2 inch on all sides of the seams.
- Step – 2: Allow a 3-inch gap of the sides and clip the corners and stitch them.
- Step – 3: Fold the four corners inside and stitch the corners.
- Step – 4: Cut the crochet cotton in half and thread twine through the stitched seams and tie them together.
- Step – 5: Pull the twine and gather them together to form a pouch and tie off the ends to form a pouch.
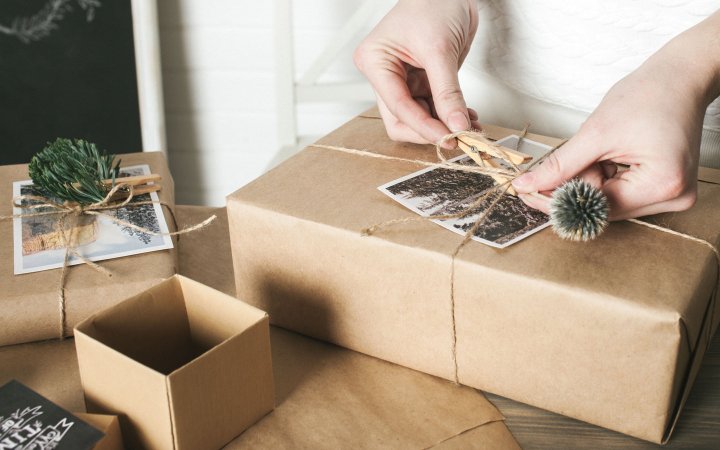
4. Photo Gift Wrap
Impress your friends and loved ones with fond memories that can be cherished. Rather than throwing away the gift wrapper, they will cherish it for a long time.
Things Needed:
- Photo paper
- Scissors
- Tape
- Ribbons
Procedure:
- Step – 1: Choose a photo that will impress your loved one or you can make a collage of various pictures.
- Step – 2: Print out the pics on photo paper and set the size based on the size of the gift.
- Step – 3: Use the photo printed paper to wrap the gift.
- Step – 4: Make sure the face of the picture is on the top while it is wrapped.
- Step – 5: Once the gift is wrapped, you can add a tag to give a personal message.
Related articles

5. Interactive Gift Wrap
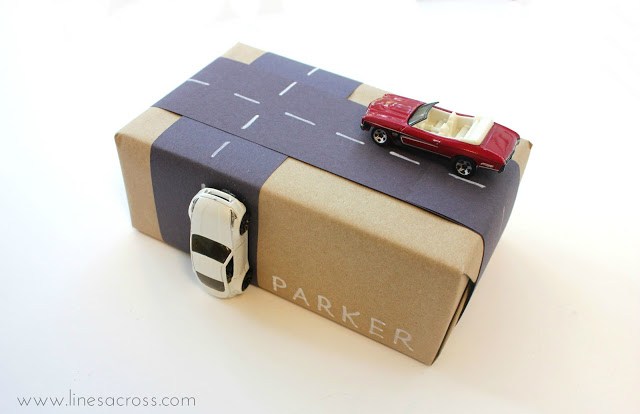
Adults can be impressed easily with attractive gifts but it is hard to impress children. Impress your kids by choosing an interactive gift wrap.
Things Needed:
- Chart paper or Kraft paper
- Car toys
- Colour pencils
- Paint
- Scissors
- Sticky tape
- Glue
Procedure:
- Step – 1: Take a Kraft paper and draw a road or a traffic signal.
- Step – 2: Paint the road and signals using coloured pens or paint. Allow them to dry.
- Step – 3: Wrap the paper on the gift wrap to model an empty road.
- Step – 4: Stick signals and numerous toy cars on the road with the help of glue or sticky tape.
- Step – 5: This enables the children to play with the wrapper even after it has been unwrapped.
This will surely impress any kid and they will love your gift wrapper more than the gift itself.
-
What If You Can Make an Exclusive Designer Dress by Re-Using Your Old Saree(2020)? Create Magic by Transforming Sarees into Lehenga Using Our Craft Ideas and Be Proud of Yourself!
-
 Top Diwali Gifts for 2020 to Give to Family, Friends and Associates
-
 Do Away with Routine Anniversary Celebrations! 10 Gifts for Husband for Anniversary to Make Him Go Weak in the Knees and Ideas to Keep the Romance Alive (2019)
-
 Wedding Gifts for Couples in India: 11 Traditional, Modern and Creative Gifts to Fit Every Kind of Budget (2019)
-
 Go the Extra Mile this Mother's Day: Thoughtful Gift Ideas for Mother's Day in 2019
Wrap Your Gift with Love and Care
When you spend a little time and effort in wrapping your gift beautifully, it conveys a lot about the warmth, love and caring you feel for the recipient, and this feeling is cherished by him for a long long time. We hope this BP Guide would have helped you realize how easy it is for you to wrap your gifts exquisitely even if you don't have gift wrapping paper. Stay connected with us for more such engaging content.
 Highlight the Best Facets of Your Incomparable Beauty: Discover the Best Face Highlighter Currently Available in India and Everything You Need to Know About Using Face Highlighters for Maximum Effect (2023)
 Forget the Blemishes and Get that Picture Perfect Flawless Radiance on Your Face: Check out the Best Foundations for Oily Skin Currently Available in India and Everything You Need to Know About Makeup Foundations (2023)
 Make Your Presence Felt Wherever You Go: Discover the Best Perfumes Under 2000 for Both Men and Women to Announce Your Arrival and Make Any Occasion Memorable (2023)
 Protect Your Oily Skin from the Harmful Rays of the Sun: Discover the Best Gel Based Sunscreens for Oily Skin and Everything You Need to Know Before Buying One (2023)
 Minor Blemishes and Wrinkles Affecting Your Confidence? Check out the Best BB Creams to Conceal Your Worries and Nourish Your Skin to Restore the Healthy, Radiant and Glowing Complexion Back Again (2023)