-
 10 Best Gifts for Boyfriend and a Complete Guide for Selecting Gifts That Will Not Only Surprise and Impress, but Knock His Socks Off! (2019)
-
 What If You Can Make an Exclusive Designer Dress by Re-Using Your Old Saree(2020)? Create Magic by Transforming Sarees into Lehenga Using Our Craft Ideas and Be Proud of Yourself!
-
 Make His Birthday a Day to Remember! 10 Excititng Gifts for Your Husband on His Birthday and 3 Ways to Make This Day Memorable (2019)
The Art of Gift Wrapping
Gifts are something that is a constant in our lives, and so is gift wrapping. Gift wrapping is an art and a tradition carried out cheerfully for many centuries until now. Since there are tons of reasons and seasons to gift, gift wrapping is frequent. Every other day or every other month, there is someone on the gift list. A beautifully wrapped gift is the most interesting to unwrap. You don't want to gift someone without brewing up some anticipation, do you? That's exactly where gift wrapping comes to play.
Gift Wrapping an Odd-shaped Gift
It's quite easy to get your hands on gifts that have nice edges and rigid cuboid shapes. For instance, if you are going to gift a book, a makeup palette, or if you are lucky enough, your gift comes with a box, then gift wrapping doesn't sound like rocket science. No wonder why many are professionals in playing with trendy gift wrappers to fashioning the good old bows.
But when it comes to some odd-shaped or not so conveniently big gifts, wrapping them fashionably becomes a tedious job. It gets challenging and confusing at times, no matter how skilful you are. But don't worry, with a few innovative ideas and tricks, you can master the art of wrapping awkward but not-awkward presents in no time.
Ten Easy Ways to Wrap Oddly Shaped Gifts
The next time you are at a gift shop contemplating whether or not to go for that particular gift, wrapping shouldn't be a problem. Here are ten easy, innovative ideas for you to wrap your odd-shaped gifts.
Gift Bags

Gift bags are every gift-givers' best friend. They are unique and convenient. Big or small, regular or irregular shape, anything fits perfectly inside a beautifully crafted gift bag. They come with different themes and patterns. Being an all-year-round favourite, they never run out of stock. Go get yourself a stunning gift bag from the gift stationery or get it online. But if you find them expensive and not going to spend any extra money, then it's time to switch on to your crafty side. This DIY gift bag is easy to get your hands on.
Things You Will Need
- Wrapping paper
- Tape
- Scissors
- Cardboard
- Ribbon
- Measuring tape
- Hole Puncher
- Glue
Steps To Make a Gift Bag
- Take your favourite wrapping paper, unroll it and place it on a flat surface, more likely on a table.
- It's crucial to measure your gift's height, width, or circumference just to get the idea of how much paper is needed. Or you could simply make a bag of any size that fits your gift.
- Leave at least an extra 1 or 2 inches on all sides, including the top and bottom, leaving enough space to make a bag and then cut the paper.
- Now pull both the sides of the paper inward towards the middle, making sure that extra inches overlap, and tape them in the middle.
- Now that the bag's body is ready, you need to seal the bottom. For that, you will have to make a fold of the bottom half towards the centre and unfold it.
- It's time to create a diamond in the bottom half. For more convenience, bring the other side over the taped side. Now place your finger on the seam from the inside (inside the paper) and gently pull the upper portion back towards the centre to create a diamond.
- For creasing the bottom folds, press the diamond flat nicely and gently.
- Now, keep your finger at the bottom point of the diamond and slowly bring the other point(top point of the diamond) inward towards the centre of the diamond.
- Take off your finger and similarly, bring the bottom point inward towards the centre and make sure that both the points touch or slightly overlap each other. Now crease the folds and tape the points together. Your gift bag is almost ready.
- For a neat finish, make the bag stand upright and try folding all the sides along the crease and then release. You may skip this step if your wrapping paper is on the thinner side.
- If you want your gift bag to be a bit sturdy, you may place a piece of cardboard in the bottom and glue it. For this, you will have to measure the bottom width of the bag and cut the cardboard accordingly. You may glue it either on the inside or outside the bottom.
- Now place your gift inside the bag.
- Finally, punch holes and tie a ribbon on both sides to make a handle. Your gift bag is ready!
Tips
- Use a double-sided sticky tape for convenience.
- Use a premium or sturdy wrapping paper.
- For bigger gifts use a cardstock paper.
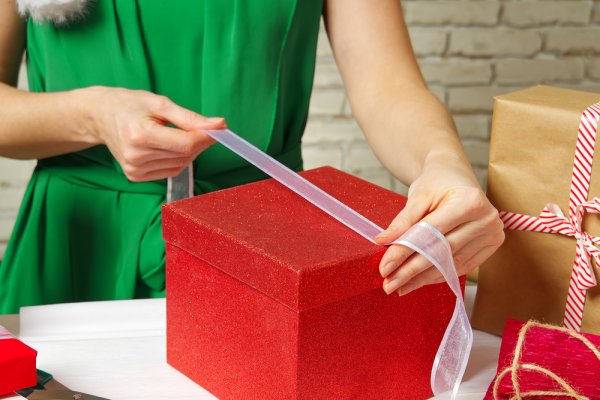
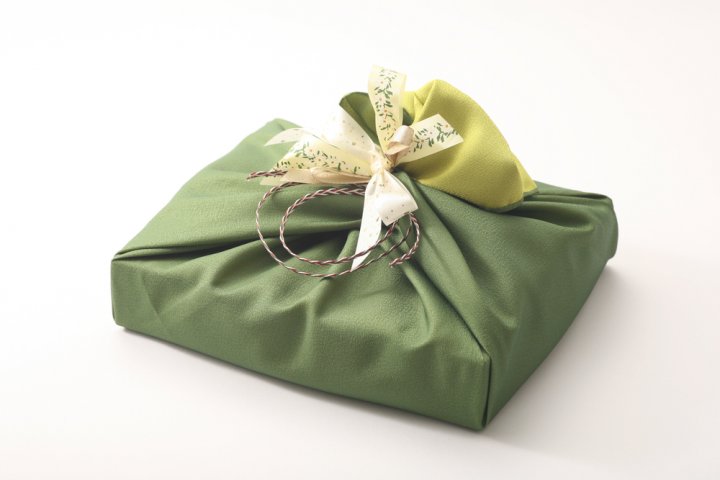
Gift Box
No clue of how to wrap assorted skincare products or chocolates or just some random picks of your choice? All you need is a happy gift box. It is the ultimate choice for all those weird shaped presents. This Valentine's day, it's not just flowers and cakes; surprise your girl with a gift box. Grab a gift box from stationery stores or online. If not, make one for yourself.
Things You Will Need
- Printable gift box template
- Scrapbook Paper or Cardstock paper
- Scissors
- Glue or tape
- Ribbon
Steps To Make a Gift Box
- Print your favourite template.
- Score along the dashed lines to make fold easier.
- Fold and assemble the box and tape at the necessary points.
- Add a personal touch by adding a tag or ribbon. Your gift box is ready!
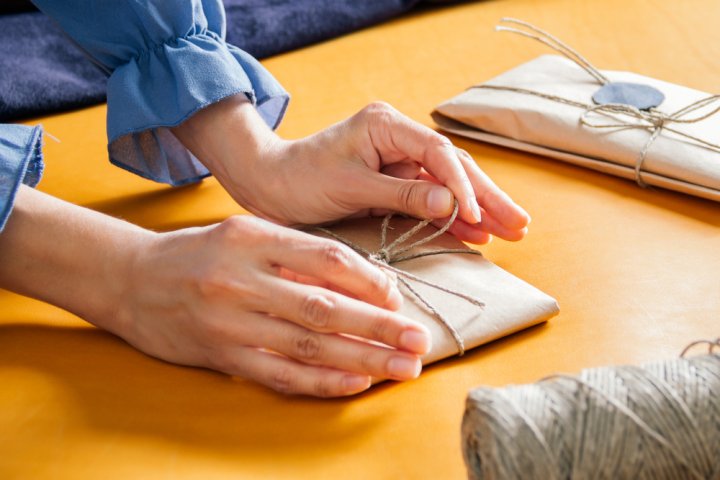
Solid Base Bundle

Scratching your head to wrap your mom's favourite mug that you bought from the mall? Don't worry; all you have to do is make a solid base bundle. Gift anything from teapots to a small flower vase or anything your heart desires. Making a bundle is way too easier than you think. This DIY solid base bundle is adorable and a must to try.
Things You Will Need
- Cardboard
- Tissue papers
- Museum Wax
- Ribbon
- Scissors
Steps To Make a Solid Base Bundle
- Place your gift on a piece of cardboard and draw a circle leaving a few inches along the circumference of the base. The base must be a little bit wider than the gift for a neat wrapping.
- Now, cut the circle and place your gift in the centre.
- Secure the gift in the middle of the circle with museum wax. Make sure it doesn't tumble down.
- Now, place the base to the centre of the staggered tissue papers. Use tissue papers of the required size.
- Slowly pull the edges of the tissue papers on the top and fasten them together with a ribbon or fancy twine. Your gift is ready to be dispatched!
Tips
- You can also glue the circle's base to the first tissue paper for more balance.
- Try the same with good quality gift wrappers.
Gift Pouch
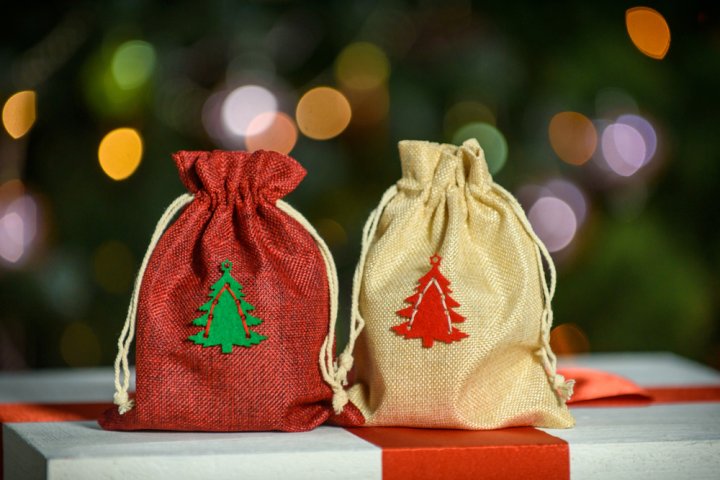
Looking for something that's both attractive and petite to wrap a sugar candy? Or rather a headphone? Or maybe a Necklace? Or anything small? Gift pouches are just the thing. They are the miniature version of gift bags. They are delicate but can easily conceal delicate gifts. And the best part is they can be made in no time.
Things You Will Need
- Wrapping paper
- Tape
- Scissors
- Hole puncher
- Ribbon
Steps To Make a Gift Pouch
- Cut the wrapping paper a few inches wider and taller than the gift, considering all the sides.
- Now, bring both sides towards the middle and tape them at the point where they overlap for half an inch.
- Fold the bottom twice for about an inch and tape them. By folding twice, the cut edge gets covered and looks neat.
- Place your gift inside the pouch.
- Finally, punch holes and get creative with your ribbon. Your cute Gift pouch is ready!
Tips
- Use a good quality wrapping paper.
Envelope Wraps
A thoughtful gift need not always have to be big; it can be small and have weird shapes. You may want to gift a pair of socks, embroidered handkerchiefs, or knitted gloves but stumbling on presentation? Envelope wraps are at your service. They are extremely easy to make. This DIY envelope wrap is a cute way of wrapping your odd-shaped softies.
Things You Will Need
- Wallpaper
- Scissors
- Double-sided tape
- Ribbon or tag
Steps To Make an Envelope Wrap
- Cut the paper according to the size of your gift.
- Keeping the plain side up, make a small fold in both the sides for about ½ an inch.
- Bring in the top two corners towards the centre so that they meet but don't overlap. This forms the envelope flap.
- Fold the bottom edge inwards. This forms the pouch.
- Now unfold the bottom edge and the envelope flap, leaving only the inner folds.
- Add double-sided tape along the inner folds of the two sides.
- Secure the envelope by folding in the bottom edge and the two top corners.
- Keep your gift inside.
- Finally, tape along the seam of the two corners and stick them down, sealing the envelope.
- Add a tag or a ribbon.
Tips
- Use only double-sided tape.
Crepe Paper Wraps
Crepe papers for gift wrapping? Sounds weird? But yes. It's time to show your creativity with these lenient and vibrant coloured party darlings. It's fun to wrap and cover something from head to toe. You can wiggle and jiggle from wrapping a guitar to a cricket bat, or an antique and what not? It's a lot of wrapping. But the fun part is you can wobble up from top to bottom or finish the middle, and accentuate a classy look or a funny look, more like a candy or a poufy top? The pleasure is yours.
Things You Will Need
- Ribbon crepe paper
- Scissors
- Tape or glue
- Ribbon or fancy twine
Steps To Wrap With Crepe Paper
- Wrap your gift with a crepe paper streamer and secure with tape at the beginning and endpoint.
- Embellish with a ribbon or a fancy twine.
Tips
- Go for additional layers for sturdiness.
- Try using different colours.
Light Up
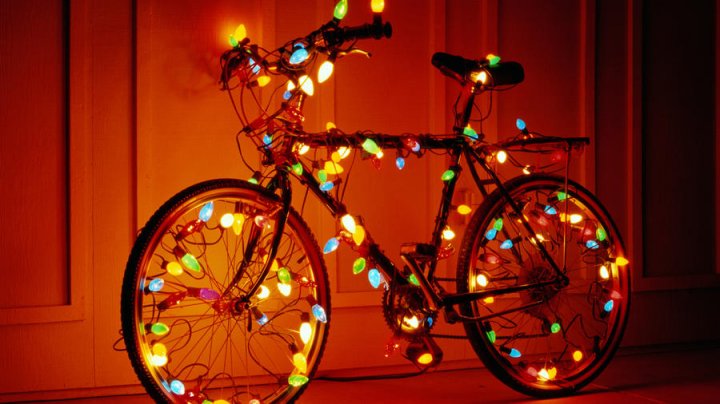
Gifting your grandpa his long-awaited rocking chair, and you are puzzled how to present it? Just adorn with lights! Gifting big is purely satisfying. A cycle, or an end table, a cradle, or maybe a toyhouse, for all these big and bizarrely shaped gifts, finding something to wrap is frustrating. But if you choose to present them in a way that you could cherish for a lifetime, string lights are your pal in the nick of time.
Things You Will Need
- Battery-powered LED light
- Zip tie or ribbon
Steps To Light Up
- Check the lights for any damage.
- Fashion the string lights around the gift the way you want.
- Make sure to secure the cords with a zip tie or a ribbon.
Tips
- For safety, try to use UL approved string lights.
- Wait until it’s dark for the eye-grabbing effect.
Drape It

Scrabbling your mind to wrap a gigantic and extravagant gift? Why wrap while you can drape it! It's an interesting way to add up the curiosity of your loved one.
Things You Will Need
- Shiny cloth
- Ribbon
- Tape
Steps To Drape
- Cover the gift with a piece of cloth. Make sure that the gift is fully covered to the floor.
- Decorate with ribbons or simply tape a bow.
Tips
- Use shiny cloth such as silk or satin. Duchess satin suits well.
- Avoid wrinkles.
Candy Wraps
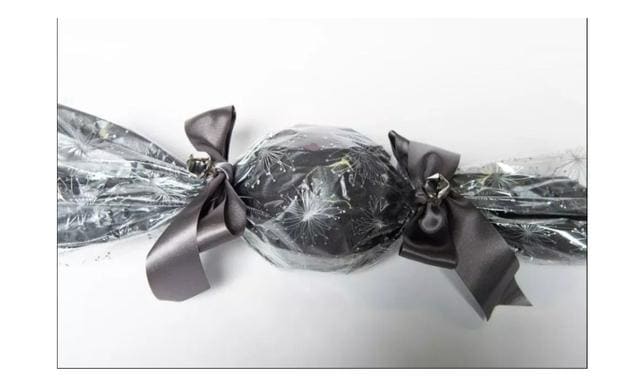
Round is a ball, and so is your son's first professional cricket ball. Make it a double sweet treat by wrapping it in candy wraps. From homemade bathing bars to trendy paperweights, anything that's round or spherical can turn into candy. Try these amazing DIY candy wraps and surprise your dear ones.
Things You Will Need
- Tissue paper
- Cellophane
- Tape
- Ribbon
Steps To Make Candy Wraps
- Place your gift on the edge of a tissue paper and start rolling it along with the paper. Make sure that the paper fully wraps your gift. If not, try adding a few more tissue papers.
- Secure the point where the paper overlaps.
- Repeat the same process with cellophane paper and tape it.
- Twist the extra peeking wrapper at both sides and secure with a ribbon or twine. It's candy time!
Tips
- Use a glittery cellophane paper for a more candy look.
Yarn Ball Wraps
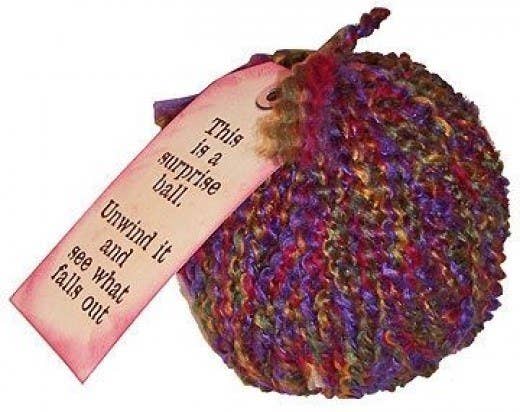
If you are crafty and have lots of time to indulge in the guilty pleasure of creating something that's going to be ripped off, then yarn ball wraps are just for you. Tiny artefacts or anything odd-shaped that holds in your palm can be made into a ball if you have the patience.
Things You Will Need
- Cotton thread skeins or yarn
- Glue
- Tape
- Scissors
- Tissue paper
- Ribbon or tag
Steps To Make Yarn Ball Wraps
- Star wrapping your gift from the middle with a nice yarn and keep wrapping all the way up and down until it fully conceals your gift.
- Use tissue papers to wrap for a more ball-like appearance. You can even use pieces of cardboard, buttons, ribbon, or anything that works for you to make it round.
- Tape or glue them if necessary.
- Again, start wrapping with yarn until it becomes a big ball of yarn and glue it.
- Finally, add a tag or a ribbon.
Tips
- Add layers of different coloured yarns for a sigh-free unspooling.
-
 Great Birthday Gifts for Him are Hard to Come By! Use Our Ideas to Find the Perfect Gift Each Time & 10 Super Gifts for Boyfriend on Birthday (2019)
-
 Top Diwali Gifts for 2020 to Give to Family, Friends and Associates
-
 Do Away with Routine Anniversary Celebrations! 10 Gifts for Husband for Anniversary to Make Him Go Weak in the Knees and Ideas to Keep the Romance Alive (2019)
-
 Wedding Gifts for Couples in India: 11 Traditional, Modern and Creative Gifts to Fit Every Kind of Budget (2019)
-
 Go the Extra Mile this Mother's Day: Thoughtful Gift Ideas for Mother's Day in 2019
People Do Care about a Nicely-wrapped Gift!
As the saying goes, "The first impression is the last.", it holds for gift wraps as well! Although what truly matters is the gift you're going to present; but, a nicely wrapped gift takes the experience on a wholly different level. You should make sure the receiver won't be able to guess what you have got them - we bet you yourself must have felt that minute-long anticipation as to what's going to be inside that gifting wrap!
 Highlight the Best Facets of Your Incomparable Beauty: Discover the Best Face Highlighter Currently Available in India and Everything You Need to Know About Using Face Highlighters for Maximum Effect (2023)
 Forget the Blemishes and Get that Picture Perfect Flawless Radiance on Your Face: Check out the Best Foundations for Oily Skin Currently Available in India and Everything You Need to Know About Makeup Foundations (2023)
 Make Your Presence Felt Wherever You Go: Discover the Best Perfumes Under 2000 for Both Men and Women to Announce Your Arrival and Make Any Occasion Memorable (2023)
 Protect Your Oily Skin from the Harmful Rays of the Sun: Discover the Best Gel Based Sunscreens for Oily Skin and Everything You Need to Know Before Buying One (2023)
 Minor Blemishes and Wrinkles Affecting Your Confidence? Check out the Best BB Creams to Conceal Your Worries and Nourish Your Skin to Restore the Healthy, Radiant and Glowing Complexion Back Again (2023)