
-
 Need an Intimate Gift for Hubby Dear? Nothing Beats Homemade Gifts: 5 Great Ideas for Romantic Handmade Gifts for Husband
-
 Knock His Socks Off on His Birthday with Handmade Gifts for Husband: 10 Gifts to Make Him Feel Like the Luckiest Man (2018)
-
 10 Special Gifts for Boyfriend's Birthday and Awesome Ideas to Celebrate His Big Day
The Attraction of a Handmade Gift

Birthdays of our loved ones are ideal occasions to celebrate the person and make them feel loved. Our gifts on their special day are a tangible expression of our affection and so it’s no wonder we put in so much effort to find the perfect one.
A lovingly handcrafted gift made just for your husband is simply incomparable. A handmade gift is truly one-of-a –kind - you make it pouring in time and effort and create it keeping in mind your husband’s likes and preferences.
Related articles

Get Your Handmade Gift Right for Your Husband with These 4 Tips
If you are considering giving a handcrafted gift for your husband this year, then we have a few tips to help you figure out the best DIY gift to give your husband. Making a well-crafted gift can be a tough ask especially for an inexperienced crafter so prepare yourself with sufficient research and planning.
Do a Recon Before Deciding
Gifts that fill a need are always appreciated. Take a look at your husband's belongings, consider his daily routine and his lifestyle – you might hit upon something you can make to improve it. It could be something related to his hobby, or something that helps him organize his stuff better. Also try not to repeat yourself in your gifting choices – If you have given him a grooming kit last year, making him handmade shaving cream this year may seem like a boring choice.
Related articles

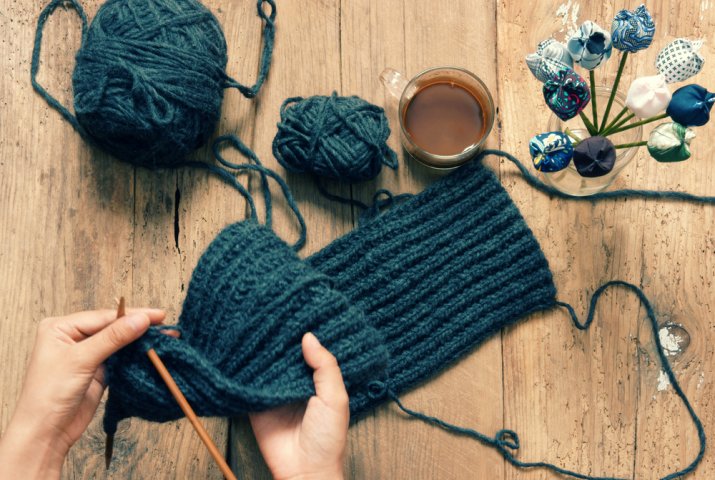
Use Your Natural Skills
Even if we are not expert crafters, many of us do have some kind of a natural talent. Some of us may be better in the kitchen while others may be handy with the needle. Someone else may be good in gardening. By choosing to make something that aligns with our existing skills and interest we can ensure that the gift turns out to be the best possible one.
Consider Your Husband's Personality

There is an incredible range of DIY ideas and tutorials available on sites like Pinterest or YouTube. The choice is really endless - romantic gifts, practical accessories, knickknacks – there is so much to look over. To pick out the right idea, think of your husband’s personality and preferences – is he someone who will like a sentimental gift or will he just keep it aside and forget it? Your gift must make your husband happy and feel cherished, so choose your gifting idea with care.
Related articles

Check Costs Involved

In many cases, handmade gifts cost much less than store-bought ones. But sometimes DIY projects end up needing a whole lot of specialised tools and essential supplies. So if budgets are a concern, then choose a gift keeping in mind the costs involved. If you can’t find any unique DIY idea that also fits into your budget, you can opt for a store-bought gift.
7 Handmade Gift Ideas that Will Bring a Smile to Your Husband's Face on His Birthday
DIY Surprise Exploding Box
An Exploding Box is a wonderfully romantic gift filled with precious memories and messages that your husband will love to see gathered in one place.
It's important you use the right paper for the project to get the desired result. Use coloured cardstock paper, like this Abaj A4 Size Glitter Paper for Art and Craft, 250 GSM Paperboard. You can buy a pack of 10 sheets for Rs.246 on Amazon.
DIY Exploding Box
What You Need- Sheets of thick paper
- Photos
- Decorative paper, ribbon, charms etc
- Ruler and scissors
- Glue
- Marker
How to make it:
- Take one sheet of paper and cut it out so that it measures 12 inches x 12 inches
- Next divide the sheet into 3 parts with the middle portion being a little more than the other 2 - do this lengthwise and breadthwise, using a ruler to mark the points
- Draw a line through the points so that your sheet has 3 parts and score it with your scissors end to make an indent
- Now fold the paper along the lines so you get a sheet with a 9-square grid.
- Score a line diagonally in the 4 four corner boxes to make an indent and fold it up to get a box (see video).
- We will now cut out the four edges so it gets a heart shape. Draw the top part of a heart on the corner edge of the paper, and cut it out. Do the same for the 3 others
- When you fold it up, you will see that the box now has heart-shaped corners.
- Now take another paper measuring 12 inches x 12 inches to make the box cover. Repeat the same process to get the 9-squared grid. Make sure to use the same dimensions
- In the four corners, draw out a little flap on the left edge of the grid. Cut out the rest of the paper, so you will be left with the little flap. Do the same for the other four corners.
- Fold it up to make a box and glue each little flap to the adjoining paper to create the box
- Fit the cover to the box and viola, your explosion box is ready! However we still need to decorate the box.
- To show off your decorations, we will create a cute contrasting base. Take another sheet of coloured paper and cut it to into 2 strips of paper slightly narrower and shorter that the box base
- Fold one of the strips gently to make three parts, and glue the middle portion onto the base of the box. Affix the other strip on the opposing side.
- On these 2 strips you can add pictures, messages and any other items that your husband might like. Don’t’ forget to decorate the top of the box cover with ribbons and beads to give it a cute look.
Related articles

Tiny Polaroid Magnets
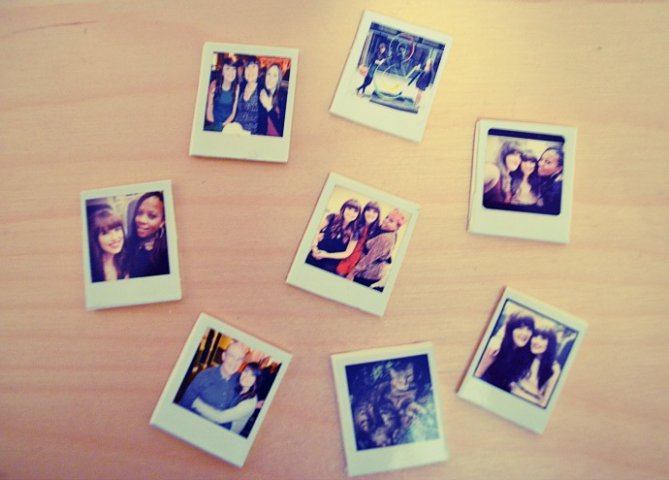
Showcase a few of the favourite photos of your family via these cute magnets that are designed to look like Polaroid photos of yore. You can get a Polaroid frame template on decoratorsnotebook.co.uk.
- Thick white cardstock
- Craft cutter knife
- Magnetic tape (available in craft stores like Itsy Bitsy)
- Craft glue
- Paper glaze (find it on craftgully.com, called The Perfect Glaze)
- A Polaroid frame template.
- Photo paper (optional)
Instructions
- Take the digital copies of your photos and add them to an photo editing software like Pixlr or Photoshop. Resize images to get the size you want
- Layer the Polaroid template onto the photo and edit such that you can see the portion of the photo you want through the template.
- Once you have the final version of the photos you can print them out yourself on photo paper or get them printed professionally.
- Cut out the photos neatly. Also cut the cardstock to corresponding sizes. Glue them and let dry
- Apply paper glaze carefully to each photo so that it gets a glossy finish. Let dry
- Now glue the magnetic tape to back of the images. Let dry.
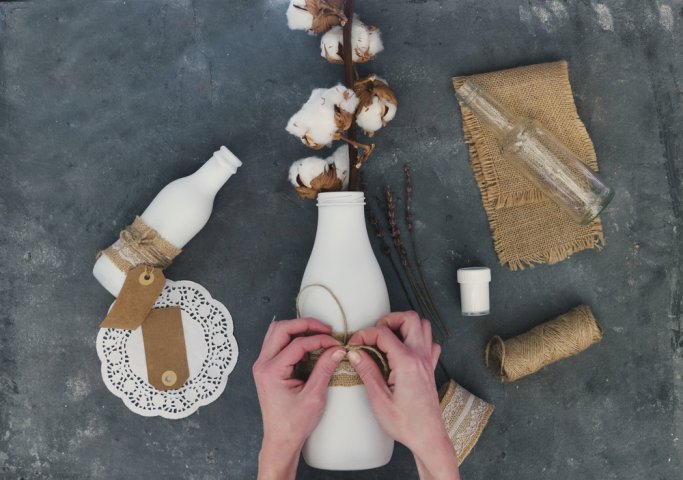
Personalised Cubicle Snack Jars
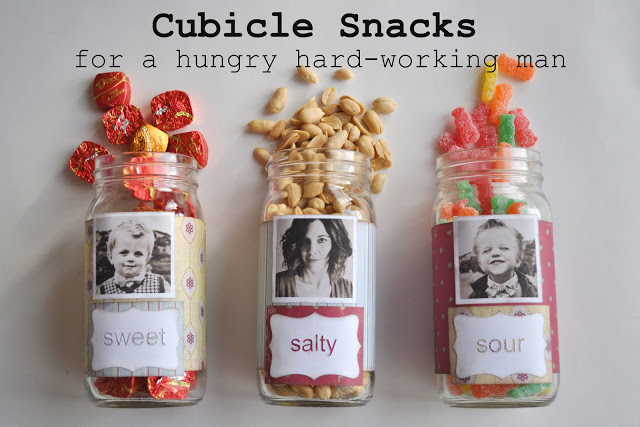
This is an adorable yet practical gift idea for your hubby - snack boxes that will remind him of his beloved family at work.
- 3 medium sized glass bottles (make sure all 3 look the same)
- 3 favourite photos of your family
- Photo paper(optional)
- 1 bottle of paint in your preferred colour & brushes
- Coloured or patterned paper
- Cute labels (or make your own!)
Instructions
- Clean out any glass jars lying in your kitchen and let dry. Or buy a set.
- Load the chosen photographs into a photo editing software and resize them such that the will fit on the front of the jars easily (suggested size: 2″ by 2″).
- Print out the photographs on photo paper. Or you can get it printed at a local printing store Cut out three approx.4″ strips of the patterned paper and glue each onto the 3 jars. Let it dry
- Paint the lids of the jars with the chosen colour and let it dry
- After the paper has dried, paste the photo on the top portion of the strip
- Create a label of the same size as the paper using free templates online and print them. Add the name of the snack or any cute message
- Glue the labels onto the bottom part of the patterned strip, let it dry. Seal with Mod Podge glue if needed.
- Fill the bottles up with snacks your husband likes.

Metal Stamped Keychain Set

Another practical gift that he can use in daily life is a keychain with a personal message. You can buy a steel alphabet punch set for Rs.680 and a number punch set for Rs.300 on Amazon.
- Blank metal tags ( find it in craft stores like thecraftshop.in)
- Metal stamps set - alphabets
- Large Hammer
- A keyring
- Black marker
Instructions
- Finalise the message you want to stamp on the tag
- Visualise the message positioning on the disc - be careful of the spacing so it will look neat.
- Use the hammer and the stamps to create the message on the metal tag.
- Run the marker over the message a few times to ensure the alphabets stand out. Wipe out excess and let dry
- Add the keyring and the keys to finish
Washi Tape DIY Herringbone Phone Case
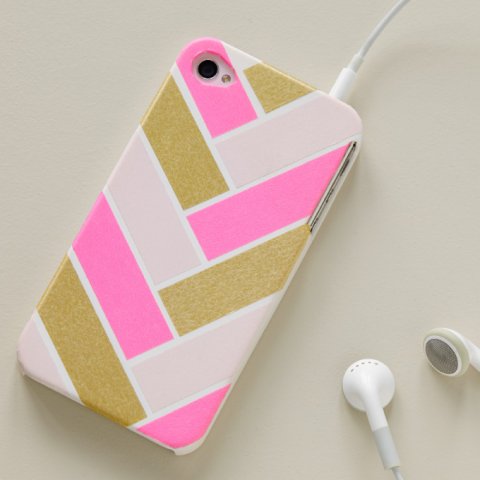
Using Washi Tape for decorating a phone case is an easy way to personalise it. The best part of using these tapes is that they can be easily replaced, so you can create a new design whenever you feel like it.
- Washi tapes in 3 different colours/designs, as per your choice
- Any plain cell phone cover for your husband's phone. You can also use a clear case
- Pencil
- Scissors and knife
Instructions
- Take the first colour tape and start by paste it at an angle across one side edge of the cover, near the camera. Cut out fold it under the phone
- Now take the second colour tape and paste it from the top of the cover such that its open edge aligns with the side edge of the first tape. Cut tape and fold it under the cover edge.
- Take the third tape and paste it from the top such that its end aligns with the bottom edge of the first tape.
- Continue this alternating pattern across the whole cover, so that it forms a herringbone pattern.
- Feel around the cover to find the camera hole. Use the craft knife to cut out the necessary tape and fold cut edges neatly.
- Use a ModPodge Glue over the tape to seal if you want.
Related articles

DIY Instagram Canvas Prints
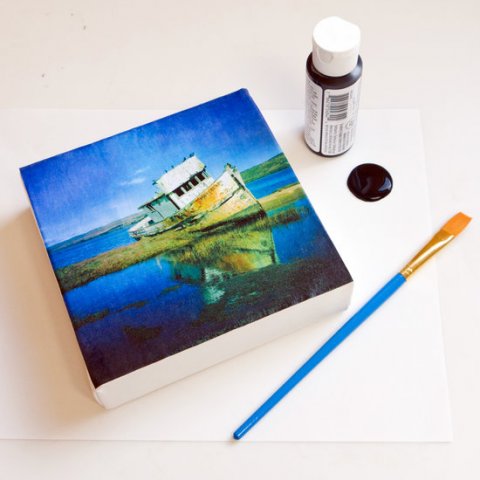
If your husband is a keen photographer, then you can make a canvas print of one of his Instagram photos pretty easily. He can put the print up in his man cave or in his office. You can buy Roger & Moris Artist Canvas, stretched and measuring 14" x 18" for Rs.400 from Amazon.
- Square stretched canvas board
- Sandpaper
- Mod Podge glue
- Brush
- Acrylic paint, in a colour of your choice
- A square-shaped picture
- Paper cutter or scissors
Instructions
- Select a picture that you'd like for creating the print, and load it up into a photo editing software
- Resize the image to the size you want, we are going with 6 by 6 inches. You can print it yourself on photo paper or get it done professionally
- Place it on top of the canvas board and trim it with the scissors to fit it as precisely as possible
- Run the sandpaper over the front portion of the canvas to make it a little rough - this will help to adhere the photo securely
- Apply Mod Podge and smooth over the photo on top of the canvas board. Ensure there are no creases or bubbles.
- Let it dry for few hours.
- Paint the sides of the canvas board with your chosen colour to give a finished look
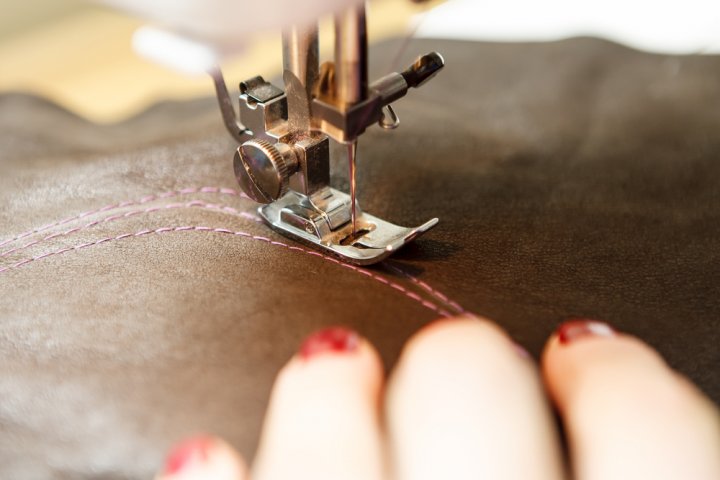
Handcrafted DIY Cord Holders
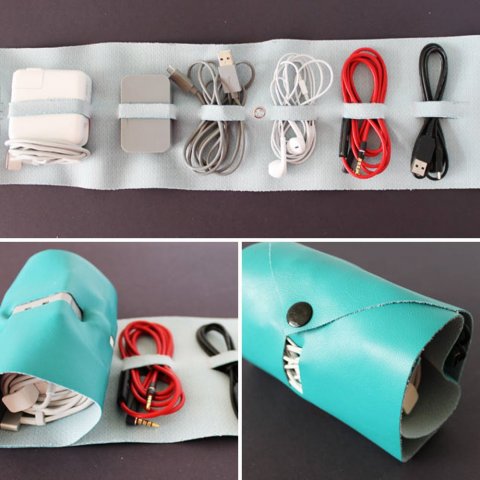
Another practical gift that will really help your husband if he travels a lot. This space saving cord holder which neatly rolls up can be used to hold 4 cords. No more tangled mess of cords! You can buy Cratly multipurpose, pure leather sheet in yellow color from Amazon for Rs.299. You will get 2 pieces of leather measuring 15 x 10 cm.
- 20 inches long faux leather or pure leather sheet
- Craft cutter knife
- Ruler
- A cutting board
- Pencil
- Press button fasteners
Instructions
- Measure out a piece of leather that is 12 inches long and 6 inches wide
- On one end draw 2 diagonal lines measuring 4.25 inches from the edge. Use the cutter to make a pointed flap
- Now it’s time to draw out loops for the cords. Draw evenly placed 3 lines, 3 inches long across the length of the leather
- Use the cutter to cut the leather to make a 1/2 inch long wide and 3 inch long loop. Repeat for the other two.
- Place the cords and roll the holder. Mark with a pencil where the pointed edge of the flap meets the roll.
- Push in the press button firmly on both sides, using a small hammer if necessary.
Related articles

Would a Handmade Gift Be the Right Choice this Birthday?
No doubt handmade gifts are a wonderful way to show your love on your husband's special day. But is it necessarily the right choice?
Do consider if your will husband appreciate a store bought gift more this time around – perhaps he would love to get his hands on the latest video game. Or maybe his mobile phone is on its last legs and a new phone would really make his life better? It would show thoughtfulness if you take a call after keeping in mind such factors. Of course you can always make a combo gift - buy him a great store bought gift and pair with a cute handmade gift!
Related articles

-
 Make His Birthday a Day to Remember! 10 Excititng Gifts for Your Husband on His Birthday and 3 Ways to Make This Day Memorable (2019)
-
 The 10 Best Gifts for Husband: Romantic Surprises and Gifts for Your Darling Hubby (2020)
-
 Stumped Trying to Find Your Husband a Present? Find Inspiration in These 10 Quirky and Pretty Cool Birthday Gift Ideas for Husbands (2020)
-
 Don't Gift Him a Shirt, Not Again! Check Out Our 12 Awesome Gifts for Husband on Birthday Instead (2019)
-
 आपके पति के जन्मदिन पर उसके लिए 10 अद्भुत उपहार जिन्हें पाकर वह बहुत खुश और अचंभित हो जाएंगे (2018)
Give him handmade gifts from time to time
Handmade gifts are like a breath of fresh air, their simplicity making them stand out amid a bunch of exciting new products. In a fast paced world these simple things are becoming exceedingly rare, and fewer people take the effort of making gifts any more. For all these reasons your husband will cherish the gesture even more.
 Highlight the Best Facets of Your Incomparable Beauty: Discover the Best Face Highlighter Currently Available in India and Everything You Need to Know About Using Face Highlighters for Maximum Effect (2023)
 Forget the Blemishes and Get that Picture Perfect Flawless Radiance on Your Face: Check out the Best Foundations for Oily Skin Currently Available in India and Everything You Need to Know About Makeup Foundations (2023)
 Make Your Presence Felt Wherever You Go: Discover the Best Perfumes Under 2000 for Both Men and Women to Announce Your Arrival and Make Any Occasion Memorable (2023)
 Protect Your Oily Skin from the Harmful Rays of the Sun: Discover the Best Gel Based Sunscreens for Oily Skin and Everything You Need to Know Before Buying One (2023)
 Minor Blemishes and Wrinkles Affecting Your Confidence? Check out the Best BB Creams to Conceal Your Worries and Nourish Your Skin to Restore the Healthy, Radiant and Glowing Complexion Back Again (2023)