-
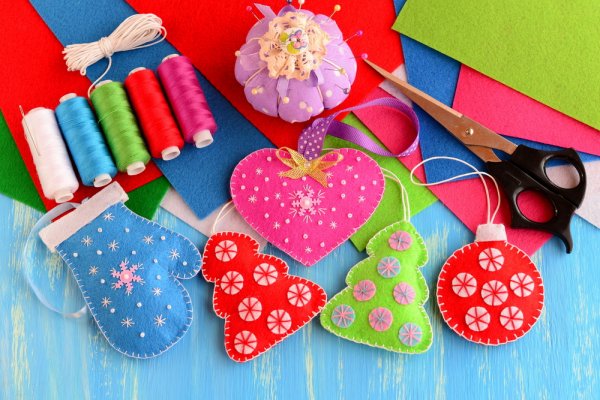
 Let the Magic of Handmade Gift Permeate Your Love! 10 Easy Handmade Gift for Boyfriend to Show Your Love and Care! (2019)
-
 9 Amazing Birthday Gifts for Boyfriend, All Handmade! Show Him How Much He Means to You with Homemade Gifts (2020)
-
 How to Impress Him with Handmade Gifts and 10 Super Simple DIY Gifts You Can Make for Your Boyfriend
Why Not Do It Yourself?
Beyond helping you save some extra money and the effort you put into making those special gifts for your loved ones, DIY projects offer you real, hands-on experience. DIY-ing is a terrific way to learn and gain new skills or knowledge. It uncovers your natural talents and helps you with do find your passions. Working with your hands is an easy, natural way to feel better — who doesn’t love that empowering feeling of creating something on your own?
Of course, not to forget. Giving out the gifts you made yourself sends a deeper message to the one you love than the everyday gifts you can pick from the shelves in a gift shop. Imagine the look on the face of your boyfriend when you give him gift items made by you, definitely priceless. The DIY gifts below are a good place to begin. So, why not get to it?
Tips To Make Your DIY Gift A Hit
Let The DIY Gifts Be Romantic
Let the gifts you make for your boyfriend be gifts that are sweet and romantic; something that reflects your love and affection for your boyfriend. Take a step further by hiding love letters inside the gifts you make. Leave prints of your kisses on some too; drive him crazy with these sweet little shows of love. He will appreciate the sweet sentiment.
Ensure They Are Long Lasting
Why not show someone how much you care for them by giving them a gift that will last or something for their future? The longer things last the more they are treasured. Make him gifts that will not fade or get worn out easily. A perfect men’s gift is one used for years, and, if you choose wisely, will be passed down for generations
Let It Carry Your Personal Touch
While we would love to give each one a thoughtful present they really need, our budgets sometimes do not let us go all the way to do what we really desire for them. Instead of buying just about anything that fits in your budget, why not give try a handmade gift? Gifts made by you carry your personal touch and are usually treasured by the recipient long after all those brightly-wrapped gifts from shops are forgotten.
Take Your Sweetheart by Surprise with These Beautiful Inspired Gifts
DIY Scratch-off Cards
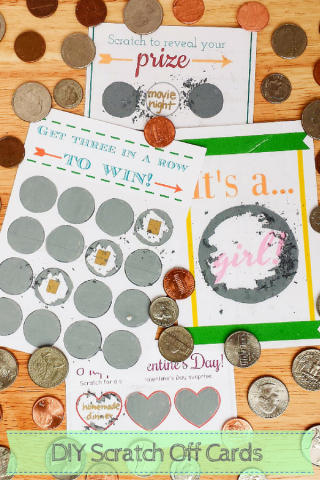
Scratch cards are small cards with concealed PINs, where one or more areas contain concealed information which can be revealed by scratching off the opaque covering. Gift your boyfriend the DIY scratch-off cards and enjoy the pleasure of watching him scratch the cards to reveal what is beneath.
How to Make Scratch Offs
Materials needed- Paint
- Pen
- Dish Soap
- Plastic cup
- Packing Tape
- Paintbrush
- Scissors
- Acrylic paint
- Heavy cardstock
How to Make Your Own Scratch Off Card
- Print your card design onto a heavy card stock, write the gift options into the circles or hearts and fill in the circle or heart with white crayon, colouring heavily over what you have written.
- Mix 2 two teaspoon of acrylic paint with 1 teaspoon of dish soap.
- Fill the circles or the hearts with the paint mixture using the paintbrush.
- The scratch-off cards will require 3 layers.
- Begin by covering the scratch-off areas with little paint so the first layer looks really thin.
- Let each coat of paint dry off before adding more layers.
- Once the last coat is placed on the card, wait for the paint to dry.
- Wrap the scratch off cards neatly and present to your boy friend.
- Visit Destination Decoration to get more details.
Travel Picture Frame of Your Travels Together
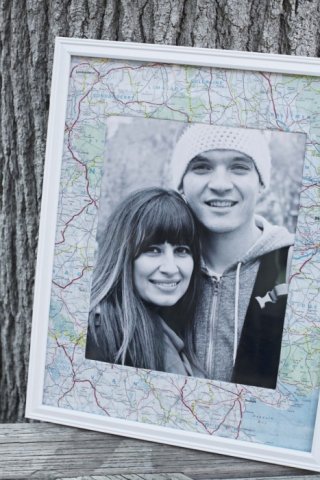
The things that bind us together are the little things in life, like the places we have visited, the songs we both love and the meals we have shared together. One of the ways to look back and relive sweet memories is the Travel Map. The Travel Map is the perfect way to document the places and countries you visited together.
How to Make Travel Picture Frame
Materials needed- 1 Empty frame
- A package of jute
- Pencil or permanent marker
- One package of miniature clothespins
- As many pictures as your little heart desires
- A package of screw-in O-hooks
- Scissors
- Ruler
- Pencil
- Jute
- Glue stick
How to Make DIY Travel Picture Frame
- Measure the inside dimension of your frame.
- If you want a horizontal frame, you have to measure dimensions within the shorter side and if you want a vertical frame measure dimension of the long side from within the frame.
- Decide how many rows of photos you want in your frame and mark the rows out.
- Also take into account the size of the pictures you will like to use.
- On the back of the frame, use a pencil or permanent marker to mark off where the wire or ribbon will be attached and screw the O-hooks into the inside of the frame ledge where you marked with the pencil.
- Once the O-hooks have been properly screwed in, tie the jute to the hook, secure it and trim off if the jute is too long.
- After your jute is secure, turn over your frame and begin to arrange your pictures.
- To find out more about the Photo Wall Display, visit The Dating Divas.
Heart Shaped Tea Bags
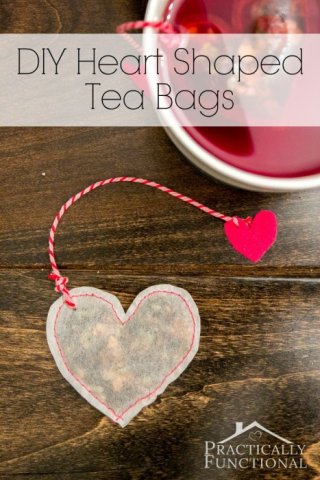
How to Make Your DIY Heart Shaped Tea Bags
Materials needed- Fillable tea bags (coffee filters will also work!)
- Pink or red thread
- Sewing machine
- One package of miniature clothespins
- Loose tea
- Pink or red baker’s twine, string, or yarn
- Pink or red felt
- Scissors
- Pencil
- Teaspoon
How to Make Your DIY Heart Shaped Tea Bags
- Draw a heart onto your tea bag, then proceed to sew around the heart, just inside the pencil line, leaving a small gap near the bottom.
- Next, cut out the sewn heart, making sure to cut out all pencil marks.
- If you do not want to use pencils, you can use a food safe marker and then you can sew right over the line.
- Use your teaspoon to fill the tea bag with loose tea and then sew the gap closed.
- Fix a long piece of baker’s twine to the tea bag.
- Then cut a small heart out of felt and attach it at the other end of the twine to make a tag for the tea bag.
- Your boyfriend will be totally pleased with to have a taste of this tea because it was specially made by you for him.
- To view the step by step pictures visit Practically Functional.
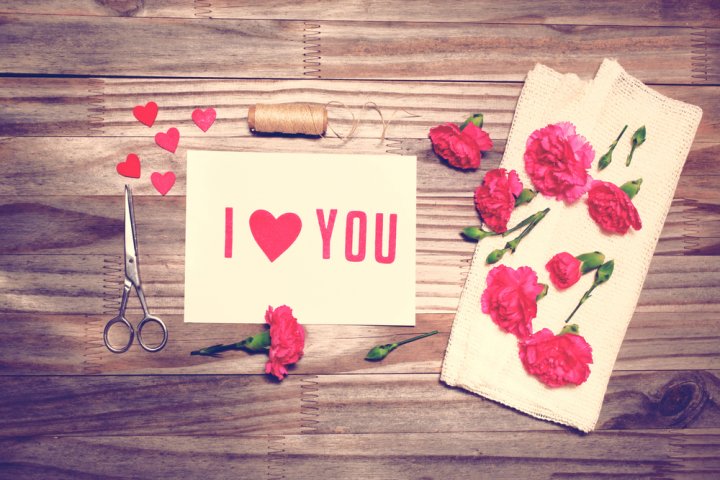
DIY Love letters
How to Make Your DIY Love letters
Materials needed- Canvas
- Letters
- Paint
- Glue
How to Make DIY Love letters
- Create a layout with the letters or words you would like to use for the Love Letters.
- Next step is to paint the letters to match the colour of the canvas you are using.
- Use the glue to stick the letters on and then let them dry.
- For more details visit this video on YouTube.
52 Things I Love About You: A Little Book
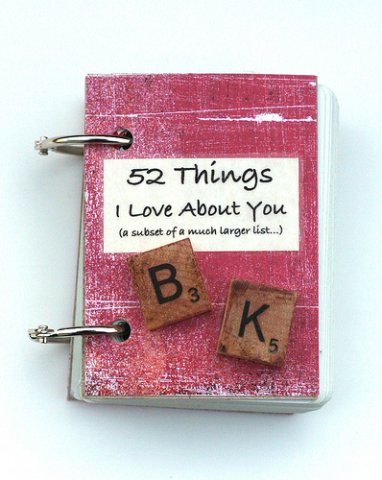
Use this special book to tell your boyfriend the many things you love about him. This will serve as a daily reminder to him. He can pick up the book whenever he feels like and smile through as he reads.
How to Make 52 Things I Love About You: A Little Book
Materials needed- Deck Of Cards
- Glue
- Pen
- Paper of choice
- Metal Opening O-Rings
- Scissors
- Hole Punch
How to Make 52 Things I Love About You: A Little Book
- Make a list of the things you want to include in the book.
- Punch holes into your cards and ensure they are lined up properly so the o-rings can fit in right.
- Cut out your pieces of paper and write down the items from your list onto your pieces of paper and glue them onto the cards.
- Write legibly so it can be seen. Next step is to put all of the cards on the metal o-rings.
- I love your voice, I love the way you look at me, I love the way you smile and I love your calmness.
- Visit Holidappy to discover more.
Here are some ideas of what can be written below:
DIY Light Bulb
How to Make DIY Light bulb
Materials needed- 6-volt battery
- Alligator clips
- 3 feet insulated copper wire
- Graphite pencil needle (0.5mm)
- Cello tape
- Pint glass canning jar with lid
- Thin iron wire
How to Make DIY Light bulb
- First, cut the copper wire into two
- At the base of the wires, take off one inch of insulation
- Next using a nail, drill two holes into the jar lid and through each hole which you drilled into the lid, gently thread the end of the wire
- At the end of the wires, make a hook such that the end with the hook will be inside the jar when the lid is placed on it
- Then twist two or three strands of the iron wire together and also twist the ends around the hooks in the copper wire
- The iron wire will act as your filament
- Once the filament and wires have been completely attached to the lid, go ahead and place the lid into the jar
- Next, position the 6-volt battery on your workstation and connect the free ends of the copper wire to the terminals with care
- After the connection is done the current would begin to flow, heating up the filament and the result will be a bright orange glow
- Discover more on on this video on YouTube.
Secret Love Notes Envelope Pillow Cover
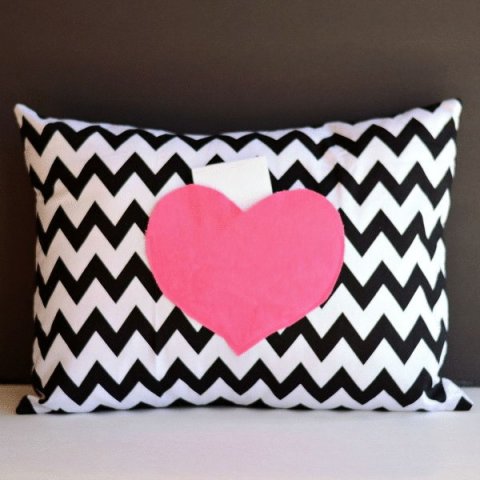
How to Make Secret Love Notes Envelope Pillow Cover
Materials Needed- Chevron material
- Pink Fleece
- Black material
- Scissors
- Sewing Machine
- Black Thread
- Pink Thread
How to Make Your Own Secret Love Notes Envelope Pillow Cover
- Begin by cutting the material. Here are some cutting dimensions you can use for this pillow. These dimensions will make it easy for the pillow to be done perfectly. Front Chevron Panel- cut material piece 16.25″x20.25″ Black Back Panel #1- 16.25″x11″ Black Back Panel #2- 16.25″x14″ Heart- Cut a heart that is in proportion to the pillow.
- Position the heart in the middle of the right side of the chevron material and pin it into place.
- Sew halfway up the sides of the heart, stopping at the arrows at the sides.
- Be sure to leave the top open so that the secret notes can be put inside it.
- For the Black Back Panel #1, press under 1/4″ on one of the short sides. Fold this edge up again another 1/4″ so that there is no longer a raw edge. Press and pin and sew this in place and keep it aside.
- For the Black Back Panel #2, press under 1/4″ on one of the short sides. Fold this edge up again 1″. Press and pin. Sew in place along pinned edge and also sew at the outer folded edge.
- Next, gently place the Chevron Panel on a flat surface, right side up. Pin the Black Back Panel #2 to the Chevron Panel, ensuring the right sides are together. Pin Black Back Panel #1 to Chevron Panel, right sides together. Both of the Black Back Panels will overlap!! Sew the panels together with a 1/2″ seam allowance then sew Pillow up. Next, clip the corners and threads, and turn the cover right sides out. Place it on the pillow and write your love a secret note.
- Get more details on Love This Pic.
DIY Date Idea Arrows
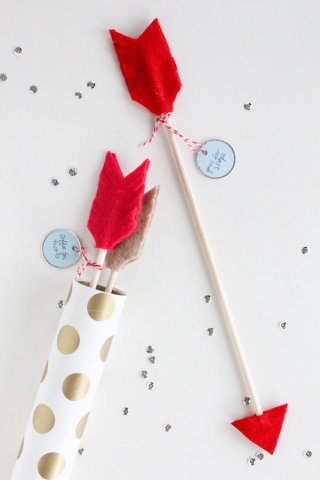
How to Make DIY DATE IDEA ARROWS
Materials needed- 1/4 inch dowel rods
- Felt sheets
- Tacky glue
- Scissors
- Mailing tube
- Wrapping paper (for wrapping around the tube, optional)
- Martha Stewart round hanging labels (from staples)
- Pen
- Start by cutting out two triangles from the colours you decide.
- Next, place one triangle on a flat surface and cover with tacky glue making sure to get the edges, then place a dowel rod just below halfway down the arrow.
- Cover a second triangle with glue and then place over top, lining up the edges with the first, and press them gently together.
- Once you notice the glue has dried, you can trim up the edges of the triangles with scissors to give a fine finishing.
- For the arrowheads, repeat the same steps above but use a rectangle shape this time for the ends of the arrows.
- Once they are glued in place on both sides cut a v-shape in the bottom edge of the felt and then cut sections along the edges of the rectangles to create a fringe. Your DIY Date Arrows are ready.
- Discover more at Sugar and Cloth.
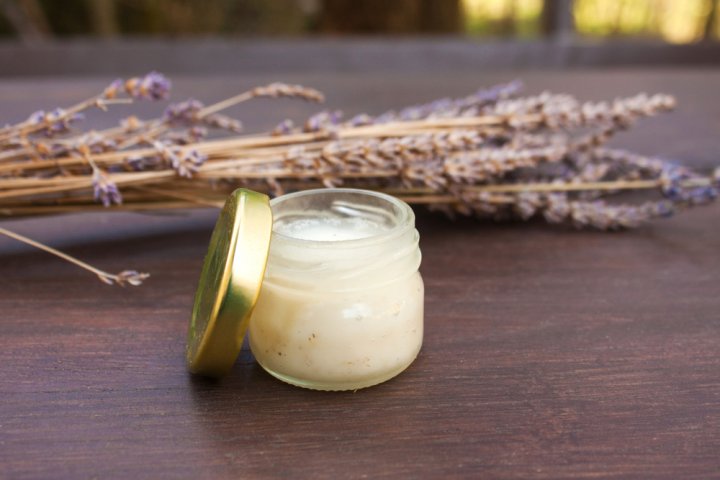
XOXO Candles
How to Make DIY XOXO Candles
Materials needed- Wax-Paraffin
- Wicks
- Fragrance Oils
- Double Boiler
- Twine
- Container-Coffee mugs, glassware or mason jars
- Thermometer
- Spatula
- Twine
How to Make DIY XOXO Candles
- Get a good work area, set up newspaper, thick tissue or paper towels around your work area.
- Melt the wax using your double boiler.
- Pour water into the bottom pan, put about half a pound of wax in the double boiler, and watch it melt.
- Watch the temperature; it should be around between 160 and 170 degrees.
- While the wax is melting, dip the metal tab of the wick into the melted wax, when the wax hardens, the wick will be stuck in the wax.
- After the wax is melted completely, pour the fragrance into the double boiler, and stir for 30 seconds so that it gets evenly distributed, then let cool.
- Once the wax is properly cooled, pour it into the container while you keep a hold on the wick so that it stays right at the center while the wax sets and hardens.
- Cut the XOXO and place on the candle.
- Visit Youtube to watch how it is done.
DIY Date Night Jar for Great Date Ideas
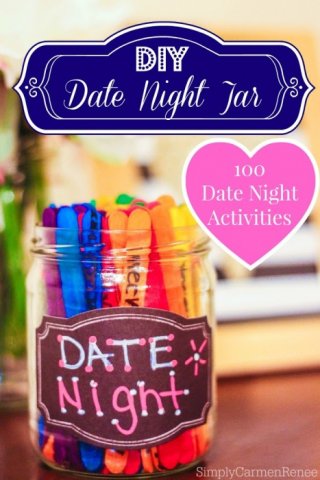
How to Make DIY Date Night Jar for Great Date Ideas
Materials needed- Wooden craft sticks
- Sharpie markers
- Mason jar
- Ribbon
- Glitter
- Buttons
- Stickers
- Paper or other desired decorations
- Glue
- Scissors
How to Make DIY Date Night Jar for Great Date Ideas
- First get a jar of your choice, ensure it has a lid. Next, make a label.
- To make the label, cut out a piece of paper into any shape you want, you can either make the label a heart shape or an oval shape.
- Write “Date Night Jar” on the label and then puncture a hole at the tip so you can but a twine through it and tie around the jar.
- Next, get the craft sticks and write out amazing date night ideas on each craft stick neatly and legibly then put the customized sticks into the jar.
- Here are some amazing date night ideas you could write on the craft sticks: -Bed fort and reading together (or watching YouTube videos) -Take out + board game night (check out this list of Great 2 Player Board Games!) -Make dessert together -Listen to a podcast and do a puzzle together. -Bike ride -Hiking -Go to the library and read together -Cheap or Affordable: -Read at a bookstore or library -Dinner + private book club -A trip to the mall (even to just walk around) -Weekend away -Spend a day at a theme park
- Find out more on Date Night Guide .
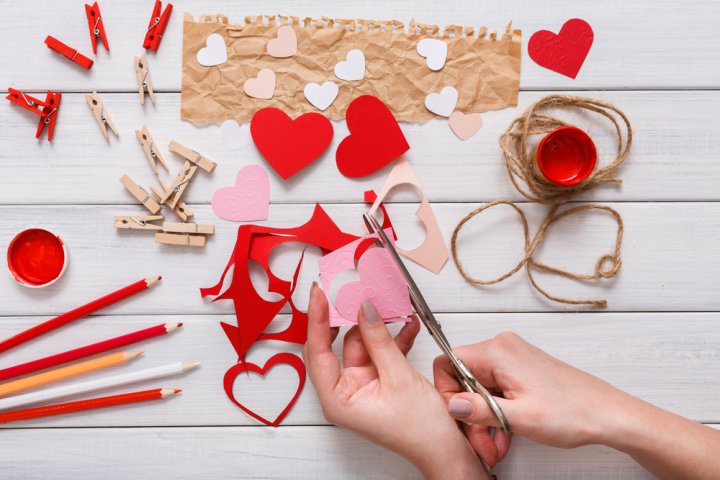
Make Him A Small But Special Gift: Heart Bookmark
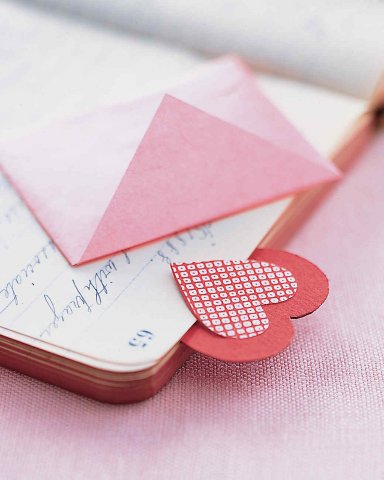
How to Make DIY Heart Bookmark
Materials needed- Heavy card stock
- Decorative paper
- Utility knife
- Glue stick
How to Make DIY Heart Bookmark
- Create a heart template and cut it out with a utility knife then trace onto the heavy card stock.
- Cut out both hearts, and use a glue stick to secure smaller patterned heart to the centre of the larger one and let it dry.
- Finally, trace bottom half of inner heart with a utility knife, cutting through cardstock beneath it and you have your bookmark ready for use.
- Discover more at Martha Stewart.
-
 Turn Your Stash of Photos into a Treasured Book of Memories. Don't Know How to Make a Scrapbook with Photos? Turn to a Professional Scrapbookist!
-
 12 Doable D.I.Y Gifts for Boyfriend on Birthday or Anniversary, Because Nothing is as Personal as a Handmade Gift
-
 Need an Intimate Gift for Hubby Dear? Nothing Beats Homemade Gifts: 5 Great Ideas for Romantic Handmade Gifts for Husband
-
 How Romantic Gifts Say You Care for Your Boyfriend and 10 Gifts for Boyfriend in India
-
 7 Adorable Handmade Gifts for Girlfriend for When You Need to Be Extra Cute and Lovable (2018)
Choose Your DIY Gift With Care
You need not be crafty to make a handmade gift. Even a simple gift made by you carries more meaning than any store-bought gift. Just look for inspiration online and you can find tons of it. From practical to romantic, the options are so many. However what you pick must be well thought out. Make sure your gift something that will resonates with your boyfriend and of course with what's in your heart. Also keep the practicality of it in mind - don't take on something for which you have no skills or experience.
 Highlight the Best Facets of Your Incomparable Beauty: Discover the Best Face Highlighter Currently Available in India and Everything You Need to Know About Using Face Highlighters for Maximum Effect (2023)
 Forget the Blemishes and Get that Picture Perfect Flawless Radiance on Your Face: Check out the Best Foundations for Oily Skin Currently Available in India and Everything You Need to Know About Makeup Foundations (2023)
 Make Your Presence Felt Wherever You Go: Discover the Best Perfumes Under 2000 for Both Men and Women to Announce Your Arrival and Make Any Occasion Memorable (2023)
 Protect Your Oily Skin from the Harmful Rays of the Sun: Discover the Best Gel Based Sunscreens for Oily Skin and Everything You Need to Know Before Buying One (2023)
 Minor Blemishes and Wrinkles Affecting Your Confidence? Check out the Best BB Creams to Conceal Your Worries and Nourish Your Skin to Restore the Healthy, Radiant and Glowing Complexion Back Again (2023)