-
 Turn Your Stash of Photos into a Treasured Book of Memories. Don't Know How to Make a Scrapbook with Photos? Turn to a Professional Scrapbookist!
-
 12 Doable D.I.Y Gifts for Boyfriend on Birthday or Anniversary, Because Nothing is as Personal as a Handmade Gift
-
 Need an Intimate Gift for Hubby Dear? Nothing Beats Homemade Gifts: 5 Great Ideas for Romantic Handmade Gifts for Husband
Unleash Your Hidden DIY Talent and Create Something
Out-of-the-Box Gifts
No matter how unique, creative and interesting the gift you founds after a load of research and hunting, nothing changes the fact that someone else can buy the exact same thing and, shudder, give it to your husband at the same time you are giving it to him. Store bought gifts aren’t as unique as we would like to believe they are and for that reason alone do-it-yourself gifts trump over them. There is no end to how imaginative you can get.
Even if you take inspiration from books and websites on crafting and gifting, the way you make it will truly be unique. Combine that inspiration with your own ideas and come up with a gift that is truly out of the box. It can be personalised in every imaginable way, right from the use of materials, colour, including your husband’s name, birthday, the date of your wedding, or something else entirely.
Completely Handmade, thus Unique
Making something by hand makes it so much more personal, much more than gifts which have been personalised by a store. There is an intimate connection between a gift made by hand and the receiver - you think of them the entire time you are involved with it, and they are very aware of this. Even the simplest of handmade gift will make your husband wonder what you were thinking of while you were making it.
Compare a handmade present to one that has been personalised by the manufacturer or store. Adding a name or picking a colour or pattern is no match for a gift that has been made by hand; it is so much more personal as you aren’t restricted to customising certain aspects of it but can create a present tailormade for your husband. Such gifts work very well for people who are very close to us as we know exactly what they like, and making it yourself can be a lot simpler than trying to find something you already have in your mind.
Uncover and Explore Your Creative Talents

As much as people enjoy using their mind to solve problems, making use of the hands to create something is incredibly satisfying. If you need proof of this, just watch children making craft projects. People do not grow out of that enjoyment, they just get busy with other things as they get older. If you haven’t tried making anything in a while it’s time to rediscover the pleasure of using your hands.
DIY gifts are a wonderful way to rediscover old talents and find new ones. Even those of you who do not consider yourself as being particularly creative will surprise yourself with what you find yourself capable of. The bottomline is, DIY gifts are incredibly fun to make so it will be a win-win for you and your husband.
10 DIY Gifts Suitable for Husband's Birthday, Anniversary or Just Because
Mini Pool Table
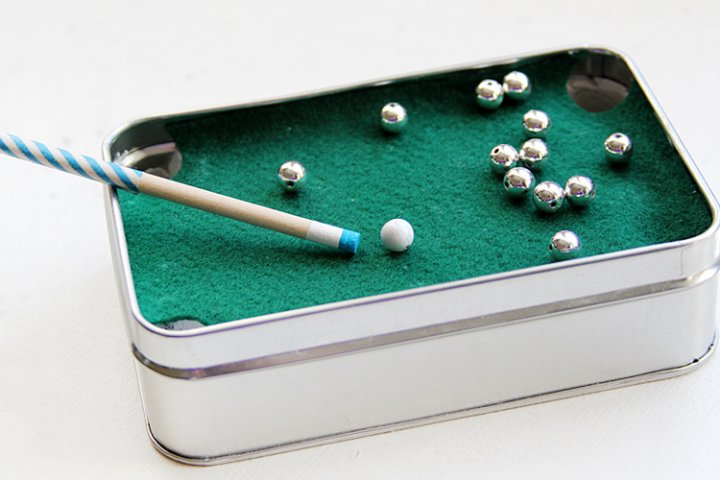
Whether your man is a fan of playing pool or has never tried his hand at the pool table, this mini table will appeal to the little boy inside him. It is a pretty cool gift for just about any man, but knowing his wife spent hours labouring over it will thrill him all the more. You can follow step by step pictures on consumercrafts.com
Mini Pool Table
What you need- Aluminium tin case
- A bag of plaster of Paris
- 8 mm beads
- Clear plastic bead tubes
- Wooden dowel
- Aluminium floral wire
- Blue and white paint
- Washi tape
- Self adhesive felt sheet
- Pliers
- Scissors
How to make it:
- The size of the tin case will be the size of the pool table so pick one which is not too small. Prepare the plaster to make the base of the pool table.
- Use the bead tubes to make space for the corner pockets. Cut four short lengths of tube and glue them down to each of the four corners. Once secure, pour the plaster in, filling up to ½ inch from the rim.
- Tap to remove bubbles and let it dry completely. Once the plaster has hardened, remove the tubes. Clean out the holes to remove any specks of plaster.
- Use the lid to cut out a self adhesive felt which will form the top layer of the pool table; the discarded tubes can be used to guide you to cut out space for the holes.
- Remove the felt lining and neatly place the felt onto the surface of the plaster, tucking around the edges to ensure the plaster is not visible.
- Measure the dowel to fit inside and trim with pliers. Paint the tip white; when it dries paint the tip blue to look like a pool cue. Also paint one of the balls white to serve as cue ball.
- Use the floral wire to fashion a triangle rack for the pool balls.
Terracotta Pot Smoker
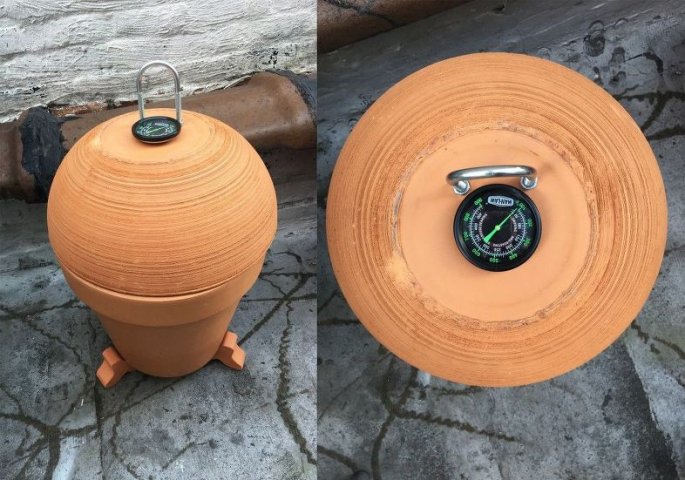
The thing about foodies is they aren’t content with only having good food, they like to take things a step ahead by trying to make foods that catch their fancy. If your husband happens to be one of these then he may have a fascination with smoked foods. Since home smoking devices can be quite expensive, here’s how you can make him his very own meat smoker.
Terracotta Pot Smoker
What you need:- Single burner hot plate
- Wood chips
- Terracotta flower pot
- Shallow terracotta pot with same width
- Grill basket
- Terracotta pot stand
- Drilling machine
- Pull handle
- Extra nuts to fit the handle
- Grill thermometer
- Rubber washers
- Rubber stopper
- Oven foam tape
How to make it:
- Place the hot plate inside the pot and pass the cord through the hole at the bottom. Locate the spot where the dial is and drill a hole through the pot to be able to access it.
- Place the grill tray on top of the hot plate and fill it with wood chips.
- Prepare the shallow pot for lid by first fitting the grill thermometer through the hole at the center with the help of a washer and secure it in place. Drill holes on the top to fit the handle and secure that in place as well.
- As a final step finalise the spot where you want the smoker placed and use the pot base to elevate the smoker so the cord can dangle free. Now all you need to do is surprise your husband.
Necktie Zip Pouch
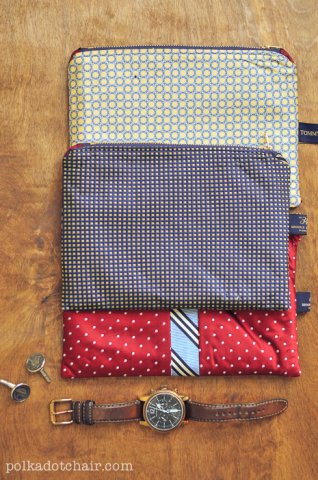
Every man has a few ties in his closet that he never uses and even though he knows he will probably never wear them again, they still stick around as no one throws them away. Do both of you a favour by using them to make something a lot more useful, such as zipper bags. You can follow detailed steps with pictures on polkadotchair.com
Zipper Tie Bags
What you need:- 2 neckties, old or new
- Metal zipper, 7 inch
- Shape flex fusible interfacing
- Fusible fleece
- A fat quarter for lining
- Zipper foot, for sewing machine
How to make it:
- Start by opening out all the stitches on the ties to open up the fabric. Remove all the interfacing and iron out the seams to flatten the fabric.
- From the fabric you get, cut a strip measuring 10” x 7”. Measure and cut the flex into the pieces of the same size and iron them onto the back of the two strips of tie fabric.
- Cut 2 strips of fat quarter also in the same size and iron the iron the fusible fleece onto the back of them.
- Cut another piece from the tie fabric measuring 3” x 5”, fold in half, press and cut in half so you have two pieces. These form the ends of the zipper and have to be stitched on either side.
- Place one piece of prepared tie fabric, tie side up on your working surface, place the zipper over the top half and cover with the other piece of prepared tie fabric, lining side up. Stitch with a half inch seam allowance. Turn inside out and hand stitch open ends, trim excess thread and your pouch is ready. Add a small present inside before gifting it to your husband.
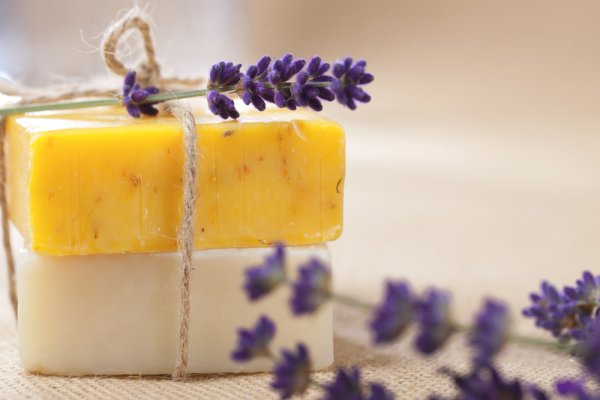
Homemade Soap for Men
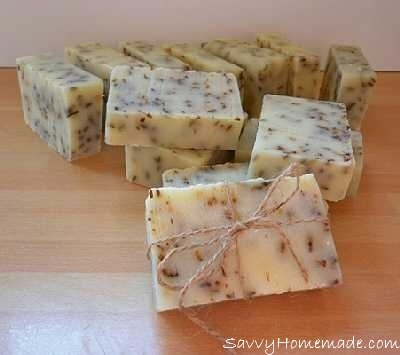
Handmade soaps have a much more luxurious feel than standard store bought soaps. There are plenty of very good options available to buy handmade soaps but this small luxury can also be made at home quite easily. There is an easy to follow recipe on savvyhomemade.com for a soap made for men. The great thing is you can use this as a guideline to create your own signature soap using ingredients and fragrances you think will appeal to your husband.
Homemade Soap for Men
What you need:- A few bay leaves
- 210 gm olive oil
- 210 gm sunflower oil
- 200 gm coconut oil
- 100 gm lye
- 310 ml mineral water
- 2 tsp bergamot essential oil
- 1 ½ tsp bay essential oil
- 1 tsp patchouli essential oil
- ½ tsp cinnamon essential oil
How to make it:
- Use a plastic mould to shape the soap. First oil it then line it with greaseproof paper.Before using the bay leaves, chop them and remove the veins.
- .Mix together olive, sunflower and coconut oil in a pan, heat over a low flame if the coconut oil is firm.
- Use a plastic bucket and spatula to mix lye with mineral water. Check the temperature of both liquids and when they are at 35.5 degrees C, pour the water into the oils and mix continuously till evenly combined. Stir till it thickens then add all the essential oils and bay leaves.
- Pour into prepared mould and cover with cardboard. Let it dry for an entire day before turning out the soap onto waxed paper.
- Chop into bars then allow them to dry for another 4 weeks in a dark and warm place, turning them occasionally.
- Wrap in coloured paper or tie with bits of ribbon or twine and present to your husband.
Calendar Planner
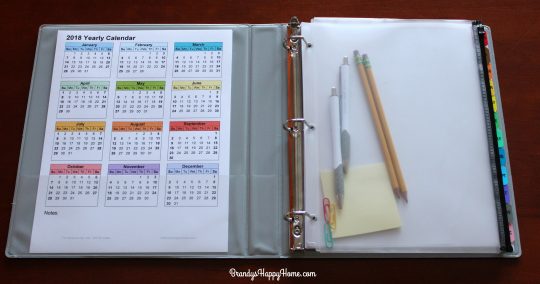
Feeling overwhelmed by the homemade gift ideas so far and need a simpler gift you can quickly put together without having to whip out pots, pans and sewing machines? We have just the thing! Calendars, diarys and planners are very useful tools to organise your life and daily activities, more so when you have kids and need to monitor everyone’s needs and activities. Your husband too could do with a good one.
Now most organisers often do not have enough space to fit everything you need to jot down. They are also very simple to make. Even if you don’t know the first thing about making layouts and worksheets on a computer, there are printable calendar planners available online, one such example being brandyshappyhome.com
2018 Calendar Planner
What you need:- Regular printing paper
- A computer and printer
- A 3 ring binder
- Punched pockets
How to make it:
- The heavy lifting has already been done, all you need to do is visit the website and download the printables for this annual calendar, there is a cover design too. If you don’t have a colour printer at home just pop over to your neighbourhood stationery-printer shop and have them printed. You can choose another design for the cover or select any other printable available online.
- When everything is ready organise all the pages in order and file them in the binder. Use the punched pockets for the annual calendar and other pages that do not have writing space included. Since these are thumbed often the pocket will keep them from fraying but you can also skip the pocket entirely.
- Add extra pages in between for notes, you can add a few pictures, encouraging or loving messages for him to find later. Personalise it in a way you know will appeal to him.
- Include a few empty punched pockets in between for his use as well, and that’s all there really is to it. Your gift is ready.
Hand Painted Mouse Pad

Mouse pads are an often overlooked computer accessory, they have a fairly important role but few people really bother with the design on them. There are mouse pads available in nice colours and interesting designs but you may not feel like spending so much on such a basic item. But if you want to add a pop of colour to your husband’s desk or workspace, try making a designer mouse pad yourself. It is fairly straightforward and the results are quite nice. We found this DIY project by ManMade.com quite easy to follow. You can use your own designs but the website has interesting templates you could use.
Hand Printed Mouse Pad
What you need:- Blank, round mouse pad, 8”
- A4 sized labels
- Computer and printer
- Sharp cutting knife and a sheet of glass or a cutting surface
- Acrylic fabric paint, 2 colours based on your design
- Paintbrush
- Iron and wax paper
How to make it:
- Start by painting the mousepad with your base colour. While it dries use a template or print your own design on the label, and cut out the shape to serve as a template. Reserve the small pieces that you cut away.
- Use the template to guide your design and start peeling away the pieces of label from its backing and sticking them onto your dry mouse pad. Once the design is in place, paint the spaces left open with your second colour. Allow it to dry completely.
- Once dry, cover the mouse pad with two sheets of wax paper and iron according to instructions on the paint packaging.
Comic Books Inspired Coasters
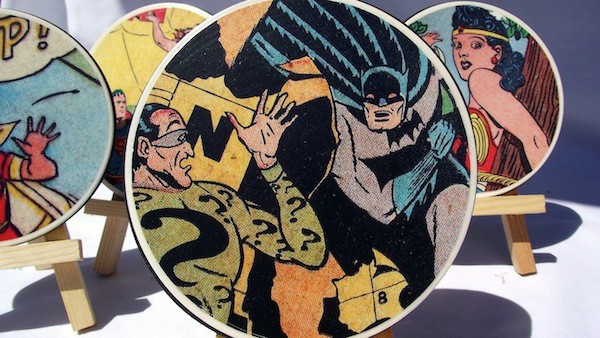
Your comic book fan husband will be thrilled to receive a set of coasters with his favourite characters and scenes. If you have had trouble getting him to use coasters when sitting at your lovely new coffee table, after giving him these you won’t have to anymore. These eyecatching coasters are a nice way to brighten your home as well. Visit modpodgerocksblog.com to see detailed instructions and pictures for each step.
Comic Book Coasters
What you need:- Outdoor Mod Podge
- Cutouts from comic books, or printouts
- Electrical outlet covers
- Strong adhesive
- Spraypaint
- Paintbrush
- Sandpaper
How to make it:
- Spray the outlet covers in a colour you want the coasters to be in. While they dry, use a large round cookie cutter to trace out the comic book images you want on the coasters and cut them out.
- Glue the round cutouts on top of the outlet covers, smoothening out any bubbles. Let it dry for about 20 minutes before applying a layer of Mod Podge over it, use the paintbrush to give it an even coat.
- When it dries completely gently smoothen the surface with the sandpaper and apply another coat.
Woven Paracord Bracelet
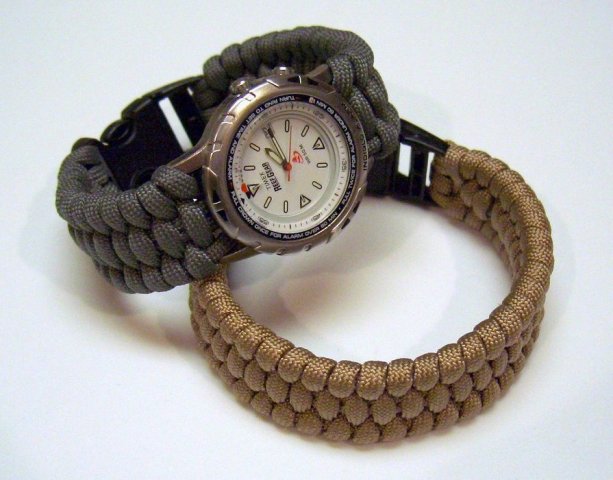
The wonderful thing about homemade gifts is you take ordinary items and give them a whole new spin, such as with this paracord watch strap, or bracelet. Your husband may have an old watch lying around the house that he doesn’t use anymore only because the strap is frayed and he may not think it’s worth the effort of having it changed. That or he has probably forgotten about it entirely. The lack of such a watch should not stop you from attempting to make the bracelet instead - when made in the right colour they can be very nice looking accessories for your husband’s wrist. You may like this DIY gift for your husband by instructables.com
Woven Paracord Bracelet
What you need:- Paracord in a dark colour, 10 feet
- Scissors
- Lighter
- Hemostats
- Measuring tape
- Watch
- ⅝ inch side release buckle
How to make it:
- If you are using a watch it should have sufficient space to loop in the paracord about 5 times; if making the bracelet, loop it into one side of the buckle.
- Measure 20 inches of the paracord and loop it into the watch. Place the watch on your work surface, watch face down, with both pieces of the buckle on either end. Measure out your husband’s wrist and use that to determine length. Pass the paracord back and forth til you have looped in 5 strands to form the base of your weave.
- Start weaving, making a tight weave. To finish, tuck the cord around so the end winds up behind, cut away excess and use the lighter to melt the end to prevent it from fraying. Tuck the end under the weave.
I Love You Jar

Everybody likes being told they are loved; they like it even more when you spell out the reasons why you love them. Giving your husband 50 reasons why you love him will make his day in a way you cannot even imagine. But instead of making a simple list, or even jotting them down on slips of paper, turn your list into a delicious gifts. What you will need is individually wrapped pieces of candy or chocolate that he likes, plain stickers and a jar. Why candy? It is the perfect to make the experience of finding out why he is loved a whole lot sweeter.
Start by writing your reasons on the stickers; use small stickers so you can stick them easily on the chocolate, and keep your notes brief and snappy - write him a long love letter if you want to give him a longer, more elaborate explanation. Next, stick the stickers on to the chocolate or candy and drop them into a jar. There are lovely printable labels available on the datingdivas.com for I Love You jars including 50 Reasons Why I Love You, 30 Reasons Why I Love You, Just a Few Reasons Why I love You and so on. Your husband is going to eat all that candy so give him only as many reasons as he can handle, the rest can go in your love letter! Print and attach the label, or use your own imagination to decorate the jar and give it to a delighted husband.
Spicy Aromatic After Shave
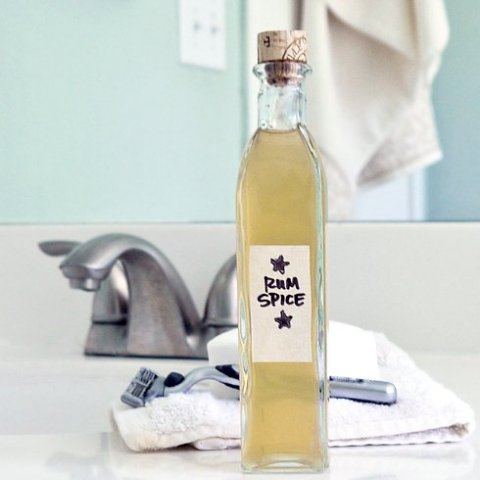
Don’t you love the smell of aftershave on your man. The masculine smell after a shave. Apart from the physical effect on you, the lotion has numerous benefits for your husband too - it soothes the skin and helps it recover from the effects of a sharp razor being run all over it. Did you know you can make after shave at home, using ingredients to target specific concern areas for your man? This aftershave made from rum and orange peels by popsugar.com is just the thing you want to start with if you want to have a go at it; you may find your husband doesn’t want to go back to back to his old aftershave after using this.
Rum Spice Aftershave
What you need:- Zest from one orange
- 1 cup witch hazel
- ½ cup water
- 2 bay leaves
- ¼ tsp cloves
- ¼ tsp fresh ginger
- ½ cinnamon stick
- ½ tsp vanilla
- Strainer
- 60 ml rum
- Small glass bottle with cork stopper
- Small saucepan
How to make it:
- Combine the witch hazel and water in the pan and warm over low heat. Add the zest, cover and simmer for an hour.
- Turn off the heat and add vanilla and rum. Let it cool down to room temperature.
- When it cools down, strain into the bottle and give it to your husband to use.
Strike a Balance with Store Bought and Homemade Gifts

If you are fortunate enough to have many friends and family, you know one of the pleasures of an active social life is the exchange of gifts. However, there are so many occasions when one must give a present and often you may feel pressurised to give really memorable presents.
Thoughtful and touching gifts don't necessarily translate to spending lots of money, you can easily balance it out with a good mix of handmade presents and things you can buy. Making gifts can be a lot of fun and the more items you make, the easier it will become. Many presents can be made out of simple things already at home and once you start making DIY gifts and things for the house, it will be easier to come up with ideas and to spot useful odds and ends which could come in handy for a new project.
You may not always have time to make presents but then there is always the option to buy a gift. However, knowing you can make certain things yourself can be your own little backup plan in case you cannot find the right gift for a certain occasion.
Fringe Benefits: Easy on the Pocket

Make no mistake about it, homemade gifts don't always mean cheaper than store bought options - if you decide to use really good quality ingredients, which you will be quite tempted to, DIY gifts can turn out to be the same price as a similar thing you may have bought or perhaps even a shade more expensive. But they are often a much cheaper alternative.
When you are making a present yourself you can set a budget at the start, allocate funds for material and ingredients accordingly and make sure everything fits within that budget. The same discipline may not always work when buying gifts as you may not find what you are looking for in your budget.
DIY gifts are a great alternative when you are low on cash as you can choose to make gifts with things you already have at home, all you need is lots of creativity and enthusiasm and a little bit of inspiration.
-
 12 Creative, Funny and Naughty Gifts for a Boyfriend on His Birthday & 6 Ways to Surprise Him (Updated 2020)
-
 Make Your Beau's Day Super Special With a Sweet Gift for Boyfriend on His Birthday: 10 Gift Ideas
-
 11 Gifts for Boyfriend on His 25th Birthday That Won't Bore Him, Plus Loads of Ideas to Make it a Day to Remember
-
 Make His Day Extra Special with the 10 Most Romantic Gifts Gifts for Husband on His Birthday
-
 Buy the Best Gift for Boyfriend's Birthday Online, Over a Dozen Ideas to Get You Started!
Be Realistic About Your Goals
Getting homemade gifts right requires careful planning, but even before that what you need to do is honestly evaluate your skills and capabilities to ensure you pick a gift that you can make well. Plan it in advance so you can source all the materials needed and have plenty of time to make it. A rushed job will reflect in the final results so give yourself enough time to give it a good finish. And most importantly, make something you know your husband will like, you don't want all that effort going to waste.
 Highlight the Best Facets of Your Incomparable Beauty: Discover the Best Face Highlighter Currently Available in India and Everything You Need to Know About Using Face Highlighters for Maximum Effect (2023)
 Forget the Blemishes and Get that Picture Perfect Flawless Radiance on Your Face: Check out the Best Foundations for Oily Skin Currently Available in India and Everything You Need to Know About Makeup Foundations (2023)
 Make Your Presence Felt Wherever You Go: Discover the Best Perfumes Under 2000 for Both Men and Women to Announce Your Arrival and Make Any Occasion Memorable (2023)
 Protect Your Oily Skin from the Harmful Rays of the Sun: Discover the Best Gel Based Sunscreens for Oily Skin and Everything You Need to Know Before Buying One (2023)
 Minor Blemishes and Wrinkles Affecting Your Confidence? Check out the Best BB Creams to Conceal Your Worries and Nourish Your Skin to Restore the Healthy, Radiant and Glowing Complexion Back Again (2023)