-
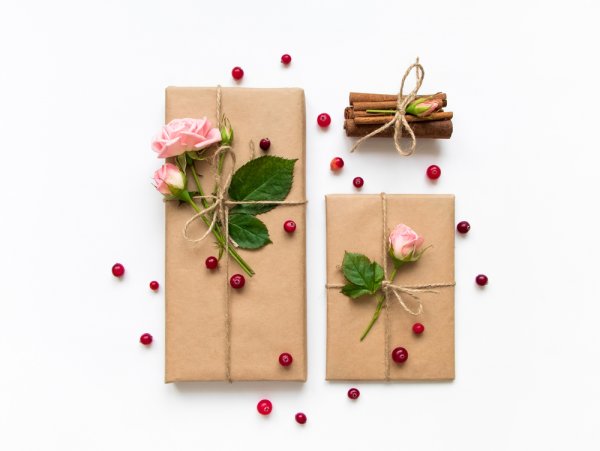
 Give An Extra Special Gift This Time! 10 Unique, Super Easy Handmade Gifts For Birthdays That You Can Make Yourself
-
 10 Easy Handmade Gifts for Friends with Step-by-Step Directions and Video Tutorials (2018)
-
 The 10 Best Handmade Gifts for a Best Friend Because Store Bought Just Isn't Good Enough (2020)
Points to Keep in Mind When Doing a DIY
The DIY gift can be the best thing you can give to your sister. The reason is that whatever you do, it comes from your heart and filled with love. While a DIY gift can be the sweetest of the gestures, it can get outta hand and unruly if you are not careful. You can be an amateur or a pro at DIY, but you need to keep the following points in mind.
Make a Note of All That You Need

Before starting on your gift, finalise on what you are planning to do. The key is to play to your strengths. Only when you finalise your design would you be able to get all that you need. So, first make a note of everything small and big that you need for your project. If you skip this step you might end up missing something vital for your gift. It should not be a problem if it is something that is available easily but if its something that needs to be bought or ordered in a specialist store, you might be in a bind. If your gift is complicated, it is better to take notes and also the measurements. It might be something simple and easy to ignore, but it makes life easier.
Keep Your Workspace Clean
An unclean workplace can make the easier of the tasks seem like a chore. Not only do they hide small stuff, but also you end up spending more time searching for them. There is also a chance that your gift can get snagged up in the mess and get dirty if any spill occurs. So, to keep it safe, clean up your workbench as and when you finish your work before moving on. With a neat surrounding, you can find that your gift is completed at a much faster pace.
Plan a Colour Palette
When you are planning something for your sister chances are that it is going to be something colourful and vibrant. But if you are not careful, you will end up with a colourful gift with clashing colours. While contrast colours can be contemporary, less is more in this case. Or maybe you want the whole gift in monochrome and minimalistic. Whatever it is, plan a colour palette and make note of it along with the rest of the stuff. Once you start on the gift, you can get along faster if everything is planned earlier.
Tidy Work Makes Quality Work
If you are a pro at DIY, you would have known by now that no matter how simple it is, tidy work is elegant and classy. Make sure you clean up as you keep going. Be it a line out of place or glue marks, keep tidying it up. Also, check if everything is in line and not misaligned. Even a small misalignment will be prominent when it is otherwise a clean gift. It is better to do something simple, rather than one that is untidy and sloppy. A sloppy work brings down the quality of the work however intricate it might be.
Don't Make Anything in Haste
This is probably the most important point to note. Once you decide you are making your sister’s gifts by hand, start the work as soon as possible. If you are doing the gift in a hurry, you would not be able to follow the pointers mentioned above including tidy work. If in a hurry, plan your gift accordingly. Don't make your gift overnight. Not only does that leave you tired, but it also leads to sloppy work. If you are expecting the outcome to be as gorgeous as you plan it to be, take your time and plan appropriately.
10 Handmade Gifts for Sister That Will Make Her Squeal with Joy
Bobby Pin Case
Bobby pins are notorious to keep safe and easy to lose however you keep it safe. Your sister is probably going through cases of it. How about a bobby pin case for your sister to keep her bobby pins safe? While you are at it, you could make it small and handy enough to carry it in her handbag or school bag. This bobby pin case is very easy to make even for someone who is clumsy with absolutely no experience.
Bobby Pin Case
-
Supplies:
- Tic Tac Container
- Oil-based Sharpies (metallic colours like gold and silver)
- Glitter (big rather than small)
- Glue
Directions:
- Take an empty tic tac bottle and remove the sticker. Use the sharpie and paint the top of the container. Apply the glue to the sides in a pre-determined pattern. Dust the glitter over the glue and shake to remove the excess. You can also use the sharpie to decorate the sides.
Yarn Ball Pom Pom Bookmark
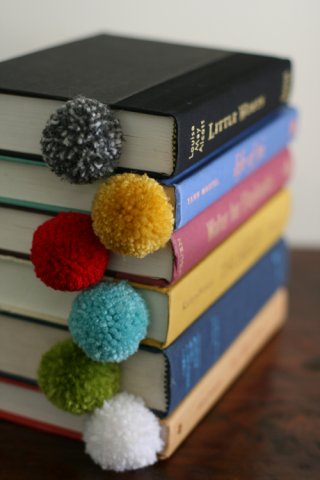
Is your sister a self-proclaimed bookworm? Would you see her in a corner with her book rather than watching TV or shopping? Then this pom-pom bookmark with yarn balls would be a perfect gift for her. All you need is a steady hand and the bookmark is ready. You can make not one but as many as you’d like for your beautiful sister since practice makes perfect.
Yarn Ball Pom Pom Bookmark
Supplies:- Yarn (Depending on the number of bookmarks you need)
- Scissors
Directions:
- Cut 2 pieces of yarn measuring 10 inches and 15 inches respectively and set aside.
- Hold one end of the yarn ball and wrap the yarn around your fingers.
- Look for a snug fit but not too tight. Go for at least 90 loops.
- After 90 wraps, cut the yarn and remove it from your fingers carefully.
- Lay it over the 10-inch yarn piece and tie a knot around the middle of the yarn loops.
- Add the 15-inch yearn piece and tie it to the string to make the bookmark.
- Slide your scissors through the loop and cut the loop to make the pom-pom.
- Use your scissors to shape it like a proper pom-pom or like a ball.
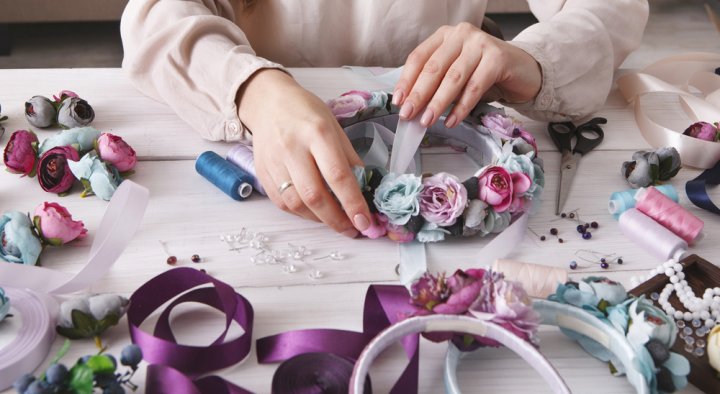
Flower Headband
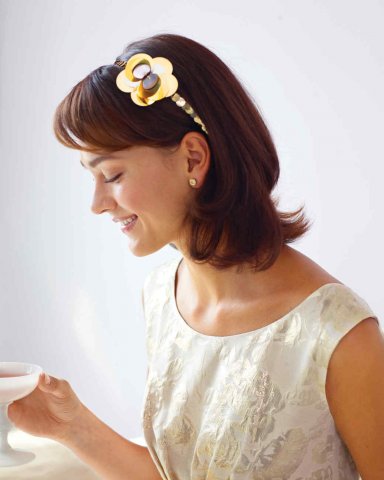
If your sister loves anything pretty and glittery, then this is the one. Very simple to make and charming to boot. She can pair it up pretty much any attire. While this is quite easy, you might have to procure the stuff before starting this DIY flower headband.
Flower Headband
Supplies:- Metal or plastic headband
- A string of sequins the same size as the headband
- 10 slightly bigger sequins
- Silver embroidery thread
- Needle
- 4 beads
- Glue
Directions:
- Use the thread and needle and string together 5 of the bigger sequins. Alternate the sequins with the beads.
- Pull the string tight to form the palliate flower centre, knot it and trim the excess.
- Place the remaining sequins in a overlapping circle and glue them together to form the flower base.
- Glue the palliate flower centre to the flower base to form the palliate flower for the headband.
- Glue the sequin string to the headband and trim the excess. Be sure to centre it properly.
- Glue the palliate flower anywhere you like.
Metallic Confetti Tumblers
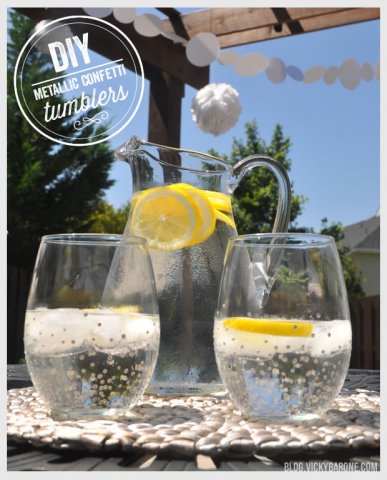
Ever heard your sister sigh over a pair of gorgeous and expensive glass tumblers? Why not make it for her? All it needs are four ingredients out of which two is readily available at your home. Purchase a brand new glass and get started.
Metallic Confetti Tumblers
Supplies:- Glass tumblers
- Rubbing Alcohol (hydrogen peroxide)
- Paper towel
- Metallic Glass Paint
Directions:
- Wipe the outside of the glass tumblers using rubbing alcohol and the paper towel.
- Use the metallic glass paint and make dots on your tumblers. The dots should be concentrated on the base of the tumbler and sparse as you go up.
- Follow the instructions on the glass paint for directions to set the paint.
Lace Doily Bowl
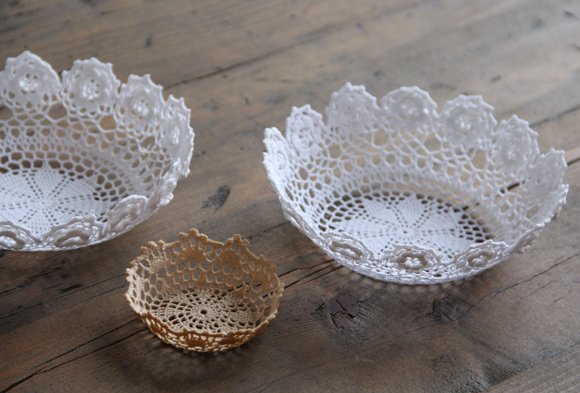
Remember the lace doilies? You would have seen them long back everywhere but they are completely out of fashion. But they are still pretty. How about making a pretty bowl for your sister? She can use it as a ring and earring holder.
Lace Doily Bowl
Supplies:- Doily
- Fabric Stiffener
- Bowl
Directions:
- Place the bowl upside down.
- Soak the doily in fabric stiffner and drape it over the turned down bowl.
- Smooth out the doily and remove any excess fabric stiffener by pushing it out.
- Leave it out preferably overnight to allow it to harden.
Homemade Lip Balm
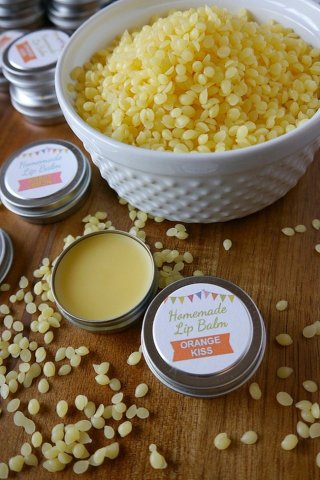
Makeup and skin care go hand in hand with women. And with the number of chemicals added in the products, this homemade lip balm would be a blessing for your sister. And what more, you can make multiple with different flavour profiles and make it a collection.
Homemade Lip Balm
Supplies:- Beeswax Pellets
- Sweet Almond Oil
- Pure Shea Butter
- Orange Essential Oil
- Lemon Essential Oil
- Lipbalm Tins
Directions:
- Melt 2 tablespoons of each beeswax pellets and pure shea butter and 4 tablespoons of sweet almond oil in a glass container in the microwave.
- Separate it into two and add 12 drops of Orange and Lemon essential oils and mix.
- Pour them in the lip balm tins and let it cool down.
- You can also add lipstick shavings if you are looking for coloured lip balm.
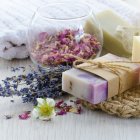
Lavender Bath Salt

Ever heard your sister complain of stress and wondered how you could help her. Well! Here is your chance with the sweet smelling lavender bath salt. The medicinal benefits of bath salts include headache relief, stress relief, relieving muscle aches and more. Few ingredients and a gorgeous jar, your bath salt is ready.
Lavender Bath Salt
Supplies:- Epsom Salt
- Himalayan Sea Salt
- Coarse Kosher Salt
- Lavender Essential Oil
- Dried Lavender Buds
- Purple Food Coloring (optional)
- Mason Jar
Directions:
- Mix 1 cup of each Epsom salt and Himalayan sea salt along with ½ cup kosher salt and 1-3 tablespoons of dried lavender buds.
- Add 10 - 20 drops of Lavender essential oil and 2-5 drops of food colouring and mix well. Make sure to add your food colouring drop by drop and keep stirring since a little goes a long way.
- Spoon the contents in a mason jar and maybe add a pretty ribbon at the neck.
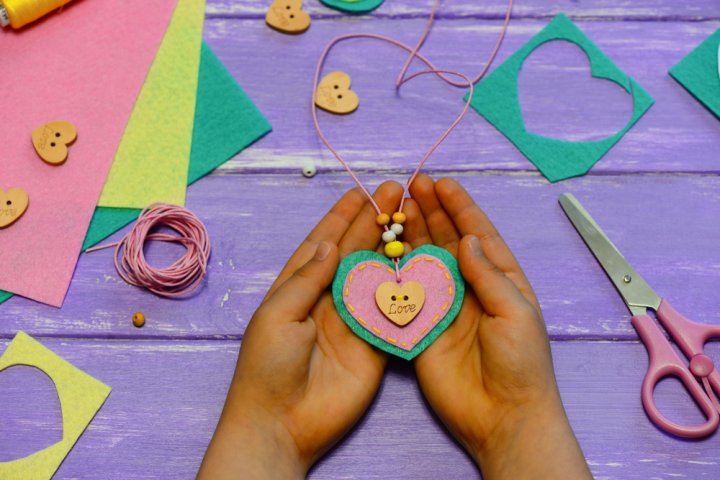
Bird Nest Necklace
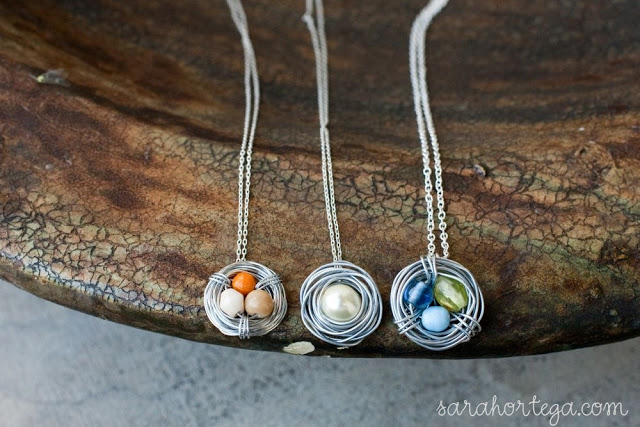
Ever think about tapping into your crafty self for a handmade jewellery for your sister? The bird's nest necklace is so beautiful to look at and very unique. This is sure to be a hit with your sister. They are quite simple and needs very few supplies which you can get from any craft store.
Bird Nest Necklace
Supplies:- 24 Gage Jewellery Wire
- Glass Beads
- Chain
- Jump Ring and a Clasp
Directions:
- Select your beads and arrange them in any way you desire in the jewellery wire.
- Start wrapping the wire around the beads. Don't forget to add the wire in between the beads and at the back of the beads too.
- Attach the jump ring and the clasp to the chain and loop it in the wire nest.
- Your bird nest necklace is ready to gift.
Monogram Marbled Mugs
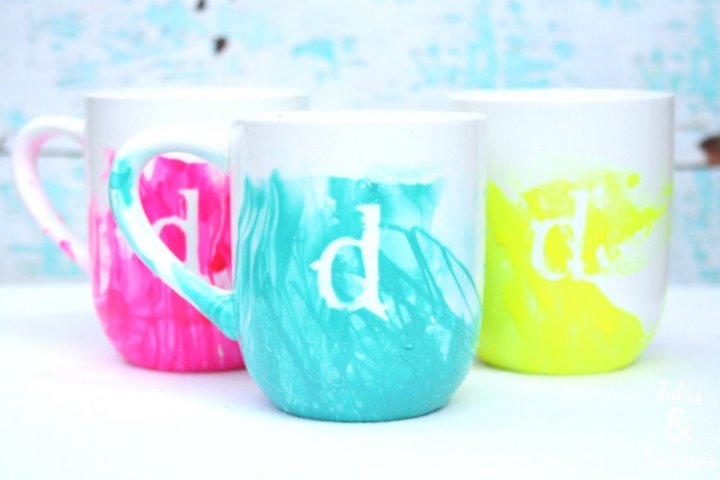
Marbled mugs are pretty and colourful. And the best thing about it is that it can be personalised to your tastes. Everything from the monogram to the colour can be changed to your sister’s tastes. The monogram marbled mug is messy but it is “pretty” messy and beautiful.
Monogram Marbled Mugs
Supplies:- Plain White Mugs
- Container
- Nail Polish
- Removable Vinyl Letters
Directions:
- Place your desired letter on the side of the mug. Press down firmly so that it sticks properly.
- Take your container and add warm water to it.
- Add nail polish drop by drop in the water and swirl it to form patterns.
- Dip the mug in the water and pull it back up again. The letter should be immersed in water.
- Peel back the letter before the polish is dry. If the polish gets dry before peeling, the polish can peel along with the letter.
- Set it on a baking rack to dry.
Tiered Hanging Pots
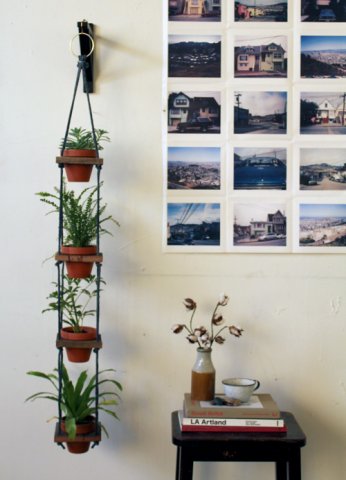
Plants have the ability to bring serenity to your home. They also purify the air and the lush green always adds a touch of elegance to the decor. Your sister is also not immune to the magic of plants. Gift your sweet sister the Tiered Hanging Pots with her favourite plants. This DIY is not that easy to make. You need skill and patience. So, if you don't have both, get the help of someone who does.
Tiered Hanging Pots
Supplies:- Scrap Wood
- Terracotta Pots
- Jigsaw
- Rope
- 3/8″ Boring Bit
- Paintbrush and Paint
- Drill
- Plants
- Metal Ring
Directions:
- Place a pot face down in a wooden plank and draw a circle over the rim of the circle.
- Leave an inch or two from the circle and cut the plank in the shape of a square.
- Draw another circle almost ¼ inch within the circumference of the circle you have already drawn.
- Repeat the steps 1 - 3 for all the planks.
- Using a ⅜” drill bit bore a hole in the centre of the plank. Using the jigsaw cut off the wood within the inner circle. Clamp the wood and cut it in portions to work easily.
- Clamp the square again and measure and mark a spot on all four corners, ½ an inch from each side.
- Use the ⅜” drill bit again and bore a hole in the marked spot.
- Repeat the steps 5-7 for all the planks.
- Cut four pieces of rope and tie them together in a knot 6” from the top. Use this 6” to secure the rope to the metal ring in the wall or in the ceiling.
- About 12” from the knot insert the first plank and put a knot individually in each rope just below the plank. Check if the plank is level and adjust accordingly.
- Repeat the previous step for all the squares. Snip off the excess rope.
- Place the potted plants in the planks and your gift is ready.
- If you’d like to pretty it up for your sister, you can paint the planks and the rope. You can either go for a rustic look or a pop of colour.
-
 बच्चों को कुछ भी गिफ्ट व्रैप किया हुवा बहुत पसंद होता है और उसकी मुस्कान जो उपहार पाकर आती है वो अमूल्य है! सभी आयु वर्ग के बच्चों के लिए 10 बहुत विचारशील द उपहार विचार (2019)
-
10 Easy Handmade Gifts for Friends with Step-by-Step Directions and Video Tutorials (2018)
-
 7 Adorable Handmade Gifts for Girlfriend for When You Need to Be Extra Cute and Lovable (2018)
-
 क्या आपको अपनी बहन के लिए कुछ व्यावहारिक डी-आई-वाई उपहार की आवश्यकता है? घर का बना उपहार विचारों का यह संग्रह सस्ता और बनाने में आसान है! बेहेन के लिए 10 घर में बनाने वाले उपहार (2019)
-
 Cute, Easy to Make 10 Best Handmade Gifts for Your Favourite Girl(updated 2019)
Enjoy the process
The best part about making a gift by hand may not even be the joy of sharing something or of giving a loved one a present. That's almost secondary to the satisfaction of building or crafting something by hand. That immensely satisfying feeling can be yours if you follow the advice we've given above, plan things well and have enough time to enjoy the process. We'd go so far as to insist on it. Those of you who're already addicted to that heady feeling, you know what we're talking about, and if you don't, well it's about time you found out.
 Highlight the Best Facets of Your Incomparable Beauty: Discover the Best Face Highlighter Currently Available in India and Everything You Need to Know About Using Face Highlighters for Maximum Effect (2023)
 Forget the Blemishes and Get that Picture Perfect Flawless Radiance on Your Face: Check out the Best Foundations for Oily Skin Currently Available in India and Everything You Need to Know About Makeup Foundations (2023)
 Make Your Presence Felt Wherever You Go: Discover the Best Perfumes Under 2000 for Both Men and Women to Announce Your Arrival and Make Any Occasion Memorable (2023)
 Protect Your Oily Skin from the Harmful Rays of the Sun: Discover the Best Gel Based Sunscreens for Oily Skin and Everything You Need to Know Before Buying One (2023)
 Minor Blemishes and Wrinkles Affecting Your Confidence? Check out the Best BB Creams to Conceal Your Worries and Nourish Your Skin to Restore the Healthy, Radiant and Glowing Complexion Back Again (2023)