-
 Looking for the Most Incredible Gift Wrap Ideas to Take Your Gifts to the Next Level? We Give You 10 Easy and Pocket Friendly Ideas of Gift Wrapping
-
 Have the Perfect Gifts for Your Loved Ones But Can't Find the Right Gift Boxes? Learn How to Make Them Yourself!
-
 Why You Must Gift a Plant: 15 Plants to Buy Online + The Benefits of Plants at Home and 4 Tips on How to Buy Them
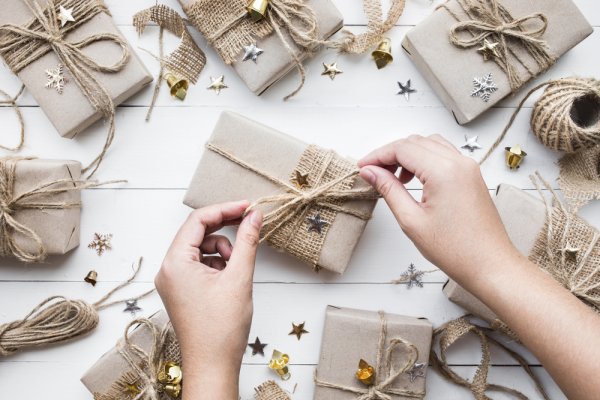
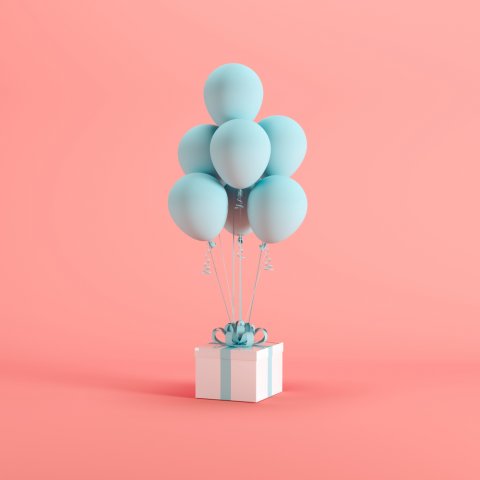
A Complete Guide to DIY Gift Boxes

Gifts are essential to add spice to any relationship and play a pivotal role in adding sparks to festivities and occasions. But, is a gift in a shopper just enough to impress someone? We don't think so! A gift in a shopper in our opinion is basically an insult to the trend. It needs to be beautified by being wrapped in a box oozing creativity and artistic excellence. Although such cases are easily available both online and in the markets, they are usually slightly heavy on the pocket. Good news is that they can be easily created, all you need to do is choose the type of box that is best suited for your gift among the options given below, find the resources and let your creative instincts take over.
Questions to Be Considered While Selecting a Gift Box

Before deciding the type of packaging for the gift, it is essential to consider a few questions that are necessary for the gift box selection. Below we have given the top three questions that require consideration while gift box selection.
Is the Gift Too Fragile?
First and the most important thing to be considered while the selection of the gift box is its fragility. If the gift can sustain damage than it can be packaged in an origami paper box but if it is too fragile then the gift box has to be sturdy and made from a hard material so, in case of any damage, the gift remains safe. We can sense you frowning over this tip because it is definitely difficult to make a DIY gift box from a stiff material. But, ladies and gentlemen you do not need to add wrinkles to your beautiful face by sporting a worried expression because BP Guide is here to rescue you.
What is the Shape of the Gift?

Well, this is a no-brainer because obviously, the gift box has to align with the shape of the gift. Imagine, someone gives you a massive circular box and, all it contains is a tiny square shaped gift. We are pretty sure your reaction would be very close to ripping hair from the scalp. You definitely don't want your loved ones to be in this position so we compiled a list of DIY gift boxes that will fit your gift like a glove.
WHAT is the occasion and WHO is the Receiver of the Gift?
Imagine receiving a gift packed in a box covered with spooky characters on New Year's celebration. You will have some serious thoughts about the presenter's intentions behind the gift. Some of you will even label it as a bad mojo and, we are completely on your side because a gift box painted with ghosts on New Year is definitely cringe-worthy. So next time when you pack a gift make sure that the design is suitable for the occasion or else there are huge chances that it might end up in the bin.
The next major aspect to consider while packaging the gift is that to whom it has to be presented? You can be as playful as you want if the gift is for someone in the family or friends' circle. But, if the gift is for your boss or someone who is above your rank in the professional setting than try to make it look a bit sophisticated. We have compiled a complete DIY list of gift boxes which is applicable for both bosses and the close ones so delve in dear readers!
DIY Creative Gift Boxes for All Shapes
Below we have compiled some of the best DIY gift box ideas, especially for you guys. These DIYs are quite simple and do not require Picasso's level of artistry, so dig in and may your gift box be the prettiest and classiest one among all of them!
Chocolate Gift Wrapping
Packing chocolates as gifts is quite a daunting task because chocolates come in various shapes and sizes but today we are going to tell you an amazing do-it-yourself method to get those bad boys wrapped up beautifully.

- Scissors
- A coloured card sheet or coverstock
- Cutter
- Pencil and eraser.
Steps to make the packaging:
- Take a piece of card sheet or coverstock according to the size and amount of chocolates that need to be wrapped and draw the pattern as shown in the image.
- Cut the pattern carefully and remove pencil markings.
- Now with the use of the cutter make two slits on the opposite sides as showen in the image.
- Now fold the adjacent sides and carefully pass the pattern on their ends from the slit as shown in the image.
- Insert the chocolates inside the cavity and pass the final fold from the slit to close the packaging. Your chocolate treat is ready!
Heart Shaped Wool Box
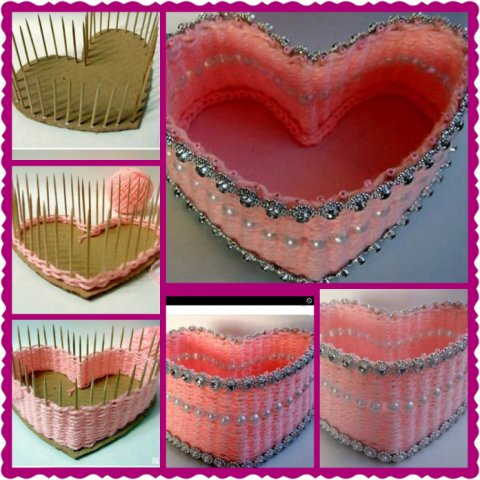
Do you want to give a gift to your loved one in a lovely heart-shaped wool box but are devoid of any idea as of how to make it? Don't worry BP Guide is here to solve your worries. You just need to find the following supplies and follow the simple instructions and your beautiful heart-shaped gift box will be ready.
- Apiece of paperboard
- A few toothpicks
- Your desired colour wool
- Fake pearls
- Sparkly thin lace
- Scissors
- Glue
- Pencil
Steps to make a beautiful heart-shaped wool box
- Take a piece of paperboard and draw a heart on it according to the size of the gift.
- Cut the heart from the paperboard and insert toothpicks at a small distance from each other on its edges as shown in the image.
- Take the wool and glue its end to the paperboard and start wrapping it around the toothpicks from their bottom in an alternative manner as shown in the image.
- Stop wrapping the wool once you reach halfway to the height of the toothpicks. Cut the wool and glue it so that it is secured. Insert one fake pearl to each tooth pick.
- Once again glue the wool and start wrapping it till it reaches the end of toothpicks. Glue the end of the wool so that it is secured and won't untie.
- Glue the thin cloth lace to the wool box to decorate it. You can do it as shown in the image or you can do it according to your own artistic taste. Congrats! your wool box is ready!
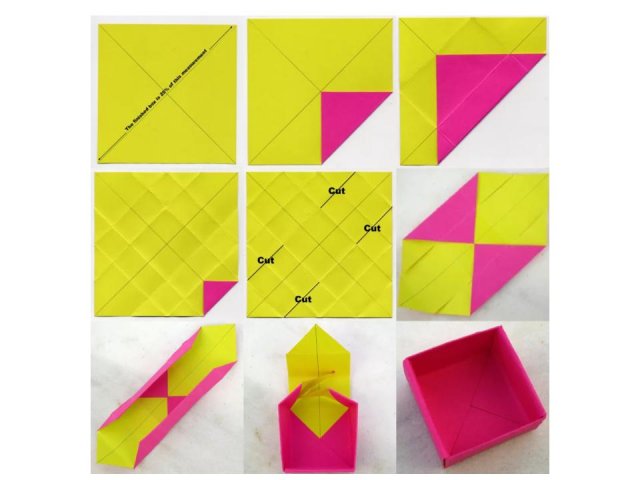
Origami Gift Box
An origami or a cardstock gift box is the simplest but sophisticated gift packaging method. This simple gift box only requires two square sheets of coloured paper and can be easily created for any size of a gift. These gift boxes can be further beautified by the addition of different types of decorations. A simple guide to these decorations has been provided in the next section of the article but first things first, let us dig into the supplies required for this DIY beauty.
- Square piece of coverstock of your favourite colour
- Ruler and a pencil
- A bone folder
- Scissors
- Glue
Steps to create the box
- Take a square piece of your favourite colour's coverstock and draw two diagonal lines such that they cross each other at the centre of the page. The size of the gift box will be 25% of the diagonal's measurement.
- Fold all 4 corners of the page such that they meet at the centre of the page. Crease the fold firmly by using the bone folder for a quality finish.
- Fold each corner up to the crease created by the first fold on the opposite side as shown in step 3 of the figure. Be careful while folding each corner to avoid any wrong folds.
- Once again fold each corner but this time to the nearest crease as shown in step 4 of the figure.
- Cut the paper from four sides as indicated in the image. The cuts can be made on any side of the page provided that they are opposite to each other.
- Fold the page from two sides to the middle of the such that the folds are aligned with the cuts. Glue the folds for greater stability.
- Fold up the edges as indicated in the image to create two sides of the box.
- Now, fold the ends that were cut earlier and glue them.
- Finally, fold the remaining two sides to the middle of the box.
- Now to create the lid make another such box but of a slightly larger size so it can cover the box. Bam! your origami ggift box is ready!
Paper Cake Box for Birthdays
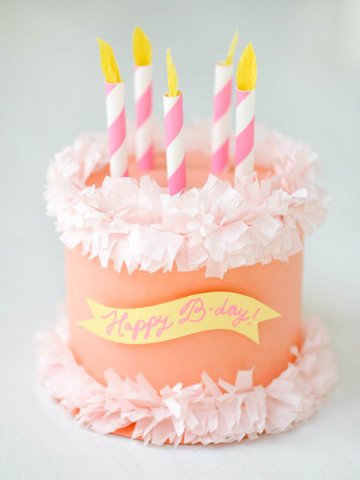
Birthdays are all about celebrations and gifts. Usually, birthday cakes are packed in boring square boxes but today we are going to tell you a simple DIY procedure to make a creative round birthday cake box.

- Fringing scissors
- Two different coloured crepe paper streamers
- Craft knife
- Bone folder
- Pencil
- Colourful paper straws
- Glue gun
- Markers
- Foam dots
- Cover weight paper
- Yellow streamer
Procedure to make the Cake Box
- First step involves cutting off two stripes each 3" wide and 11" long. You can adjust the length and width of the stripes according to your cake's size.
- Score 0.5" using the bone folder from the longer side of the strip as shown in the image.
- Third step involves cutting of tabs, make sure that the width of each of them is around 0.25".
- Crease the tabs in order to fold them down.
- Now roll these strips and glue their edges to get a cylinder.
- One cylinder should be slightly larger than the other one so that they can easily fit each other.
- Trace a circle equal to the larger cylinder, now, trace another circle but it should be 0.75" larger than the previous one.
- Fold the tabs and glue them to the smaller circle as shown in the photo. The top/lid of the box is ready. Now, employ a similar method to glue the smaller cylinder to the larger circle, which will be the base of the box in which the cake will be held.
- Cut out a few lengths of your chosen crepe paper and fold it in half. Cut fringes into it which will be used to decorate the box.
- Attach these trimmed fringes to the top and bottom f the box.
- Produce a flame illusion from yellow streamer by rolling it and cutting out a flame shape. Cut small pieces of colourful straw and glue the flames on top of them. Glue these fake but creative candles on the top of the box.
- For the Happy Birthday tag, cut out a small banner from a sheet of your desired colour. write and decorate the message using the markers and stick it to the box using the foam dots. Congrats! your cake box is ready!
Gift Boxes Decoration Ideas
Gift boxes look absolutey boring without some artistic and creative decoration. Although these decorations are easily available on various shops but today we will show you how they can be created at home by some simple tricks. These decorations will give an amazing personalised touch to your gift box. Time to unfold your creativity!
Paper Butterflies Decoration
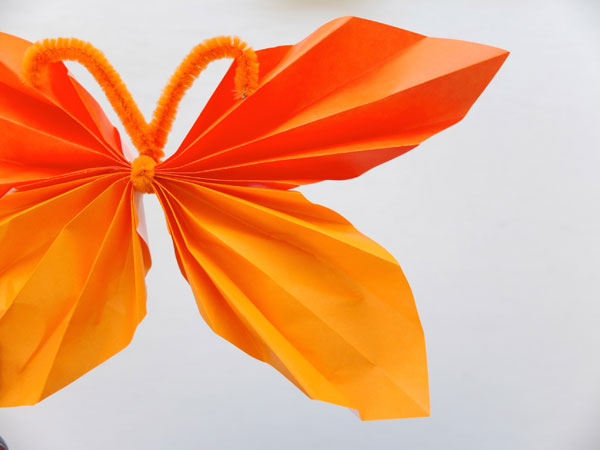
Butterflies are a symbol of spring and beauty. A paper butterfly is a perfect decoration piece for a gift box. There are multiple ways to craft them but today we are going to tell you the DIY method to make the simplest but the most beautiful paper butterflies.
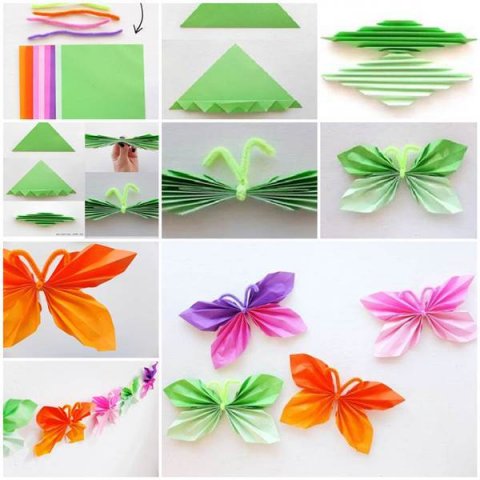
- Square coloured sheets
- Thin ribbon or yarn
Procedure to make paper butterflies
- Take two equal sized square sheets of different colours. Fold each of them diagonally.
- Now fold each side of the triangle in a zig-zag pattern as shown in the figure. These zig zags should be around 1 cm apart. Repeat the same procedure with another diagonally fold triangle.
- Now place these sheets together as shown in the image and tie them with the thin ribbon or yarn of your desired colour.
- Spread out the sides of the triangle to give them a wing-like design as shown in the image. Ta-da your paper butterfly is ready!
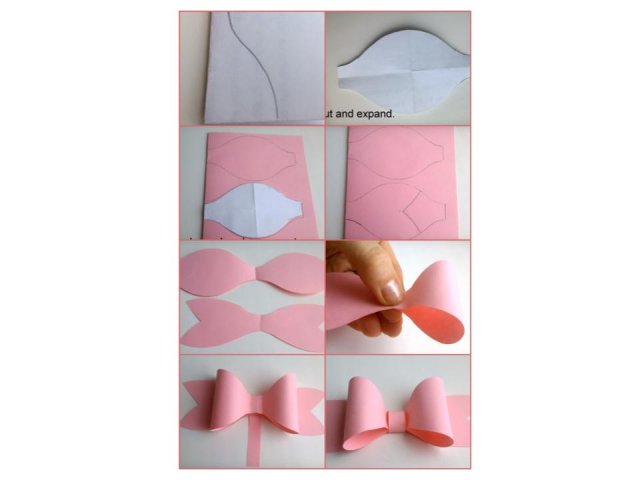
Easy Paper Bow
Paper Bows
Required material:- Square coloured chart sheets
- Glue
- Scissors
- Pencil
Step by step paper bow:
- Take a square white sheet of paper and fold it in half.
- Once again fold the already folded sheet in half.
- Draw the pattern as shown in the image.
- Cut the drawing and expand it.
- Take another sheet from which you want to make the bow and place the cut-out on it and then outline it twice as shown in the image. Draw the bow lines on one of the images as shoen in the photograph.
- Cut both the outlines. Cut a rectangle having a length of around 4cm and width of 1 cm.
- Apply glue to both the edges of the cut-out as shown in the image and stick them to the middle as shown in the image.
- Now stick the rectangle's edge to the back of the second cut out and place the bow on top.
- Wrap the rectangle around the bow and glue it so that it remains at its place. Congrats! your aper bow is ready!
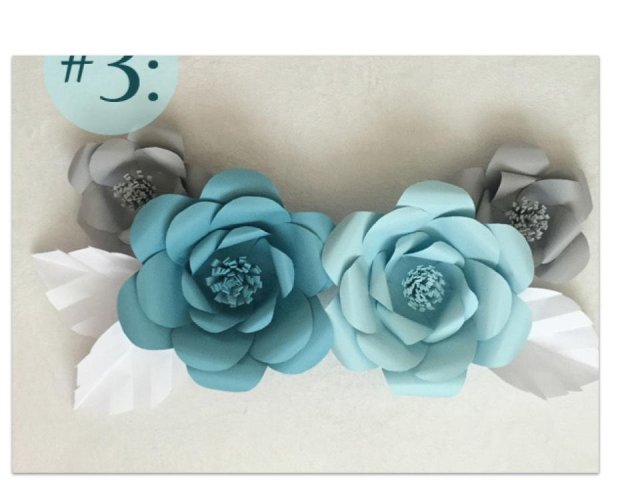
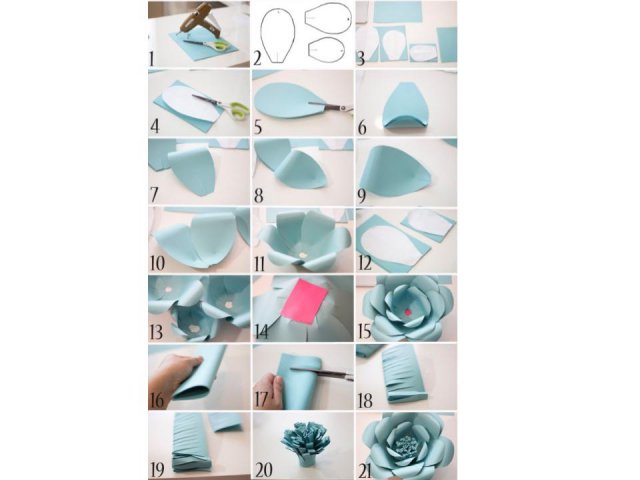
Paper Roses Decoration
- Glue gun
- Pencil
- Coloured chart sheets
- Scissors
Step by Step Paper Roses Procedure
- Take a white chart sheet and sketch three different sizes of petals as shown in the image.
- Take 18 pieces of your required chart sheet, ouline 6 petals of each size and cut them out as shown in the image.
- Place 6 petals of the same size together and cut them slightly at the base as depicted in the image. Repeat the same procedure with the remaining two type of petals.
- Slightly bend the top part of the paper petals to give them an illusion of a real rose petal.
- Apply glue at one side of the cut at the bottom and stick the other cut on top it so that a base is formed. Consult the image incase of any confusion.
- Now, stick these petals with one another and form a flower shape as shown in the image. Stick a small piece of paper below the base for increased stability.
- Repeat the same procedure with the other two types of petals to produce a three layered rose.
- Take a square piece of sheet and fold it in half. Now cut fringes at the folded part and then curl it in a circle to form the centre part of the rose as shown in the image.
- Stick the curled fringes in the centre of the rose. Ta-da your rose is ready!
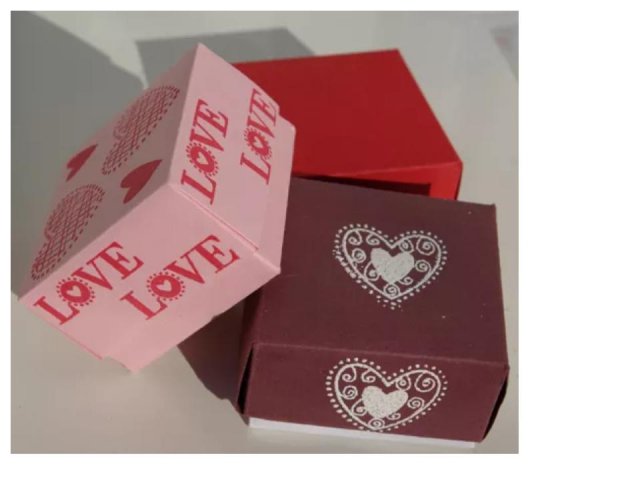
Personalised Lid
A gift box that has a personalised touch always stands out from the rest. There are multiple ways to provide a tinge of personalisation to your gift box but in our opinion, the best one is the presence of a favourite photograph on the lid. This decoration is usually best suited for DIY gifts such as an explosion box.
Another great method of personalizing a gift box is by writing short messages all over it. This idea is best suited when the gift is to be given by a group of friends. A small message from each person of the group will spice up the gift box and the gift.
At the end of this article, we can sense your confusion as all these amazing ideas are battling in your mind to gain domination. Best of luck with choosing the best one!
-
Looking for the Most Incredible Gift Wrap Ideas to Take Your Gifts to the Next Level? We Give You 10 Easy and Pocket Friendly Ideas of Gift Wrapping
-
Have the Perfect Gifts for Your Loved Ones But Can't Find the Right Gift Boxes? Learn How to Make Them Yourself!
-
Why You Must Gift a Plant: 15 Plants to Buy Online + The Benefits of Plants at Home and 4 Tips on How to Buy Them
-
 Can't Find the Perfect Present Present for Your friend's Housewarming Party? 7 Home Decor Gifts You Can Buy Online + 3 DIY Gifts If You Want to Gift Something Personalised! (2021)
-
 Know All About Gift Boxes with Paper: Top 10 Paper Gift Boxes to Pack Your Gifts in And 3 Ways to Make It Extra Special!
Look around for odds and ends to serve as embellishments
Once your box is ready, take a step back and see if it needs a final touch. It may look pretty but are you sure a piece of lace, ribbon, some rhinestones, buttons or flowers couldn't make it look even better? Rummage around your sewing kit, dressing table and look about the house for things you could use as embellishments. You'll be surprise at what you find, and it will be better than going out to buy an expensive trinket to act as an ornamnet for your present.
 Highlight the Best Facets of Your Incomparable Beauty: Discover the Best Face Highlighter Currently Available in India and Everything You Need to Know About Using Face Highlighters for Maximum Effect (2023)
 Forget the Blemishes and Get that Picture Perfect Flawless Radiance on Your Face: Check out the Best Foundations for Oily Skin Currently Available in India and Everything You Need to Know About Makeup Foundations (2023)
 Make Your Presence Felt Wherever You Go: Discover the Best Perfumes Under 2000 for Both Men and Women to Announce Your Arrival and Make Any Occasion Memorable (2023)
 Protect Your Oily Skin from the Harmful Rays of the Sun: Discover the Best Gel Based Sunscreens for Oily Skin and Everything You Need to Know Before Buying One (2023)
 Minor Blemishes and Wrinkles Affecting Your Confidence? Check out the Best BB Creams to Conceal Your Worries and Nourish Your Skin to Restore the Healthy, Radiant and Glowing Complexion Back Again (2023)