
-
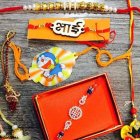 खुद ही राखी बनाए इन 8 बेहतरीन राखी विकल्पों के साथ और अपने भाई को हद से ज्यादा खुश करें। राखी पर अपने भाई-बहनों के साथ करने के लिए दिलचस्प गतिविधियों के लिए विचार भी (2020)
-
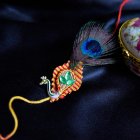 A Step-by-Step Guide to Making Rakhis: 10 Ideas for Handmade Rakhis, Envelopes and Thalis
-
 Looking for the Most Incredible Gift Wrap Ideas to Take Your Gifts to the Next Level? We Give You 10 Easy and Pocket Friendly Ideas of Gift Wrapping
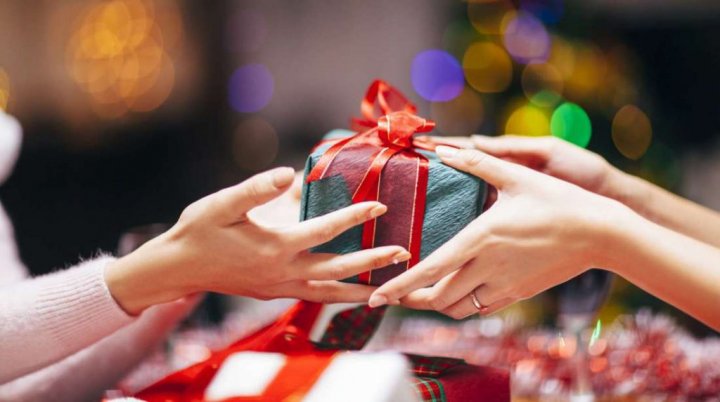
Gifts Can Strengthen Relationships

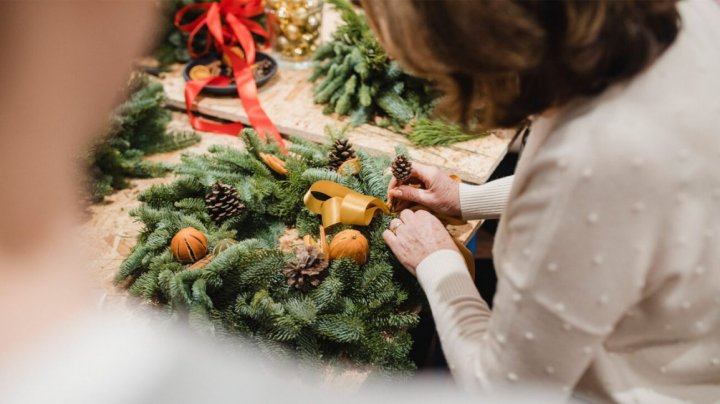
There are times when you feel the need to have people around you. It could be either something good happening in your life or it could be bad times. But having friends and family care about you is a great feeling. Building and fostering relationships are important. One way is to show your gratitude at appropriate times. What better way to make it special than creating something unique and personalised? While there are several options online, taking the trouble of designing and making a gift yourself adds so much feeling to the gift. But many of us don't have the needed time to make this happen. We have listed some easy-to-make DIY Thank You gifts that you can present.
How a Thank You Gift Can help
Shows Appreciation
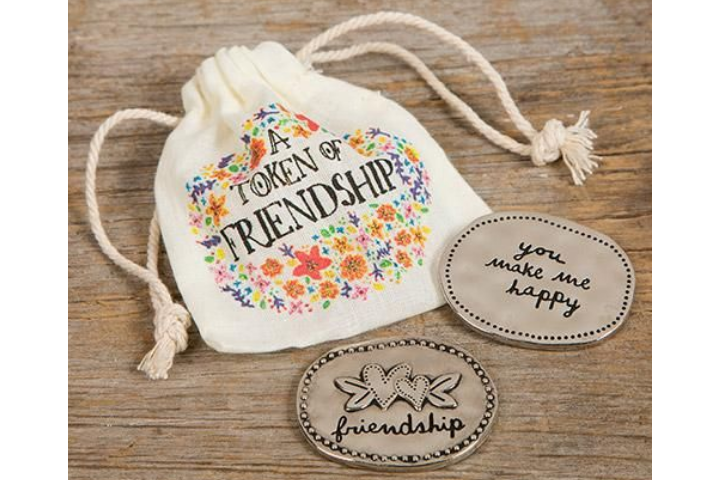
A Thank You gift can show the appreciation you have for others. It could be an achievement, or for elders for the support, they have been for you. You can also send the DIY gifts as a token of friendship for the friends who have been with you for a long time. You cherish your relationships with colleagues and can decide to hand them presents.
Provides Mental Benefits
Gifts from friends and family can positively affect our mental health. It will help if you send out gifts to those under severe stress. It can provide them with a sense of freshness, and they can remain thankful to you. An act of kindness like sending a cute Thank You gift can help engage people under a bout of anxiety and distress.
Improves Relationships

Giving cute DIY gifts can help nurture relationships. It can help appreciate the effect of the recipient on your life. You can strengthen bonds with various people and ensure they are beside you during tough times. Even going out of you to design DIY gifts is bound to put a smile on the lips of the recipient.
Nurtures Better Karma
Giving out gifts is a sense of selflessness and helps you reap the benefits of better karma. Doing good things in life and reaching out to people will ensure that they return the favour when you need it. An adage states that all good deeds are returned, and you can be assured that your good deeds will be returned as well.
Positive Effect on the Recipient

Any gift, even if inexpensive, can have different sentiments attached to it. It brings a sense of satisfaction to the giver. You can assure them and provide happiness to the recipient. The recipient is delighted and lets the people know that you are beside them.
10 Easy to Make DIY Thank You Gift Options: Simple Yet Meaningful!
Coasters Made from Magazines
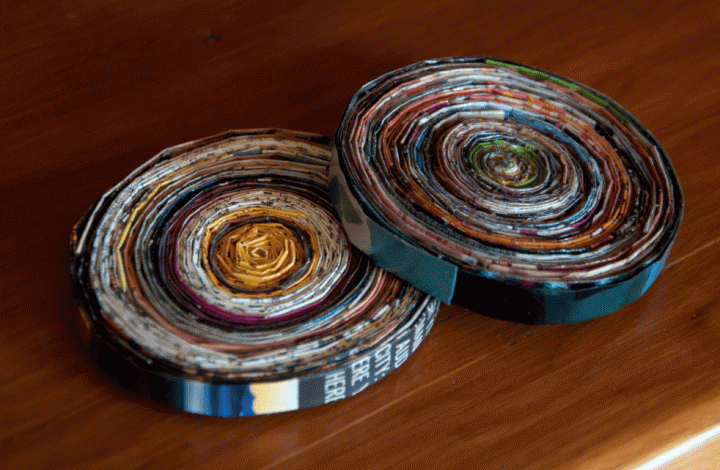
Old magazines occupy too much space and lead to be an annoyance at times. But are you aware they can be recycled and be made into beautiful coasters that can be handed out as Thank You gifts to people close to you? There can be a collection of lovely coasters that do not require too much time. A set of four can be easily created with minimal resources, and most of them would be generally available at home.
You can tear out a few magazine pages. The advertisement pages can be an excellent option. The straight side of the page can be folded to 1/4th inch. Make around four folds, which is the measurement for all the pages. Apply glue at the edges and fold again. Finally, cut along the edge, giving you a thin strip. Make around 30-40 such strips.
Apply glue on one side of the first strip, then roll it and make it circular and tight. Take the next strip and apply glue on one side. Please attach it to the end of the last strip and wrap it. You can wrap several such strips to make the coaster wider.
Materials you can use:
- Glue and brush
- Paper clip
- Old magazines
- Scissors
Wooden Utensils Dipped in Paint
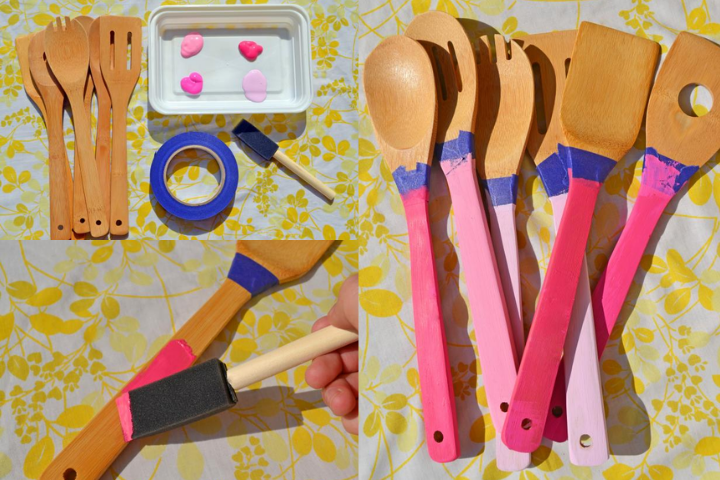
Several people are shunning plastic spoons and opting for wooden ones. The wooden spoons can also be a creative cutlery in the dining room. You can paint the wooden spoons with craft paint which can be a colourful addition to the dinner table. They prove to be an attractive gift for people you care about. You can use them as salad spoons or have ice cream and be a welcome break from ordinary spoons.
First, apply the painter's tape to the wooden spoon that will help you mark the height with a ruler. Take the craft paint and use it on the spoon. Once you apply the paint, place it upright in a container. Apply the coats based on your preference. When the paint dries, you can use shellac. Ensure it is food safe. It will give an enamelled finish. When the shellac dries, remove the painter's tape.
Materials you can use:
- wooden utensils
- painter's tape
- paint tray
- craft paint
- food-safe shellac and sealer
- foam paintbrush
Fabric Bookmark

Bookmarks are a favourite among DIY gifts. It can double up as a token of appreciation too. It is an ideal gift for those who have reading as a hobby. The gift is perfect for your teacher and elders at home. They will find it helpful to mark pages on the book they are reading. The recipient will remember you whenever they read a book and use the bookmark you presented.
First, cut the fabric lengthwise. The measurement depends on the width and height you prefer. Fold the cloth and have the pattern in the centre. The fabric can be sewed along the length, but leave the ends open. The seam must be at the centre on the backside of the bookmark. You can use an iron to ensure it. Make a fold of ¼ inch at one end and use the iron to press it in place. Place an elastic hair tie in the edge and sew the edge. Also, sew a button at the other edge.
Materials to be used:
- Fabric
- Sewing machine
- Button
- Needle (for sewing on a button)
- Hair elastic
- Coordinating thread
- Iron
Chocolate-Dipped Spoons
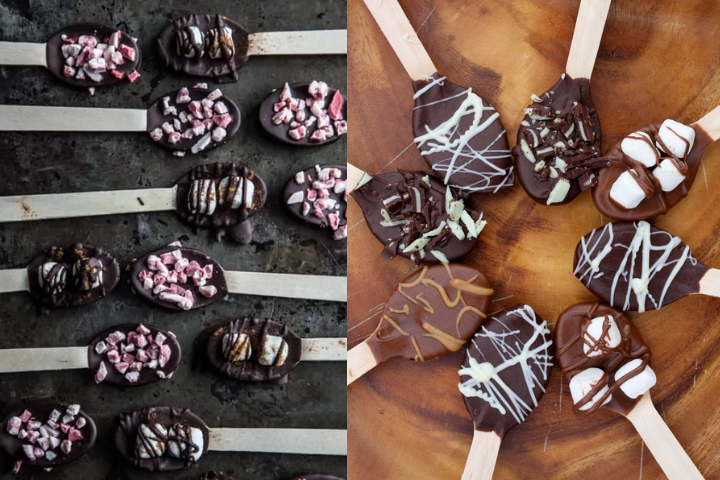
People of all ages love chocolate. It can be brilliant to dip it in your coffee every morning. Being a brilliant option during the weekends, you can rope in your kids to make one of them. They are straightforward to create and provide a burst of added flavour in your beverages.
You can take parchment paper and a baking sheet. Place them in a flat area. Take some chocolate and melt them in a boiler. The choice of chocolate is yours, but it is better to use dark chocolate as it contains lesser fat and is considered healthier. Take the spoon, dip it in the molten chocolate, and put it on parchment paper. Take some baking chips and sprinkle them on the spoon. Place this in a freezer to ensure the chocolate is set.
Materials to be used:
- 12 wooden spoons
- 1/2 cup dark chocolate chips
- 1/4 cup Peppermint Baking Chips
Leather Cord Rolls
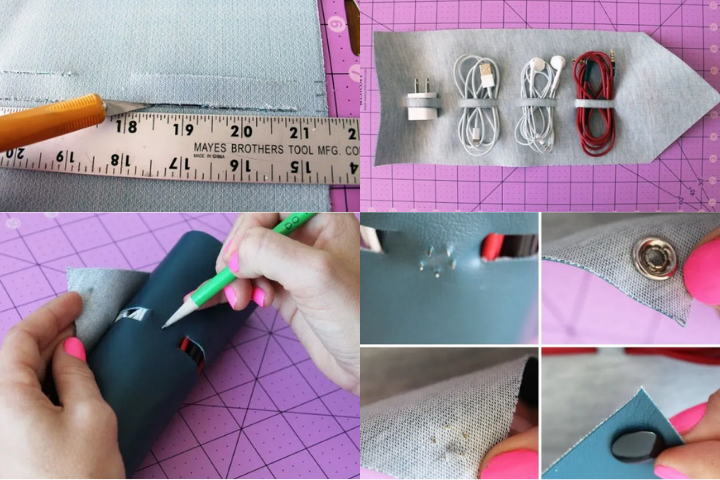
It is incredibly fussy when the ear chords get entangled. In severe cases, they must be disposed of, and a new one must be bought in its place. The chords can be a helpful companion when travelling, and you wouldn't like to untangle them all the time. Having them in order, but keeping them out of sight can be an ideal option. But how can you ensure that the chord will be like that for a long time? These are the leather rolls that can help. The recipient will also love such a gift, making it another brilliant option as a Thank You gift.
You can cut three lengths based on the materials you would prefer to carry. You can cut the leather with a knife. Also, cut some small pieces that will act as the chords. The loops can be cut to hold items in a single row. Mark with the pencil where the strip will meet. You can push the snap button and secure both sides.
Materials to be used
- Leather
- Buttons
- Knight
- Ruler
- Pencil
- Cutting board
Wrapped Bracelets
Are you willing to gift a fashionista a Thank You gift? You must try something new and unique too. What about designing a DIY wrapped bracelet for the person? It will show that you know in detail about their preferences. It also shows that you care about them. Moreover, you will be remembered whenever the person wears it. Designing it is easy as you will only need a pair of new socks and some glue.
Take a wooden bangle and place it correctly inside the sock. Cut the sock carefully while ensuring that the bangle is inside the cock. The sock must cover the bangle adequately with a slight overlap. You can now use some hot glue inside and let it dry. You can also add some designs on the outside to add the elegance needed to the bangle.
Materials to be used:
- Wooden bangles
- New pair of socks
Customised Clipboard
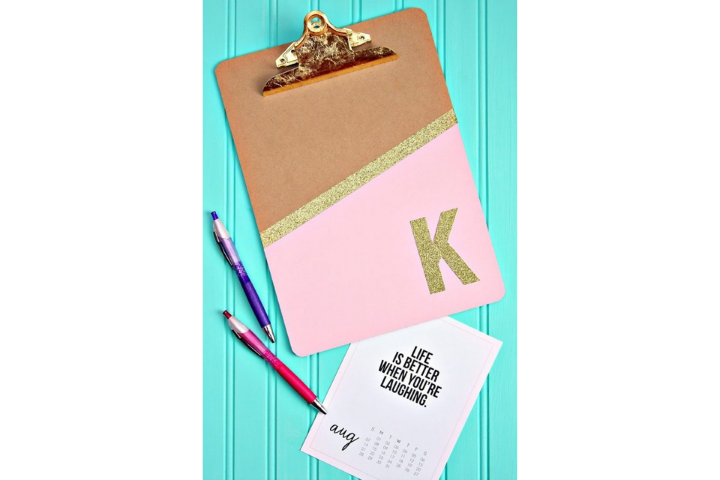
If you are gifting a person like a teacher, nurse, or coach, the customised clipboard can be a great present they will cherish. It will be a valuable gift for them, and they will use it throughout the day. It can be created by jazzing up any old clipboard. But we suggest that you put forth your creative skills and personalise them well for the recipient.
First, cover the clip with something jazzy. Use a designer tape and tape the clipboard diagonally through the middle. Add glitter tape atop the painted line. Also, put some golden glitter letters. The clipboard can be sprayed with a sealer. You can similarly decorate the back portion too.
Materials to be used:
- painters’ tape
- gold leafing and adhesive
- favourite colour paint
- gold glitter tape
- spray sealer
- gold glitter letter
Monogrammed Hand Sanitiser Bottles
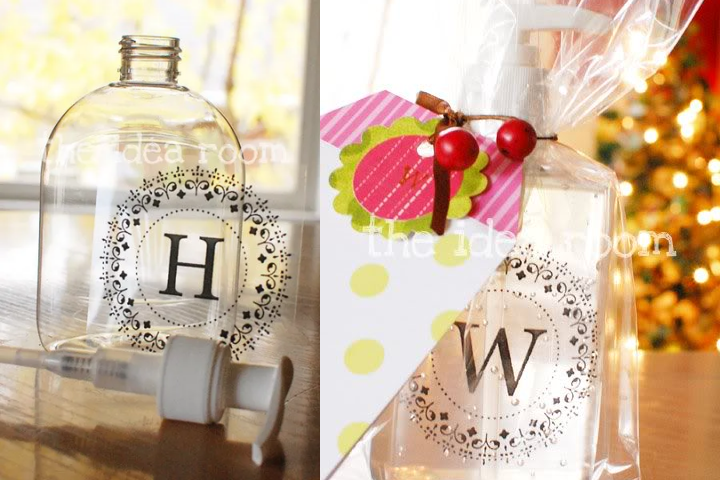
A carefully designed hand sanitiser can also be a welcome Thank You gift for people you care about. It will be welcomed during pandemic times and will adorn the shelf of the recipient. When we buy any sanitiser, we usually use it and throw away the bottles. But we suggest you keep one with you after using it. The sticker and labels can be removed with a wet cloth. A glass bottle can be the ideal option for you.
First, you must choose a unique and elegant design by searching the internet. It is better if the design is circular, as you can add the recipient's initials in the middle. Take the size of the bottle and ensure the picture can fit the front of the bottle. If you don't have a laser printer, print the design on a standard printer and request a copy centre to superimpose it onto a transparent slide paper. Cut the transparent paper properly and keep the design intact. Cut it as a square piece. Finally, paste this on the bottle.
Materials to be used:
- Glass / transparent sanitiser bottle
- transparent paper
- printer / copier
- scissors
- glue
Handprinted Aprons for Mother's Day
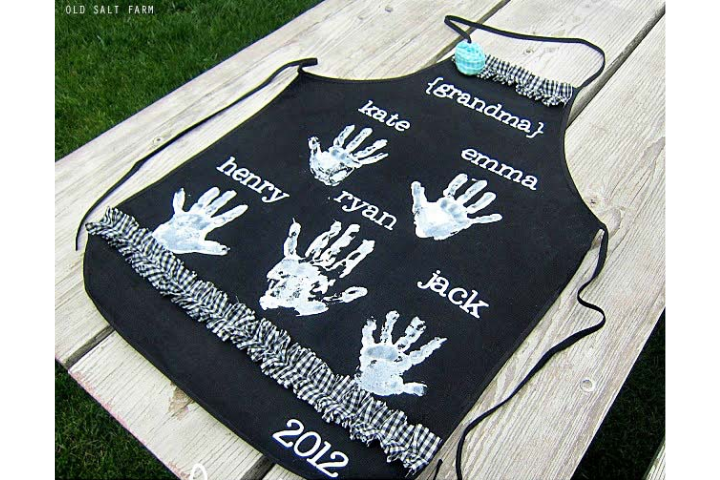
Aprons as a Thank You gift can be an excellent option for women or anyone who loves cooking. You can capture small hand-prints of your kids. It will act as a freezing moment for the elderly at home. The hand-prints of all kids at home can adorn the aprons too.
Take the apron and design with embroidery or any design according to your preference. Also, consider the colours that the recipient prefers. Next, you cut out the name of the kids and the recipient. The name can be stitched onto the apron. Apply some white paint on the kids' hands and tell them to place their hands on the apron. Be careful that the hand-prints are against the names of the kids. Let the paint dry out for some time. You can use a cloth frill or any other design you wish at the neck.
Materials to be used:
- canvas apron
- fabric paint (make sure it’s washable!)
- fabric, matching thread
Cute Bath Bombs
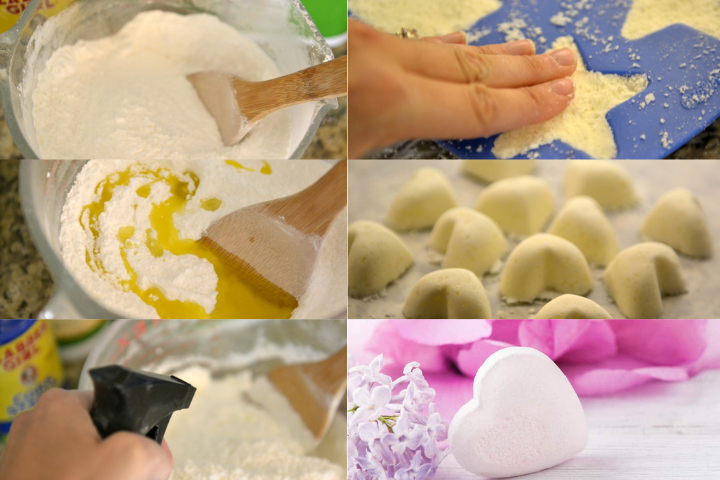
Bubble baths are a welcome means to de-stress oneself. Bath bombs can help ensure the recipient keeps cool and has a better mind. It shows that you care about the well being of the person. Don't be bogged down by the list of ingredients, as they are relatively easy to make.
- Take a large bowl and mix citric acid, salt, baking soda, and cornstarch. Ensure it blends well with no lumps being formed.
- Mix the essential oils and olive oil in this mixture. Blend well for a smooth mixture.
- Spray some hazel to ensure the mixture is moistened to hold shape.
- The mixture can be pressed into the mould and rest for 10 -15 minutes.
- They are moved from the moulds, placed on parchment paper, and dry for a day.
- Place them in a jar or wrap them in cellophane before gifting.
Materials to be used:
- empty spray bottle
- 1 cup sea salt or Epsom salt
- 5-6 drops essential oil
- 3 teaspoons olive oil
- 2 cups baking soda
- 1 cup cornstarch
- 1 cup citric acid
- 2 teaspoons witch hazel or water
- silicone mould
-
 10 Best Gifts for Boyfriend and a Complete Guide for Selecting Gifts That Will Not Only Surprise and Impress, but Knock His Socks Off! (2019)
-
 What If You Can Make an Exclusive Designer Dress by Re-Using Your Old Saree(2020)? Create Magic by Transforming Sarees into Lehenga Using Our Craft Ideas and Be Proud of Yourself!
-
 Make His Birthday a Day to Remember! 10 Excititng Gifts for Your Husband on His Birthday and 3 Ways to Make This Day Memorable (2019)
-
 Great Birthday Gifts for Him are Hard to Come By! Use Our Ideas to Find the Perfect Gift Each Time & 10 Super Gifts for Boyfriend on Birthday (2019)
-
 Top Diwali Gifts for 2020 to Give to Family, Friends and Associates
Your Gifts Will Tend to Speak Louder Than Words
It has been stated that actions speak louder than words, and there is no better way to express yourself than by gifting. Giving a thank you gift might help you convey exactly what you want to say when you are trying to find the right words or don't know how to articulate your thoughts and feelings. These DIY thank you gifts given does not even have to be expensive - you can easily make it with your penny savings. These creative DIY thank you gift ideas will be sure to put a smile on your loved one’s faces.
 Highlight the Best Facets of Your Incomparable Beauty: Discover the Best Face Highlighter Currently Available in India and Everything You Need to Know About Using Face Highlighters for Maximum Effect (2023)
 Forget the Blemishes and Get that Picture Perfect Flawless Radiance on Your Face: Check out the Best Foundations for Oily Skin Currently Available in India and Everything You Need to Know About Makeup Foundations (2023)
 Make Your Presence Felt Wherever You Go: Discover the Best Perfumes Under 2000 for Both Men and Women to Announce Your Arrival and Make Any Occasion Memorable (2023)
 Protect Your Oily Skin from the Harmful Rays of the Sun: Discover the Best Gel Based Sunscreens for Oily Skin and Everything You Need to Know Before Buying One (2023)
 Minor Blemishes and Wrinkles Affecting Your Confidence? Check out the Best BB Creams to Conceal Your Worries and Nourish Your Skin to Restore the Healthy, Radiant and Glowing Complexion Back Again (2023)