Related articles
-
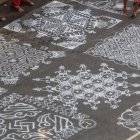 Simple and Easy-To-Create Pongal Kolam Designs To Decorate Your Home Traditionally
-
 A Party without the Right Decor is Hardly a Party: 5 Home Decor Ideas for Birthdays and 10 Party Props to Buy Online (2020)
-
 This Diwali, Prepare to Welcome Goddess Lakshmi with a Mix of Traditional and Contemporary Décor: Unique Diwali Decoration Ideas for Your Home to Make It Look Spectacular Like Never Before! (2020)
Rangoli and Its Significance in India
Rangolis are a traditional form of art that has its origin in India. This includes patterns or designs that are drawn on the floor mainly in front of the house or in the pooja room. The word Rangoli is derived from the Sanskrit word -“ranga-Valli” which means coloured earth. They are given different names in different states of India. Rangolis are believed to have the spiritual aspect and the design, colour and pattern of rangoli determines its vibrations. They are either drawn on wet or dry surfaces and may be of freehand type or dots guided one.
Rangoli is considered auspicious and hence they are particularly drawn during festivals, religious ceremonies and special occasions. Dhanteras marks the first day of Diwali. Diwali is celebrated to welcome Goddess Lakshmi and rangoli designs adorn the entrance of every house to welcome the deity.
Rangolis can be of geometric patterns, lines, nature representing motifs, face of Hindu deities and abstract art. A rangoli with lotus design is usually popular during Dhanteras as this beautiful flower represents Goddess Lakshmi. There are hundreds of variations that are drawn during this festival. Irrespective of the design, Dhanteras is incomplete without rangoli. However, not many of us are adept in this ancient art, especially newbies. So, we look for some easy ways to draw a rangoli pattern.
Rangolis are made easy with the help of various tools and moulds. Some of these tools are easily available at home which includes daily usage articles like bangles, plates, fork, comb, earbuds, spoons etc. Well, you must be wondering how to use these tools to draw rangoli. Mentioned below are simple ways to use them to create this beautiful art.
3 Tips for Rangoli Drawing
1. Select an Easy Design
If you are a beginner then choose an easy design. You can find plenty of designs these days in magazines, books and on the internet. If you are creative, then you can make your own design too.
2. Decide Where to Draw
Usually, rangoli is drawn at the entrance or in the puja room on a flat and dry surface. You can also make your rangoli design on a sturdy paper that can be displayed anywhere.
3. Fill the Rangoli with the Chosen Material
Rangoli can be made using a variety of materials like vermillion, turmeric powder, rice flour, sand, flowers, chalk powder, coloured marble powder, paints, crayons etc. Filling the rangoli is perhaps the challenging part. Take the required material and using your index and thumb finger to sprinkle gently on the design.
10 Easy Rangoli Designs for Dhanteras
Using a Comb
Material Required
- Rangoli powders in blue, red, green, purple, yellow and white colour. Tools used to make this rangoli – Comb, Sieve, Ear Bud, Jar Lid, Strainer and Pressure Cooker Gasket.
Steps for Drawing
- Place a sieve on the floor and through a strainer pass the red coloured rangoli powder to make a circular pattern. Now, with the help of a comb make a scallop-shaped design on the circle.
- Use a pressure cooker gasket as a guide to place dots of alternating blue and red around the circular pattern you just made. Create straight lines on these dots with the help of the comb. Fill in the space between the two circles with green rangoli powder. Make use of a jar lid to draw a leaf-shaped pattern around the outer circle with white rangoli powder. Fill the leaf with purple rangoli powder. Now make green and yellow alternating dots between the tips of the leaves. Draw lines on the dots using comb-like you did earlier. Below this makes blue dots and using earbuds create patterns as shown in the video. Place colourful diyas in the centre of the rangoli and on the leaf pattern.
Using a Fork
Material Required
- A big circular ring, Rangoli Powders and Fork
Steps to Draw the Rangoli
- Place the Circular Ring (you can also use a cooker gasket). Make dots with white rangoli powder around this ring as the guideline. Remove the ring and add small heaps of red rangoli powder in the form of dots inside the white circle of dots. Drag the fork on these dots twice from the sides to form Tulip shape. Next, make white dots close to each other right below this tulip shape. Fill in the centre with a red colour. Take a stick or paintbrush and drag the white dots towards the centre to give it a flower-like shape. Make a small circular dot at the centre with red rangoli powder. Complete the rangoli by making huge dots with red rangoli powder as the outermost layer and make the same tulip shape using a fork. Make small triangular white dots between these tulip shapes and drag the dots down to form a leaf-like pattern.
Using a Spoon
Materials Required
- Rangoli Bottle Squeezer, Rangoli Colours - Blue, Purple, Yellow, Pink, White, Green.
Steps to Draw
- Draw two horizontal lines (3 – 4 inches apart) and of the required length on the floor or any place where you want to make this beautiful rangoli. Draw semicircles with one of the horizontal lines as the base. Each width between the semicircles must be about 2 inches. Fill the plastic squeezer with white rangoli powder. Make dots without any space between them on the horizontal lines. Use a fork to make a wavy pattern on these dots. Fill the gap between the wavy pattern with another line of dots. Now start the rangoli design from the outermost semicircle. Place a small quantity of rangoli powder in the form of dots next to each other inside the semicircle. Take a spoon and apply gentle pressure on the small heap of rangoli powder to slightly flatten it. Once you complete the entire semicircle move on to the next one. Place dots of rangoli powder at the bottom of the first layer and repeat the process for all the half circles. Complete the design with a border of three triangular dots (slightly flatten the dots with your fingers) with a small circle in between them. Finally, make small dots (4 – 5) of alternating colours on the outermost edge of the rangoli.
Stencil Rangoli
If you want to try something creative this season then DIY stencil rangoli is just perfect. There are plenty of free stencil designs available on the internet from beautiful floral patterns to delicate peacock feathers which you can download and get a printout. You can choose any of your favourite themes. Cut out the stencil and keep it ready. You can use acrylic or poster colours or rangoli powder for filling. If you are using paint then you will need earbuds and tissues to wipe excess paint. Place the stencil on the area where you want to make rangoli. You can tape the paper to the floor before you begin. Fill the empty space on the stencil with rangoli powder or paint. Once you are done, remove the paper. You can wipe excess paint with an earbud. Decorate the rangoli with marigold flowers and diyas or candles. If you are not a DIY person, then go for readymade stencils available on Amazon. A set of 8-piece stencils will cost you Rs. 274.
Mosquito Coil
Material Required
- Different Rangoli Powders, a Strainer and Mosquito Coil
Steps to Make the Rangoli
- Use a strainer to sprinkle white rangoli powder on the floor. Place the mosquito coil on the white base and sprinkle red colour rangoli powder to cover the coil. Remove the coil carefully. For the second round use a smaller coil and place it in such a way that it forms a semicircle. Sprinkle purple rangoli powder only the semicircle area. You need to repeat this 5 times. For the third layer, place the coil in-between the two semi-circles of the 2nd round. Sprinkle blue rangoli powder on it. For the final layer repeat the same procedure by placing the coil in-between the semicircles of the 3rd layer. Complete the rangoli by placing dots around. Draw circles on the dots using an earbud or your finger.
Quilling
This unique rangoli is a great alternative when you do not have coloured powders. Moreover, you can preserve this carefully and reuse it for any other occasion.
Material Required
- Quilling paper strips of various colours, Slotted Quilling Tool, Scissors and Craft Glue.
Steps to Make This Rangoli
- Start by wrapping blue coloured paper around a circular object (a jar lid) until you get the required thickness, glue the end and remove it from the object. You will now have a circle. Make 10 small loosely rolled coils of white paper and glue it at equidistance on the circle. Now make 20 teardrop shapes using dark green, yellow and red-coloured strips. Glue two of these petal shapes in between the white coil. For the next layer of rangoli, you will need orange and purple paper strips. Make Marquise shape with orange in the centre and purple on the outside. (to make marquise shape – just roll a closed loose coil and pinch both sides to a point). You will need 24 such pieces. Now paste 4 of these marquise shapes in a vertical diamond shape in between the two teardrops of the 2nd round at equidistance. Next, you will need 24 shaped teardrops. (For this you will need to roll a closed loose coil and pinch one side to a point and slightly bend on a side). Paste these at the bottom of the vertical diamonds you just made to complete the design. Fill a container with water and add some flower petals. Place a floating candle in the container and put it in the centre of this amazing quilling rangoli. Be prepared to get tons of compliments from everyone for your efforts.
Ice-Cream Sticks
Material Required
- Ice-cream sticks, Rangoli Powders, Strainer, Earbuds
Steps to Draw the Rangoli
- Draw a circle with the length of the ice-cream stick as the radius. Place a small candle/a lid in the middle of the circle. Now sprinkle yellow rangoli powder inside the circle and completely cover it. Arrange 16 ice-cream sticks on the circle at an equal distance. Sprinkle blue rangoli powder around the candle/lid to form a small circle. Around this sprinkle, purple colour to form another circle. Use black rangoli powder for the last circle. Now gently remove the candle/lid that you had placed at the centre and the ice-cream sticks gently without disturbing the colours. Take a square-shaped jar to make the triangular shape design at the edge of the rangoli. Fill the centre of the rangoli where you had placed the candle/lid with alternating black, blue, purple and yellow powder. Make dots around the rangoli and gently flatten it. Fill the alternating dots with black powder. You can place diyas or candles around the rangoli to make it more attractive.
Plates
Material Required
- Different size plates or lids, strainer, rangoli colours
Steps to Draw the Rangoli
- Draw 5 concentric circles with plates of different sizes. Place the smallest plate/lid at the centre and carefully using the strainer sprinkle pink rangoli powder around the lid. Now remove the lid and place a bigger plate such that it covers the pink rangoli powder. Take white rangoli powder in the strainer and now sprinkle it around the lid like you did earlier. Repeat this process until you cover all the concentric circles with different rangoli powder. Now make a semicircle kind of design around the rangoli by gently pushing the last layer with a small lid towards the centre. Complete the design by placing small dots in a triangular shape in green, white and pink rangoli powder around the tip of the semicircles. Take an earbud or a stick and shape these dots to look like flowers and leaves. Place a candle or diya in the centre.
Bowl
Materials Required
- Six bowls of similar shape and size, Rangoli colours, Strainer and earbuds
Steps to Make the Rangoli
- Arrange the six bowls in a hexagonal shape. Take a strainer and fill it with any rangoli colour of your choice. Sprinkle the powder around and on the bowls to form a circular shape. Now carefully remove the bowls. You will see six empty circular shapes. In the centre, you can draw any design (flower, Ganesha etc). Now at the centre of the empty circles, place a small pile of rangoli powder and gently flatten it. Take an earbud and create circular designs on it. Even a novice who doesn’t have any experience can make this beautiful rangoli and get compliments for it.
Bangle
Material Required
- This beautiful rangoli design is sure to beautify the space during a festival. You will need bangles of different sizes and coloured Holi powder or Gulal.
Steps to Make the Rangoli
- To begin, place a bangle on a flat surface and fill it with blue coloured Gulal. Place 6 bangles of the same size around the centre circle to mimic a flower and fill them with pink powder. Place more bangles in between each petal to form the second row of circles. Fill it with green colour powder. Place 2 small bangles, one in front of the other in the empty spaces between the circles of the second row and fill them with purple coloured powder. Draw a circle with a yellow powder such that the second smaller bangle intersects it.
- Carefully remove all the bangles and fill the empty spaces with a thin coat of white powder. Then, pipe small dots of white powder in the empty space around the centre circle and the first row of circles. Flatten the dots with your finger and fill it with bright orange coloured powder. Finish the design by outlining the centre and first row of circles with white powder.
Bonus Idea: Eco-friendly Rangoli Ideas
During a festival, rangoli is one of the best ways to decorate your homes. It is usually made on the courtyard or near the doorstep. These designs are created using bright colours which are harmful to the environment. The world is moving towards sustainable ways of living, so keeping the environment and climate in mind, it is good to ditch the synthetic powders. Instead, you can create beautiful designs using natural colours and dyes like rice flour, lime, turmeric or kumkum. Stunning rangolis can also be made using vibrant flowers and leaves arranged in a pattern on the floor or in a container filled with water. To enhance the design, you can add diyas or LED lights which also light up space.
Related articles
-
This Diwali, Prepare to Welcome Goddess Lakshmi with a Mix of Traditional and Contemporary Décor: Unique Diwali Decoration Ideas for Your Home to Make It Look Spectacular Like Never Before! (2020)
-
 10 Divine Rangoli Designs for Navratri: Beautiful Rangolis To Welcome the Goddess and Also Good Luck to your Home! (Updated 2020)
-
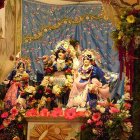
 जन्माष्टमी उत्सव पर अपने घर में आने वाले महमानों को घर की सजावट और सुंदरता से प्रभावित करें : यहां 10 जन्माष्टमी सजावट के सुझाव जिन्हे आसानी से लागु किया जा सकता है। (2020)
-
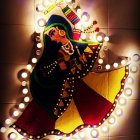
 Its Birthday Time for Our Favorite Lord Krishna and Time to Go the Creative Way this Year with These Unique Janamashtami Decoration Ideas 2020
-
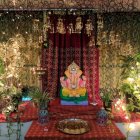 Decorate Your Home Spectacularly This Ganesh Chathurthi! 10 Artistic and Stunning Ganesh Chathurthi Decoration Ideas for a Fresh Look!
No Rules
There is no particular rule to follow. You can draw your own designs, freehand. Also, you can expand your rangoli by adding layers, making it bigger. Or you can simplify, by drawing basic shapes and patterns. It is always your choice.