-
 Ever Wondered How to Make Paneer at Home? Here is the Complete Guide to Take Out Soft and Creamy Paneer from Milk at Home (2021)
-
 Looking to Spice Up Your Next Meal? Here Is a List of Best Food Delivery Apps in India for 2019
-
 समुद्र तट, प्रकृति का जादुई सौंदर्य, अनूठा आकर्षण सब कुछ है - पांडिचेरी यात्रा के दौरान वहाँ क्या देखें, क्या खाएं, कहां खरीदारी करें: पांडिचेरी में घूमने के 10 सर्वश्रेष्ठ स्थान (2020)
Many Ways to Use the Baby Food Jars
Using Baby Food Jars at Home
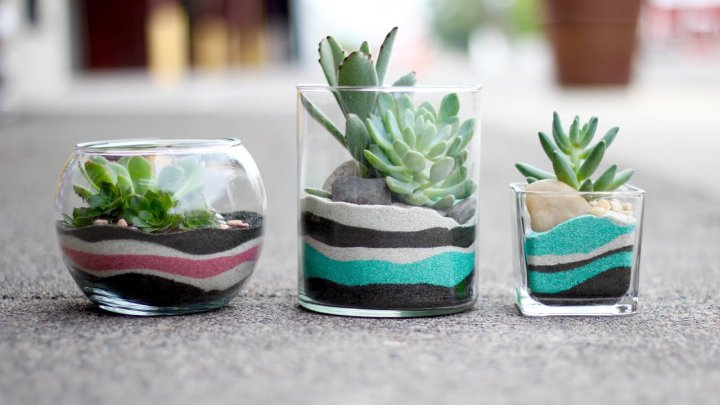
If your home’s filling up fast with empty baby food jars, why not put them to better use? Once the jars have been cleaned, they can be used for crafting, organizing, to being tiny gifts. When it comes to reusing the baby food jars around the house you can store hair accessories, Q-tips, hair rubber bands and keep them on a bathroom counter, or plant succulents in the jars and display on a porch or on the patio.
Baby food jars are excellent for storing garden seeds or hold paper clips, thumb tacks, etc on your work desk or in the office. A photo globe with a picture of your family or your kids inside a baby food jar would be cute, as can organizing your spare change with different coins in different jars be. A mini sewing kit or a travel keeper for your small jewelry and trinkets in the baby food jar can be useful too.
Baby Food Jars in the Kitchen
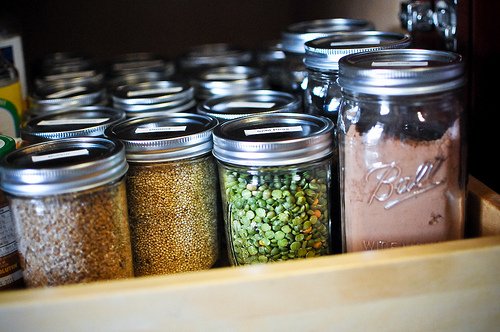
The baby food jars can be reused to organize your spices or you can just hang them with spices on your refrigerator door with magnets. You can decorate your window sill in the kitchen with a herb garden in the baby food jars or Edible party favours with hot cocoa, shaved chocolate and mini marshmallows in the jars can be an interesting giveaway as well.
Serve up the ingredients for a cheesecake for individual servings in baby food jars and voila your dessert’s ready! Since baby food jars are a perfect size for serving, you can sterilize the jars and the lids and reuse them for homemade baby food. Mini cupcakes in baby food jars, make for a super cute gift!
Other Ways to Use Baby Food Jars Creatively

Besides being reused at home, the baby food jars can be reused for craft purposes and more. For storage purposes, they can be used for placing different supplies in your kids’ or your crafts room. For instance, you’d use them as a crayon caddy with coloured crayons, or fill the water and set them on the art table to rinse your paint brushes in. A mini ocean in the jar would be a fun plaything or a pretty home décor item, while different jars filled with different coloured homemade play dough for a kids’ gift basket could be a creative idea to work with.
Reuse the baby food jars as favours by making cute & quirky emoji jars for desktops or glue painted toy animals on the food jar lids as giveaways for storage purposes. You can also use them as tooth fairy jars for small kids and/or teach your kids to save their pocket money by dividing their allowance in 3 baby food jars labelled save, bank and spend! For home décor, you can fill the baby food jars with layers of coloured sand or make them into mini lava lamps, or even jar lanterns. Wish or Dream Jars, or Craft Kit Jars with different embellishments are some other crafty uses for the baby food jars.
Baby Food Jar Gift Ideas
Inspirational Jar Candles
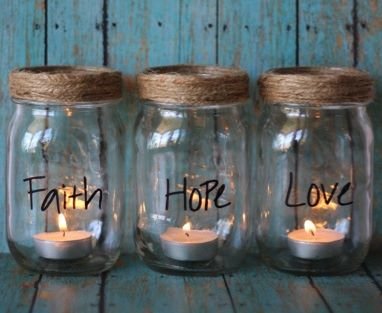
Add a bit of fun flair to your mantelpiece with these simple & inspiring T-Light Jar candle holders. Don't forget to check-out this link.
What You Need:
- Brush Black Sticko Alphabet Stickers
- Baby food jars
- Mod podge
- Glue gun or glue dots
- T-light candles
- Twine.
Method:
- To begin with, get the stickers and choosing the words Faith, Hope & Love, affix the letters on the baby food jars by brushing a thin layers of mod podge to the back of each letter.
- Next, wrap some twine around the jars’ rims using glue dots or a glue gun to keep it in place. Drop in a t-light in each jar and voila you have your cute T-Light Candle Holders!
Snow Globe Gift Jar
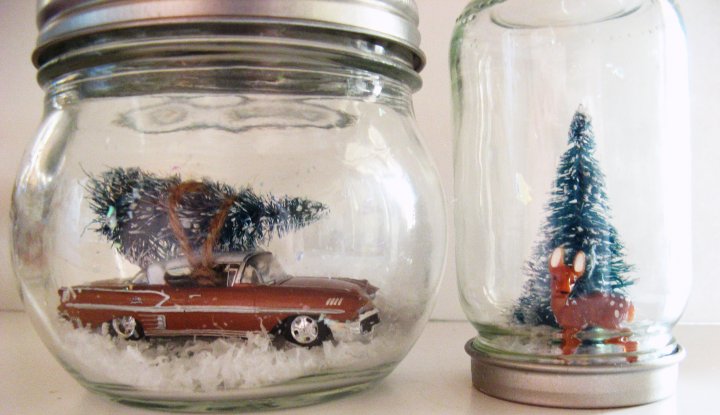
There’s something warm and magical about turning a snow globe upside down and watching tiny glitter flakes dance at the bottom of the jar delightedly. A DIY snow globe in a baby food jar is an adorable gift that is relatively easy to make and that too in less than 5 minutes!
Make sure to check out this link
What You Need:
- An empty baby food jar
- A mini scrub sisal Christmas tree on a wooden base
- Glycerin
- A glue gun
- Chunky colored glitter
- Gold spray paint
- Distilled water.
Method:
- After removing the labels of the baby food jar, clean the glue off and then spray paint the lid.
- Glue the mini scrub sisal Christmas tree on the inside of the jar lid by applying glue both inside the lid and at the base of the tree. Then allow them to dry for a couple of minutes, pressing the tree onto the lid. Keep them aside to dry for 24 hours.
- Next, add about a teaspoon of glitter to the jar, fill it with distilled water and add about 5 drops of glycerin. Then screw the lid back on and turn the jar snow globe upside down to witness the beauty of a cute mini snow globe.
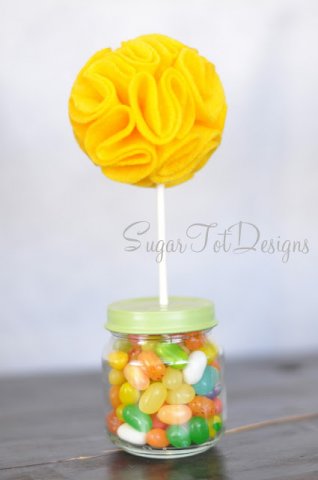
Topiary Treats Jar
Check out this link for more.
What You Need:
- A baby food jar (a taller one if possible)
- Candies or other décor to fill the jar
- A sucker stick
- Felt
- A drill
- Green spray paint
- Hot glue gun
- Pair of scissors.
Method:
- Begin by drilling a small hole in the middle of the baby food jar lid, big enough for the sucker sticks to fit in and then spray paint the lid.
- Next, cut about 14, 2” circle for the felt flower and a single small one.
- Fold the circle in half and then fold the half of it forward by gluing it, and then the other half backward, so you have a little S shape.
- After you have 6 such pieces, glue them all together in a circle on the small felt piece. Now take one of the petals and trim off the tip a bit and glue it in the middle to make it puffier.
- Turn over the petal and repeat the trim and glue step. Now, put a dab of glue on your stick and place it on the flower.
- You can hold the stick to the lid by applying a little glue on the bottom of the lid and the stick.
- Now, put some jelly beans or candies inside the jar, close the lid and your topiary treat’s ready.
Lemon Sugar Scrub Gift Jar
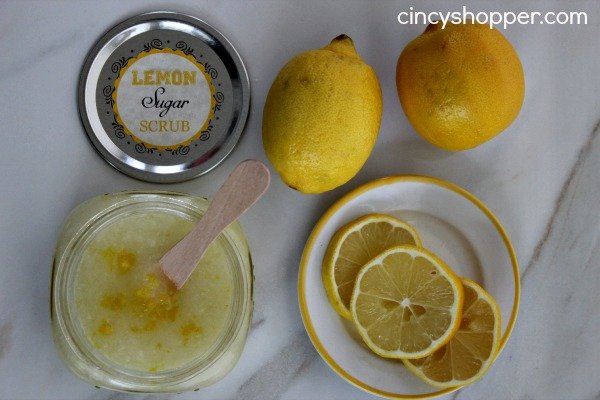
The Lemon Sugar Scrub Gift Jar is a perfect gift for a lady friend and very easy to make! Also, check out this link for more.
What You Need:
- ½ cup sugar
- ¼ cup coconut oil and a lemon,
- Baby food jar
- Label for the jar
- Colorful ribbons.
Method:
- Pour the sugar in a bowl and then squeeze lemon juice on it, mix it all up with the coconut oil.
- Zest the lemon and add it to the mix, be sure to save some for a later garnish to top up the scrub.
- Now add the lemon sugar scrub to the jar, glue a label to the front of the baby food jar and adorn it a ribbon to gift ahead.
Bubble Jar with Bubble Wand
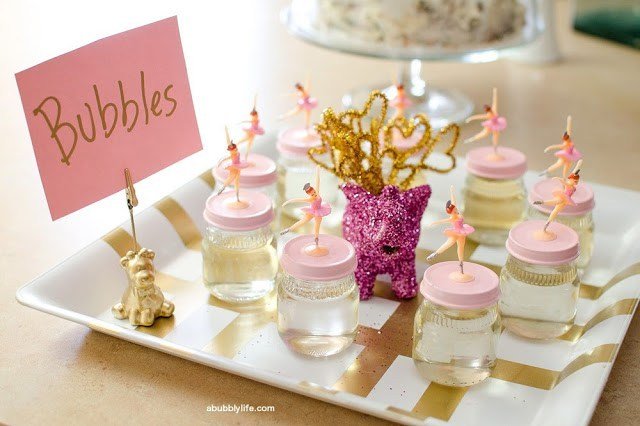
As party favors, bubble jars are an easy choice to make. Don't forget to check out this link
What You Need:
-
For Bubble Jar:
- A clean baby food jar with the label removed
- Spray paint
- Glue gun
- A plastic doll or topper like a ballerina
- An animal, or whatever goes with the theme you have in mind. For reference purposes, we will use a ballerina here.
- 4 cups of warm water
- ½ cup sugar
- ½ cup of blue dawn dish soap.
- A pipe cleaner
- A wooden dowel
- Assorted beads.
For Bubble Mix:
For the wand:
Method:
- Before you begin, ensure that there’s no writing or stamp on the jar lid, which is best removed with rubbing alcohol or by using a primer before painting the lid. Spray paint the lid and let it dry for some time. Next, glue the ballerina topper to the lid
- To make the bubble mix, whisk the sugar into the warm water until it dissolves. Add the dish soap and the whisk to combine. Let the mix sit for a couple of hours, to help the bubble mix work better. You can then transfer the mix to the jar and screw the lid back on.
- To create a bubble wand, take one end of the pipe cleaner and twist it to form a circle or any other shape like a heart or a triangle, that’s approximately a quarter size or a size that will fit inside the jar comfortably.
Mini Rainbow Cake Gift Jar
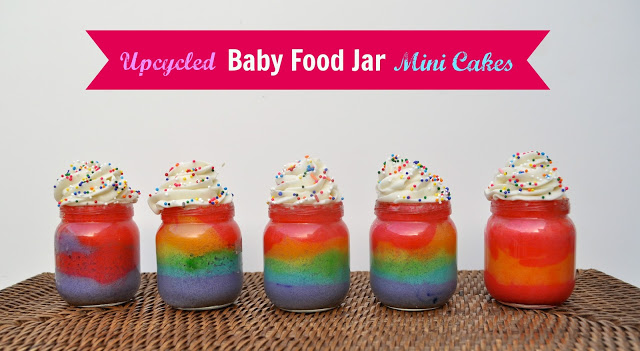
Very few people can resist a sliver of colorful cake that comes in a cute little jar! Here’s an easy way of springing up a mini rainbow cake gift jar. Also, don't forget to check out this link
What You Need:
- Betty Crocker Vanilla cake mix
- Gel food colors
- Baby food jar.
Method:
- Begin by heating the oven to a temperature mentioned on the cake mix box. Mix the contents of the cake mix as per instructions.
- Depending on how many jars you plan to make, you can make a box or two and with the number of colours you’d like to use, you can then divide the mix into so many bowls, one for each colour.
- Then add the gel food colour to each bowl and mix thoroughly.
- Next, carefully fill each jar with no more than half of it with the cake mix, either one colour per jar or layers of multiple colours in one jar.
- Then, place the jars on a baking sheet and bake for approx. 15-20 minutes, with an occasional check till the cakes are cooked thoroughly.
- If the jars are filled too high and the cake overflows, cut the top part of the cake when it has cooled down with a butter knife.
- Then screw the lids back on the jars and decorate the jars with ribbons, stickers or however you’d like to be gifted ahead.
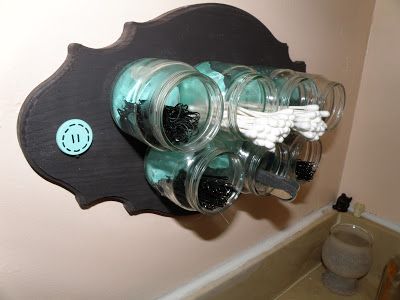
Storage Plaque Gift
What You Need:
- A wooden plaque
- Baby food jars
- Little wooden buttons
- Screws E6000
- Craft glue
- Paints.
Method:
- Start by painting the plaque and the inside bottom of the baby food jars in colours of your choice and then set them aside to dry completely.
- Next, hang the jars on the plaque with E6000 craft glue and leave them be for about 24 hours.
- Follow it up with gluing the little wooden buttons atop the screws and mount it on the wall you have in mind.
- You can store crafty knick-knacks, bathroom accessories, spices and more on the storage plaque.
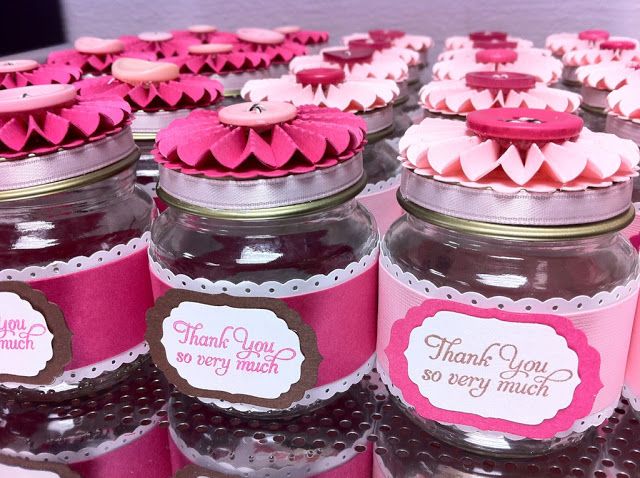
Love in a Jar Gift
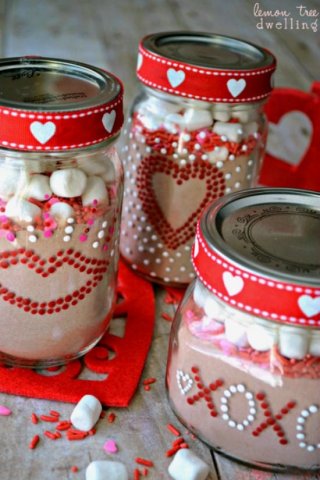
Whether you use them as a party favor or craft them as an adorable gift for a special someone, this love-in-a-jar gift is warm, endearing and edible! For more, check out this link
What You Need:
- Baby food jars
- Hot cocoa powder
- Pack of marshmallows
- Some sprinkles
- Acrylic paint markers
- Small paint brushes
- Ribbons
- Glue gun.
Method:
- Use the acrylic paint markers to adorn the baby food jars with some free-handed cute design like hearts, stars, or one-liners.
- Fill each jar with hot cocoa, marshmallows and sprinkles and then put the lids back on. Glue some colourful ribbons around the lids and your Love in Jar gifts are ready.
Jar Aquarium
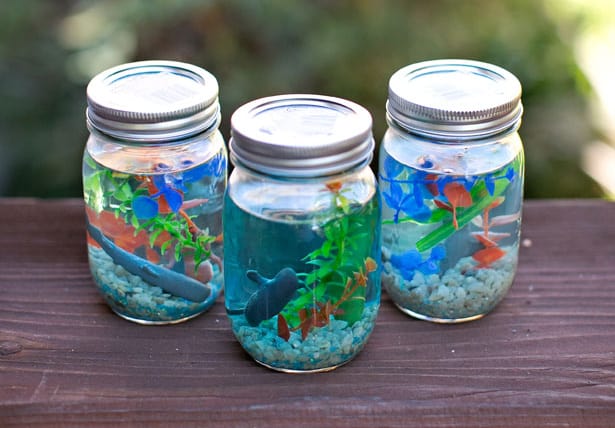
You can now have a DIY aquarium, as captivating and colorful as a real aquarium with few easy steps to follow. Checkout this link for more
What You Need:
- A baby food jar
- Blue food coloring
- Filtered water
- Aquarium plastic figurines or toy fish
- Blue and white glitter
- Glycerin
- Some aquarium rocks
- Plastic plants.
Method:
- Fill the jar with the pebbles/rocks, plants, water and the plastic figurines. Then add some blue food color to the extent that it looks visually appealing.
- Continue the process of filling the jar by adding some glitter and a few drops of glycerin to allow the water to flow more slowly and appear gooier.
- Put the lid back on and shut it tight and gently swirl the jar to see your sea creature swimming through the jar aquarium.
Glitter Fairy Night Light Jar Gift
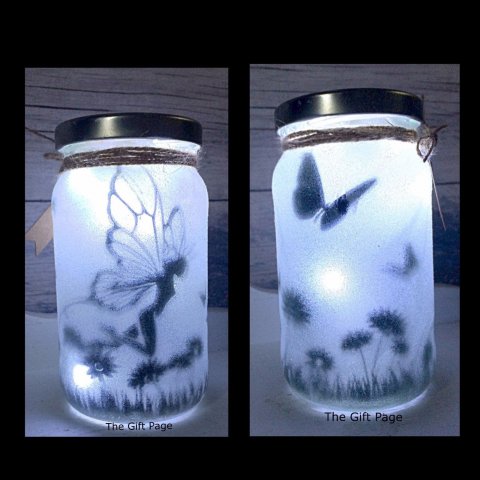
If you are looking for something unique and creative to add a special touch to your bedroom, then ambient lighting is a beautiful way to make that happen. An inexpensive, quick and simple way to do that is to create a glitter fairy night light in a jar. Check out this link
What You Need:
- A taller baby food jar
- Some glitter
- A spray adhesive
- Battery operated LED lights.
Method:
- Begin by spraying the inside of the jar with the adhesive to ensure every part of the jar is covered when filled with glitter, then add the glitter to the jar.
- Put the lid back on the jar and shake it up, next wrap the LED lights around the jar or inside for a sparkly glow.
Bonus Tip: Baby Food Jars as Party Favours
Baby Food Jars are cute, pocket-friendly and easy to fill with things or goodies that make any party favour gift a hit! Here are some more ideas on how you can reuse the baby food jars as gift items.
- Paint Dipped Baby Jars – can work as gorgeous mini vases, looking adoringly festive. All that’s required is to dip the baby jars in your choice of latex paint colors swirling them around, so that the paint finish looks uneven and visually distinct on each jar. Once the jars have been placed to dry over a paper towel, upside down for about 24 hours, the end result would be a batch of unique and beautiful painted baby jars, ready to be used as flower vases.
- DIY Nail Polish Remover Jars – are spill proof and perfect party favors for your lady friends looking for quick revamp of their nails. All you need are two sponge pieces for each jar, tightly wrapped around each other in a swirl formation and then placed inside the jars. You can then place a small bottle of nail polish remover that can be used later to pour on the sponges to saturate them. And the jar’s ready to remove nail polish by just twisting the finger.
- Salt & Pepper Shaker Jars – can be ready with just a couple of small drills at the top of the lids, quick decoration with stencils and paints or acrylic paint markers and then filling the jars up with salt and pepper, one in one jar.
-
Ever Wondered How to Make Paneer at Home? Here is the Complete Guide to Take Out Soft and Creamy Paneer from Milk at Home (2021)
-
समुद्र तट, प्रकृति का जादुई सौंदर्य, अनूठा आकर्षण सब कुछ है - पांडिचेरी यात्रा के दौरान वहाँ क्या देखें, क्या खाएं, कहां खरीदारी करें: पांडिचेरी में घूमने के 10 सर्वश्रेष्ठ स्थान (2020)
-
 If You are Planning a Trip to Pondicherry in 2020, These are the Places to Visit for Foodies, Beach Bums and Shopaholics!
-
 Want More Tantalizing Breakfast Ideas? Here are 6 Scrumptious Egg Recipes for Breakfast That Will Make You Want to Eat Eggs All Day (2020)
-
 How to Increase Weight: Foods to Include in Your Diet for Your Weight Gain Journey + Tips for Gaining Weight (2020)
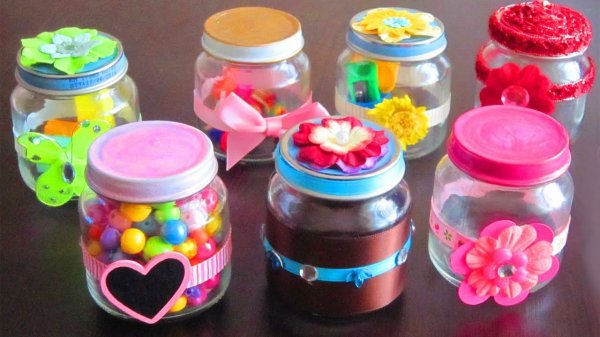
Put those Empty Baby Food Jars to Good Use with These Creative DIY Ideas
Baby food jars can become an unnecessary item unless you put your creativity to good use, to transform them. Follow these amazing DIY ideas to make some amazing items out of empty baby food jars, and use them as home decor, or as a party favour.
 Highlight the Best Facets of Your Incomparable Beauty: Discover the Best Face Highlighter Currently Available in India and Everything You Need to Know About Using Face Highlighters for Maximum Effect (2023)
 Forget the Blemishes and Get that Picture Perfect Flawless Radiance on Your Face: Check out the Best Foundations for Oily Skin Currently Available in India and Everything You Need to Know About Makeup Foundations (2023)
 Make Your Presence Felt Wherever You Go: Discover the Best Perfumes Under 2000 for Both Men and Women to Announce Your Arrival and Make Any Occasion Memorable (2023)
 Protect Your Oily Skin from the Harmful Rays of the Sun: Discover the Best Gel Based Sunscreens for Oily Skin and Everything You Need to Know Before Buying One (2023)
 Minor Blemishes and Wrinkles Affecting Your Confidence? Check out the Best BB Creams to Conceal Your Worries and Nourish Your Skin to Restore the Healthy, Radiant and Glowing Complexion Back Again (2023)